Integration
1. Set up a Match Configuration
1.1 Create a ruleset
Use the PGOS web portal console to manage the matchmaking ruleset.
Follow the steps below to create a ruleset:
Navigate to
Battle / Matchmakingpage, click theRulesettab.Click the
Add Rulesetbutton, orclonefrom an existing one.Fill in the ruleset details.
- Ruleset Name. Create a meaningful name so you can easily identify it in a list. The ruleset name must be unique in a title region, which will be used when creating match configurations later.
- Description. (Optional) Description of the ruleset.
- Script. Enter the JSON text of a ruleset body.
Validatethe script and thenSubmitthe ruleset.Save as Draftif the ruleset has not been completed yet.
Speed up your ruleset scripting:
The Ruleset Script is a JSON structure, primarily composed of four sections: Player Attributes, Teams, Rules, and Expansions.
- Player Attributes are used to declare the player attributes that are needed for referencing in the matchmaking rules. These can come from client requests or from hosted Player Data storage.
- Teams are used to declare the team structure for the match.
- Rules are used to write expressions based on player attributes, defining the matchmaking rules.
- Expansions are used to implement rule parameter adjustments based on a timeline, balancing matchmaking accuracy and time consumption.
Learn more details about the ruleset script structure in Ruleset Reference.
A low-code mode is supported to speed up the ruleset scripting work. You can switch between low-code mode and source code mode while scripting. Learn more in Ruleset Editor.
A rule and expression debugger is supported to gain an insight into the execution of ruleset script. Learn more in Ruleset Debugger.
Delete a ruleset:
- You must make sure that there are no associated match configurations with the current ruleset. Otherwise, an error notification will appear and the delete operation will fail. In this case, you must change the matchmaking configuration and use a different ruleset before you can delete the ruleset.
- On the rulesets console page, select a ruleset and Click
Delete ruleset.
1.2 Create a DS Placer (Optional)
A placer is used to determine the best fleet to run a battle session. Use an existing placer or create a new one for matchmaking. Click the Create Placer link for more details:
When using matchmaking as a standalone service, this step can be skipped.
1.3 Create a Match Configuration
Use the PGOS web portal console to manage match configuration.
Before you can create a match configuration, you must create the ruleset and placer that you want to use with the configuration.
Follow the steps below to create a match configuration:
Navigate to
Battle / Matchmakingpage, click theMatch Configurationtab.Click the
Add Match Configurationbutton, orclonefrom an existing one.Fill in the match configuration details.
Name. Create a meaningful match configuration name so you can easily identify it in a list. The match configuration name must be unique within a title region. Matchmaking requests identify which match configuration to use by its name and region.
Description. (Optional) Add a description of the match configuration.
Ruleset & Placer:
- Ruleset. Choose a ruleset for this match configuration.
- Placer. Choose a placer for the ruleset above.
tipYou can set multiple ruleset-placer pairs to implement multi-mode matchmaking. It is important to note that only rulesets with completely identical Player Attributes sections can be used for a matchmaking config's multiple-rulesets.
Our matchmaking engine is a Time-sharing system oriented around rulesets, where each configured ruleset equally shares the engine's working time slices. For players, the battle sessions obtained through multi-ruleset matchmaking will satisfy at least one of the rulesets. Games can use this feature to aggregate multiple game modes into a single matchmaking configuration, thereby increasing players' matching success rates.
Acceptance. (Optional) Indicate whether to require each player in a proposed battle to actively accept participation in the battle. If you choose yes, please indicate how long you want the matchmaking service to wait for player acceptance before canceling the battle.
- Accepting Timeout. Type in the maximum amount of time, in seconds, for the matchmaking service to wait for all matched players to accept the proposed battle. Value ranged in [1, 300], and the default value is 30.
- Auto Continue. When the
Auto Continueoption is on, all the other's matchmaking request will return to the Searching phase if any players refused the battle proposal. Note that the searching timeout will be reset each time when a matchmaking request enters the searching phase.
Preparing Timeout. (Optional) Type in the maximum amount of time, in seconds, for the matchmaking service to wait for all matched players to confirm the matchmaking result.
The default value is 30. Zero means no timeout. We recommend using a suitable value for a better matching experience instead of 0.
Searching Timeout. (Optional) Type in the maximum amount of time, in seconds, for the matchmaking service to match the players who meet the ruleset critera.
The default value is 30. Zero means no timeout. We recommend using a suitable value for a better matching experience instead of 0.
Battle Properties. (Optional) Battle properties will be passed to your game server when a new battle session is created through matchmaking.
The relationship between Match Configuration and Match Ruleset:
A Ruleset is used to define the team structure and matchmaking rules for a match, while the Match Config references it.
Match Config is used to adjust parameters related to the matchmaking process, such as the timeout duration for each stage, whether confirmation is needed after a match is made, and the placement of the match via a Placer, etc.
A Match Config, when the Multiple Rulesets feature is enabled, can be associated with multiple Rulesets which share the same player attirbutes definition.
Among the multiple Rulesets that can be formed using the players in the matchmaking pool, PGOS will randomly select one Ruleset to generate a match. PGOS supports associating a specific Placer with each Ruleset to facilitate multi-mode matchmaking.
2. Integrate Matchmaking Into Your Game Client
The code below uses the UE4 Plugin C++ interface as an example.
2.1 Preparations
To prepare your client for matchmaking, do the following:
- Integrate PGOS SDK (Unreal/Unity) to you game client.
- Read to learn API calling & notifications observing of PGOS SDK.
- Get match configuration information.
- Get the name of the match configuration that you plan to use.
- You also need the list of required player attributes, which are defined in the match configuration's ruleset.
2.2 Start a Matchmaking Request
When starting a matchmaking request, you can optionally specify the team, attributes, and latency information of players in the request. Solo and group matchmaking requests are supported.
Matchmaking mutex type is supported in StartMatchmaking_V2, the matchmaking mutex type enumerated values are:
EClientMatchmakingMutexType::PerMatchmakingConfig: There is no limit to the number of battle sessions a player can be in. Multiple matchmaking requests from a player in the same matchmaking config are not allowed at the same time.EClientMatchmakingMutexType::PerPlayer: If a player has any ongoing battle sessions or matchmaking in progress, they will not be able to start a new matchmaking request.
Call StartMatchmaking from Matchmaking module as follows:
- UE C++
- UE BP
#include "PgosSDKCpp.h"
#include "Core/PgosErrorCode.h"

void SomeUObjectClass::StartMatchmaking()
{
    FString ConfigurationName;
    TArray<FClientMatchmakingPlayerInfo> PlayerInfoArray;

    auto matchmaking = IPgosSDKCpp::Get().GetClientMatchmakingAPI();
    if (matchmaking)
    {
        FClientStartMatchmakingParams params;
        matchmaking->StartMatchmaking_V2(params, [](const FPgosResult& Ret, const FClientStartMatchmakingInfo* Data) {
            if (Ret.err_code == (int32)Pgos::PgosErrCode::kSuccess)
            {
                UE_LOG(LogTemp, Log, TEXT("OnStartMatchmakingSuccess"))
            }
            else
            {
                UE_LOG(LogTemp, Log, TEXT("OnStartMatchmakingFailed: err_code=%d, err_msg=%s"), Ret.err_code, *Ret.msg);
            }
        });
    }
}
#include "PgosClientMatchmakingAPI.h"

void SomeUObjectClass::StartMatchmaking()
{
    FClientStartMatchmakingParams params;
    PGOS_CALL_ASYNC_API(UPgosClientAPIStartMatchmaking::StartMatchmaking,
                        this,
                        &SomeUObjectClass::OnStartMatchmakingSuccess,
                        &SomeUObjectClass::OnStartMatchmakingFailed,
                        params);
}

void SomeUObjectClass::OnStartMatchmakingSuccess(
    FPgosResult Error, FClientStartMatchmakingInfo StartInfo)
{
    UE_LOG(LogTemp, Log, TEXT("OnStartMatchmakingSuccess"))
}

void SomeUObjectClass::OnStartMatchmakingFailed(
    FPgosResult Error, FClientStartMatchmakingInfo StartInfo)
{
    UE_LOG(LogTemp, Log, TEXT("OnStartMatchmakingFailed: err_code=%d, err_msg=%s"), Ret.err_code, *Ret.msg);
}
Key Error Codes
- PgosErrCode::kBackendQueryMatchConfFailed (20006)
- PgosErrCode::kBackendQueryMatchRulesetFailed (20007)
- PgosErrCode::kBackendMemberAlreadyInMatchmaking (20008)
- PgosErrCode::kBackendPlayerInfoIllegal (20010)
- PgosErrCode::kBackendPlayersInBattle (20014)
- PgosErrCode::kBackendPlayerNotInRequestedList (20015)
- PgosErrCode::kBackendPlayersInBattle (20014)
2.3 Track Matchmaking Request Status
Add code to your client service to track the statuses of all matchmaking requests. There are two approaches to tracking statuses: event dispatcher and continuous polling.
Event Dispatcher
Bind dynamic delegate to OnMatchmakingProcessChanged as follows:
- UE C++
- UE BP
#include "PgosSDKCpp.h"
#include "Core/PgosErrorCode.h"

void SomeUObjectClass::SomeFunction()
{
    auto matchmaking = IPgosSDKCpp::Get().GetClientMatchmakingAPI();
    if (matchmaking)
    {
        matchmaking->OnMatchmakingProcessChanged().AddUObject(
            this,
            &SomeUObjectClass::OnMatchmakingProcessChanged);
    }
}

void SomeUObjectClass::OnMatchmakingProcessChanged(const FClientMatchmakingProcessChangedEvt& Event)
{
    UE_LOG(LogTemp, Log, TEXT("OnMatchmakingProcessChanged"));
}
#include "PgosClientEventDispatcher.h"

void SomeUObjectClass::SomeFunction()
{
      auto Dispatcher = UPgosClientEventDispatcher::GetPgosClientEventDispatcher();
      if (Dispatcher)
      {
          Dispatcher->OnMatchmakingProcessChanged.AddDynamic(
              this,
              &APluginTestGameModeBase::OnMatchmakingProcessChanged);
      }
}

void SomeUObjectClass::OnMatchmakingProcessChanged(const FClientMatchmakingProcessChangedEvt& Event)
{
    UE_LOG(LogTemp, Log, TEXT("OnMatchmakingProcessChanged"));
}
Continuous polling
To query a player for ongoing matchmaking requests, use the GetCurrentMatchmakings interface.
You can query the matchmaking progress for informaiton by calling DescribeMatchmaking.
Call DescribeMatchmaking from Matchmaking module as follows:
- UE C++
- UE BP
#include "PgosSDKCpp.h"
#include "Core/PgosErrorCode.h"

void SomeUObjectClass::DescribeMatchmaking()
{
    FString TicketID;

    auto matchmaking = IPgosSDKCpp::Get().GetClientMatchmakingAPI();
    if (matchmaking)
    {
        matchmaking->DescribeMatchmaking(TicketID, [](const FPgosResult& Ret, const FClientMatchmakingProcessInfo* Data) {
            if (Ret.err_code == (int32)Pgos::PgosErrCode::kSuccess)
            {
                UE_LOG(LogTemp, Log, TEXT("DescribeMatchmakingSuccess"))
            }
            else
            {
                UE_LOG(LogTemp, Log, TEXT("DescribeMatchmakingFailed: err_code=%d, err_msg=%s"), Ret.err_code, *Ret.msg);
            }
        });
    }
}
#include "PgosClientMatchmakingAPI.h"

void SomeUObjectClass::DescribeMatchmaking()
{
    FString TicketID;

    PGOS_CALL_ASYNC_API(UPgosClientAPIDescribeMatchmaking::DescribeMatchmaking,
                        this,
                        &SomeUObjectClass::DescribeMatchmakingSuccess,
                        &SomeUObjectClass::DescribeMatchmakingFailed,
                        TicketID);
}

void SomeUObjectClass::DescribeMatchmakingSuccess(
    FPgosResult Error, FClientMatchmakingProcessInfo ProcessInfo)
{
    UE_LOG(LogTemp, Log, TEXT("DescribeMatchmakingSuccess"))
}

void SomeUObjectClass::DescribeMatchmakingFailed(
    FPgosResult Error, FClientMatchmakingProcessInfo ProcessInfo)
{
    UE_LOG(LogTemp, Log, TEXT("DescribeMatchmakingFailed: err_code=%d, err_msg=%s"), Ret.err_code, *Ret.msg);
}
Matchmaking request status
You can track matchmaking request status via EClientMatchmakingStatus in event data ( FClientMatchmakingProcessInfo ). The key status are described below:
- Preparing. Means the multi-player matchmaking's preparation phase. When a multi-player matchmaking request start, the request status will trun to
pgos_Preparing, each player in the request should decide to join or reject the matchmaking request inpreparing_timeout. - Accepting. Wait for players to accept the matchmaking result.
- Completed. A new battle-session and player-battle-sessions have been successfully created. You will get DS access information in
FClientMatchmakingProcessInfowhen request turn to this status. - Canceled. Matchmaking request is cancelled by player.
- TimedOut. Matchmaking request is timeout and no battle-session is created.
Key Error Codes
2.4 Query Matchmaking Concurrent Players Count
Sometimes you need to display concurrent players count for a matchmaking configuration, and we offer two ways to help you do this.
The first way, ideal for players who have already initiated a matchmaking request in which you can obtain concurrent_player_count field in FClientMatchmakingProcessInfo. But note that the player count info got by this way will only be updated when the matchmaking ticket status changed.
Another way is to use the GetConcurrentMatchmakingPlayerCount interface we provide in FPgosMatchmakingAPI module:
- UE C++
- UE BP
#include "PgosSDKCpp.h"
#include "Core/PgosErrorCode.h"

void SomeUObjectClass::GetConcurrentMatchmakingPlayerCount()
{
    FClientGetConcurrentMatchmakingPlayerCountParams params;

    auto matchmaking = IPgosSDKCpp::Get().GetClientMatchmakingAPI();
    if (matchmaking)
    {
        matchmaking->GetConcurrentMatchmakingPlayerCount(params, [](const FPgosResult& Ret, const FClientGetConcurrentMatchmakingPlayerCountResult* Data) {
            if (Ret.err_code == (int32)Pgos::PgosErrCode::kSuccess)
            {
                UE_LOG(LogTemp, Log, TEXT("GetConcurrentMatchmakingPlayerCount Success"))
            }
            else
            {
                UE_LOG(LogTemp, Log, TEXT("GetConcurrentMatchmakingPlayerCount Failed: err_code=%d, err_msg=%s"), Ret.err_code, *Ret.msg);
            }
        });
    }
}
#include "PgosClientMatchmakingAPI.h"

void SomeUObjectClass::GetConcurrentMatchmakingPlayerCount()
{
    FClientGetConcurrentMatchmakingPlayerCountParams params;

    PGOS_CALL_ASYNC_API(UPgosClientAPIDescribeMatchmaking::GetConcurrentMatchmakingPlayerCount,
                        this,
                        &SomeUObjectClass::GetConcurrentMatchmakingPlayerCountSuccess,
                        &SomeUObjectClass::GetConcurrentMatchmakingPlayerCountgFailed,
                        params);
}

void SomeUObjectClass::GetConcurrentMatchmakingPlayerCountSuccess(
    FPgosResult Error, FClientGetConcurrentMatchmakingPlayerCountResult ProcessInfo)
{
    UE_LOG(LogTemp, Log, TEXT("GetConcurrentMatchmakingPlayerCountSuccess"))
}

void SomeUObjectClass::GetConcurrentMatchmakingPlayerCountgFailed(
    FPgosResult Error, FClientGetConcurrentMatchmakingPlayerCountResult ProcessInfo)
{
    UE_LOG(LogTemp, Log, TEXT("GetConcurrentMatchmakingPlayerCountgFailed: err_code=%d, err_msg=%s"), Ret.err_code, *Ret.msg);
}
2.5 Handling Multiplayer Matchmaking Request
If you're launching a matchmaking request with multiple players, add code to handling the Preparing stage of the request.
Request player confirmation for a multiplayer matchmaking request:
Detect the Preparing stage of a matchmaking request
- Monitor the matchmaking request to detect when the status changes to
EClientMatchmakingStatus::Preparing.
- Monitor the matchmaking request to detect when the status changes to
Get confirmation from all players
- Players have a limited time to respond before the preparing stage timeout.
FClientMatchmakingProcessInfo::last_updated_status_timeandFClientMatchmakingProcessInfo::accepting_timeoutcan be used to provide the player with a timing mechanism to confirmation a multiplayer request.
- Players have a limited time to respond before the preparing stage timeout.
Handle request with failed preparing stage
- A multiplayer request fails when any player in to request choose to reject the request.
Please note that the count of players in group matchmaking request should not exceed the team size limit (maxPlayers) in ruleset.
Sample code for JoinMatchmaking
Call JoinMatchmaking from Matchmaking module as follows:
- UE C++
- UE BP
#include "PgosSDKCpp.h"
#include "Core/PgosErrorCode.h"

void SomeUObjectClass::JoinMatchmaking()
{
    FString TicketID;
    FClientMatchmakingPlayerInfo PlayerInfo;
    FString Reason;

    auto matchmaking = IPgosSDKCpp::Get().GetClientMatchmakingAPI();
    if (matchmaking)
    {
        matchmaking->JoinMatchmaking(TicketID, PlayerInfo, Reason, [](const FPgosResult& Ret) {
            if (Ret.err_code == (int32)Pgos::PgosErrCode::kSuccess)
            {
                UE_LOG(LogTemp, Log, TEXT("JoinMatchmakingSuccess"))
            }
            else
            {
                UE_LOG(LogTemp, Log, TEXT("JoinMatchmakingFailed: err_code=%d, err_msg=%s"), Ret.err_code, *Ret.msg);
            }
        });
    }
}
#include "PgosClientMatchmakingAPI.h"

void SomeUObjectClass::JoinMatchmaking()
{
    FString TicketID;
    FClientMatchmakingPlayerInfo PlayerInfo;
    FString Reason;

    PGOS_CALL_ASYNC_API(UPgosClientAPIJoinMatchmaking::JoinMatchmaking,
                        this,
                        &SomeUObjectClass::JoinMatchmakingSuccess,
                        &SomeUObjectClass::JoinMatchmakingFailed,
                        TicketID,
                        PlayerInfo);
}

void SomeUObjectClass::JoinMatchmakingSuccess(FPgosResult Error)
{
    UE_LOG(LogTemp, Log, TEXT("JoinMatchmakingSuccess"))
}

void SomeUObjectClass::JoinMatchmakingFailed(FPgosResult Error)
{
    UE_LOG(LogTemp, Log, TEXT("JoinMatchmakingFailed: err_code=%d, err_msg=%s"), Ret.err_code, *Ret.msg);
}
Sample code for RejectMatchmaking
Call RejectMatchmaking from Matchmaking module as follows:
- UE C++
- UE BP
#include "PgosSDKCpp.h"
#include "Core/PgosErrorCode.h"

void SomeUObjectClass::RejectMatchmaking()
{
    FString TicketID;
    FString Reason;

    auto matchmaking = IPgosSDKCpp::Get().GetClientMatchmakingAPI();
    if (matchmaking)
    {
        matchmaking->RejectMatchmaking(TicketID, Reason, [](const FPgosResult& Ret) {
            if (Ret.err_code == (int32)Pgos::PgosErrCode::kSuccess)
            {
                UE_LOG(LogTemp, Log, TEXT("RejectMatchmakingSuccess"))
            }
            else
            {
                UE_LOG(LogTemp, Log, TEXT("RejectMatchmakingFailed: err_code=%d, err_msg=%s"), Ret.err_code, *Ret.msg);
            }
        });
    }
}
#include "PgosClientMatchmakingAPI.h"

void SomeUObjectClass::RejectMatchmaking()
{
    FString TicketID;
    FString Reason;

    PGOS_CALL_ASYNC_API(UPgosClientAPIJoinMatchmaking::RejectMatchmaking,
                        this,
                        &SomeUObjectClass::RejectMatchmakingSuccess,
                        &SomeUObjectClass::RejectMatchmakingFailure,
                        TicketID,
                        Reason);
}

void SomeUObjectClass::RejectMatchmakingSuccess(FPgosResult Error)
{
    UE_LOG(LogTemp, Log, TEXT("RejectMatchmakingSuccess"))
}

void SomeUObjectClass::RejectMatchmakingFailed(FPgosResult Error)
{
    UE_LOG(LogTemp, Log, TEXT("RejectMatchmakingFailed: err_code=%d, err_msg=%s"), Ret.err_code, *Ret.msg);
}
2.6 Handling Player Acceptance
If you're using a match configruration with Acceptance required option on, you need to add code to handling the Acceptance stage of the request.
Request player acceptance for a proposed battle:
Detect the Acceptance stage of a matchmaking request
- Monitor the matchmaking request to detect when the status changes to
EClientMatchmakingStatus::Accepting.
- Monitor the matchmaking request to detect when the status changes to
Get acceptances from all players
- Notify the players that there is a proposed battle that needs to be accepted. Players should be able to accept or reject the battle. Player information in the battle can be obtained from
FClientMatchmakingProcessInfo::matched_players. Acceptance status of each player will be updated instantly and can be obtained fromFClientMatchedPlayerInfo::accepted. - Players have a limited time to respond before the proposed battle is canceled.
FClientMatchmakingProcessInfo::last_updated_status_timeandFClientMatchmakingProcessInfo::accepting_timeoutcan be used to provide the player with a timing mechanism for acceptance.
- Notify the players that there is a proposed battle that needs to be accepted. Players should be able to accept or reject the battle. Player information in the battle can be obtained from
Handle request with failed acceptance stage
- A request turns to
Terminatedstatus and is no longer processed when the player in reqeust rejects to join the battle or fails to respond before the acceptance timeout. For a request with multiple players, if any players in the ticket did not accept to join the battle, the entire request is terminated. A proposed battle will be canceled if any request in it is rejected.
- A request turns to
Handle a auto continued request
- In failed acceptance cases, the accepted requests will returns to
Searchingstatus instead ofTerminatedif theAuto Continueoption is on. Typically, games do not need to add additional code to control this flow change. However, the game UI needs to be able to adapt this reverse status transition somehow.
- In failed acceptance cases, the accepted requests will returns to
Sample code for AcceptMatchedBattle
Call AcceptMatchedBattle from Matchmaking module as follows:
- UE C++
- UE BP
#include "PgosSDKCpp.h"
#include "Core/PgosErrorCode.h"

void SomeUObjectClass::AcceptMatchedBattle()
{
    FString TicketID;
    auto matchmaking = IPgosSDKCpp::Get().GetClientMatchmakingAPI();
    if (matchmaking)
    {
        matchmaking->AcceptMatchedBattle(TicketID, [](const FPgosResult& Ret) {
            if (Ret.err_code == (int32)Pgos::PgosErrCode::kSuccess)
            {
                UE_LOG(LogTemp, Log, TEXT("AcceptMatchedBattle Success"))
            }
            else
            {
                UE_LOG(LogTemp, Log, TEXT("AcceptMatchedBattle Failed: err_code=%d, err_msg=%s"), Ret.err_code, *Ret.msg);
            }
        });
    }
}
#include "PgosClientMatchmakingAPI.h"

void SomeUObjectClass::AcceptMatchedBattle()
{
    FString TicketID;

    PGOS_CALL_ASYNC_API(UPgosClientAPIAcceptMatchedBattle::AcceptMatchedBattle,
                        this,
                        &SomeUObjectClass::AcceptMatchedBattleSuccess,
                        &SomeUObjectClass::AcceptMatchedBattleFailed,
                        TicketID);
}

void SomeUObjectClass::AcceptMatchedBattleSuccess(FPgosResult Error)
{
    UE_LOG(LogTemp, Log, TEXT("AcceptMatchedBattleSuccess"))
}

void SomeUObjectClass::AcceptMatchedBattleFailed(FPgosResult Error)
{
    UE_LOG(LogTemp, Log, TEXT("AcceptMatchedBattleFailed: err_code=%d, err_msg=%s"), Ret.err_code, *Ret.msg);
}
Sample code for RejectMatchedBattle
Call RejectMatchedBattle from Matchmaking module as follows:
- UE C++
- UE BP
#include "PgosSDKCpp.h"
#include "Core/PgosErrorCode.h"

void SomeUObjectClass::RejectMatchedBattle()
{
    FString TicketID;

    auto matchmaking = IPgosSDKCpp::Get().GetClientMatchmakingAPI();
    if (matchmaking)
    {
        matchmaking->RejectMatchedBattle(TicketID, [](const FPgosResult& Ret) {
            if (Ret.err_code == (int32)Pgos::PgosErrCode::kSuccess)
            {
                UE_LOG(LogTemp, Log, TEXT("RejectMatchedBattle Success"))
            }
            else
            {
                UE_LOG(LogTemp, Log, TEXT("RejectMatchedBattle Failed: err_code=%d, err_msg=%s"), Ret.err_code, *Ret.msg);
            }
        });
    }
}
#include "PgosClientMatchmakingAPI.h"

void SomeUObjectClass::RejectMatchedBattle()
{
    FString TicketID;
    FString Reason;

    PGOS_CALL_ASYNC_API(UPgosClientAPIRejectMatchedBattle::RejectMatchedBattle,
                        this,
                        &SomeUObjectClass::RejectMatchedBattleSuccess,
                        &SomeUObjectClass::RejectMatchedBattleFailure,
                        TicketID,
                        Reason);
}

void SomeUObjectClass::RejectMatchedBattleSuccess(FPgosResult Error)
{
    UE_LOG(LogTemp, Log, TEXT("RejectMatchedBattleSuccess"))
}

void SomeUObjectClass::RejectMatchedBattleFailure(FPgosResult Error)
{
    UE_LOG(LogTemp, Log, TEXT("RejectMatchedBattleFailure: err_code=%d, err_msg=%s"), Ret.err_code, *Ret.msg);
}
2.7 Cancel Matchmaking
You can cancel a matchmaking request by calling CancelMatchmaking.
CancelMatchmaking may not succeed when the matchmaking request status is pgos_Placing or pgos_Pending.
Call CancelMatchmaking from Matchmaking module as follows:
- UE C++
- UE BP
#include "PgosSDKCpp.h"
#include "Core/PgosErrorCode.h"

void SomeUObjectClass::CancelMatchmaking()
{
    FString TicketID;
    FString Reason;

    auto matchmaking = IPgosSDKCpp::Get().GetClientMatchmakingAPI();
    if (matchmaking)
    {
        matchmaking->CancelMatchmaking(TicketID, Reason, [](const FPgosResult& Ret, const FClientCancelMatchmakingInfo* Data) {
            if (Ret.err_code == (int32)Pgos::PgosErrCode::kSuccess)
            {
                UE_LOG(LogTemp, Log, TEXT("CancelMatchmakingSuccess"))
            }
            else
            {
                UE_LOG(LogTemp, Log, TEXT("CancelMatchmakingFailed: err_code=%d, err_msg=%s"), Ret.err_code, *Ret.msg);
            }
        });
    }
}
#include "PgosClientMatchmakingAPI.h"

void SomeUObjectClass::CancelMatchmaking()
{
    FString TicketID;
    FString Reason;

    PGOS_CALL_ASYNC_API(UPgosClientAPICancelMatchmaking::CancelMatchmaking,
                        this,
                        &SomeUObjectClass::CancelMatchmakingSuccess,
                        &SomeUObjectClass::CancelMatchmakingFailed,
                        TicketID,
                        Reason);
}

void SomeUObjectClass::CancelMatchmakingSuccess(
    FPgosResult Error, FClientCancelMatchmakingInfo CancelInfo)
{
    UE_LOG(LogTemp, Log, TEXT("CancelMatchmakingSuccess"))
}

void SomeUObjectClass::CancelMatchmakingFailed(
    FPgosResult Error, FClientCancelMatchmakingInfo CancelInfo)
{
    UE_LOG(LogTemp, Log, TEXT("CancelMatchmakingFailed: err_code=%d, err_msg=%s"), Ret.err_code, *Ret.msg);
}
Key Error Codes
3. Modify Matchmaking Result Using Virtual Server
After PGOS finds a match but before the client retrieves the matchmaking results, you can use a Virtual Server to inspect, adjust, and modify the matchmaking results, which is called as post-processing. You have the option of determining the validity of the matchmaking results, changing the matchmaking results, and re-queuing certain matchmaking tickets into the matchmaking queue to continue matchmaking.
To implement these actions, firstly, you need to associate a Virtual Server with the Match Config and then process the matchmaking results according to the protocol specifications agreed upon with PGOS. During actual testing, you can learn about the outcomes of the Virtual Server's post-processing of the matchmaking results through the match ticket's transaction log.
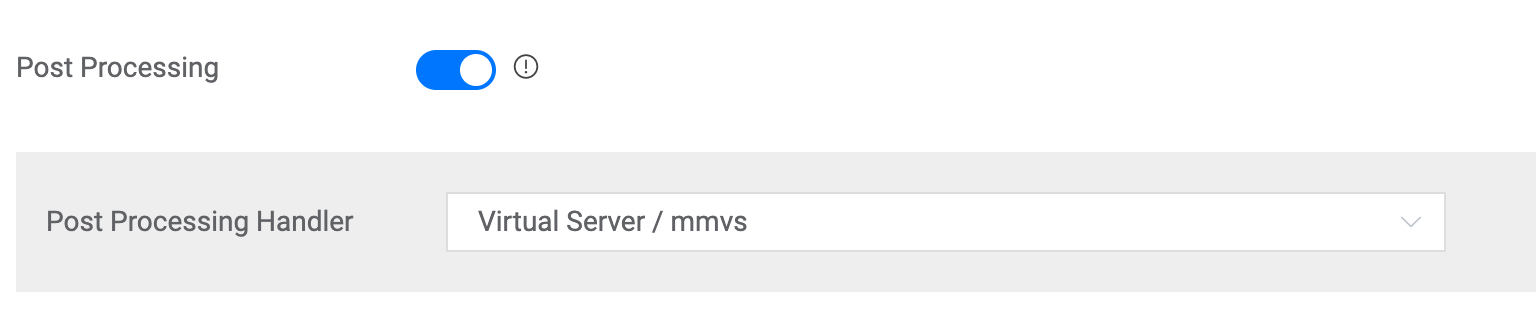
3.1 Associate a Virtual Server With the Match Config
Use the PGOS web portal console to manage match configuration.
- Navigate to
Battle / Matchmakingpage, click theMatch Configurationtab. - Select a match config and specify a Virtual Server.
3.2 Implement Post-Processing Logic in Virtual Server
When PGOS finds a match, if the MatchConfig has enabled the use of a Virtual Server for Post-Processing tasks, it will call the /pgos_matchmaking URL of that Virtual Server.
We provided a demo project of the Virtual Server written in the Go language, demonstrating three methods of processing match results:
- Continuously requeue all tickets until they time out.
- Divide each ticket from the original battle to form new, separate battles.
- Maintain the original battle configuration without any changes.
Click here to download the demo project.
Generally speaking, the Virtual Server can perform the following actions:
- Re-queue the tickets included in the request back into the matchmaking queue to continue matchmaking.
- Split a matchmaking result into multiple matchemaking result, which still contain the matchmaking tickets from the request.
- Adjust the team assignments within the matchmaking tickets, moving players from one team to another.
- Modify the attribute data of players within the matchmaking tickets.
The JSON protocol specifications required for the HTTP request and response can be refered here, and the followings are basic explainations:
Request:
├── trigger_id
├── operation: which will be `matchmaking_post_processing_data`
├── trigger_time: timestamp in milliseconds
└── data
    ├── battle_properties
    └── battle: each battle is consisted of several tickets
        └── tickets: ticket is a container of corresponding players

Response:
├── battles: battles processed by virtual server
└── requeued_tickets: tickets sent back to matchmaking queue
As explained in the protocol, a Battle is the match generated by PGOS, which contains Tickets. Ticket includes Players, and Player consists of an assigned team and other attribute information.
The Virtual Server needs to understand the Battle generated by PGOS in the HTTP request and return its generated Battles in the HTTP response according to the specifications. It should set any tickets that are not needed to RequeuedTickets. PGOS will then notify the clients of the Battles and re-queue the RequeuedTickets back into the matchmaking queue to continue waiting for a match to be found.
When implement the Virtual Server to process post-match requests, pls note the following points:
- Ensure that the HTTP response includes every Ticket from the original request. Each ticket must be either reassigned to a new battle or returned to the matchmaking queue.
- Avoid from adding or removing players within each Ticket. However, you can modifying their team, attributes, and other details.
- Respond quickly to HTTP requests to prevent match tickets from timing out due to excessive latency.
In the following cases, PGOS determines that the virtual server call is in error and attempts to maintain the original matchmaking result within the timeout limit:
- The HTTP error code returned by the Virtual Server is not equal to 200.
- The HTTP response returned by the Virtual Server does not comply with the protocol specifications agreed upon with PGOS.
- The HTTP response from the Virtual Server is missing some of the matchmaking tickets, or it includes new tickets that do not exist.
- The HTTP response from the Virtual Server has missing players from the matchmaking tickets, or it includes new players that do not exist.
3.3 Inspect Post-Processing Result on the Web Portal

Since a matchmaking ticket may undergo multiple Post-Processing operations, you can view the details of a matchmaking ticket on the web portal and view the detailed results of each Post-Processing instance. This includes the HTTP status code returned by the Virtual Server, error messages, processing outcomes, ExecutionID, and the time spent on the call,etc.
The processing outcomes of the Virtual Server can be briefly categorized into four types:
- Requeued: The ticket has been returned back into the matchmaking queue for rematchingmaking.
- Timedout: The ticket was initially matched successfully, but times out after the Virtual Server returned the results.
- Changed: The ticket was initially matched successfully, and then the Virtual Server adjusted the matchmaking results.
- Unchanged: The ticket retained its initial results because the Virtual Server did not modify the original matchamaking result or PGOS determined the response of Virtual Server is illegal and then maintained the original matchamaking result .
4. Process Matchmaking Result on the Client
4.1 Associate with a Placer
Three types of placer can be selected for a match config:
- Online Placer: create a battle and run it on managed dedicated servers
- Local Placer: create a battle and run it locally for development usage
- No Placer: won't create a battle by PGOS
If you select online placer or local placer, a battle session will be automatically created and PGOS will find a DS to host it.
The game client can obtain the DS address information of the battle session from FClientMatchmakingProcessInfo when the matchmaking request status changes to Completed. DS address information includes:
- ip_address: IP address of the instance that is running the battle session.
- port: Port number of the instance that is running the battle session.
- player_battle_session_id: Session id assigned to players in the battle session. PGOS will verify the connection request of a player to the battle session with
player_battle_session_id.
A example for UE4 client:
// Format the TravelURL with ip_address, port, and player_battle_session_id
FString TravelURL = FString::Printf(TEXT("%s:%s?player_battle_session_id=%s"),
                                    *ip_address, *port, *player_battle_session_id);
// Connect to battle session
PlayerController->ClientTravel(TravelURL, ETravelType::TRAVEL_Absolute);
If you choose no placer, the whole process stops at getting matchmaking results.
4.2 Subscribe to Event
When the matchmaking system finds a match, it will trigger an event called event_matchmaking_completed. This event includes the following information:
- Battle Session ID: an unique id for this matchmaking result.
- Matched Players: a list of player in matchmaking result. The list contains the player's ID, team name, latency data, and matching attribute information.
- Configuration Name: the match config name.
- Battle Properties: the battle properties associated with the match config.
- Timestamp: the timestamp when finding matchmaking result.
You can subscribe to this event, and the subscription method can be found here.
5. Key Errors Handling
These are key errors but not all of them. For the errors not on the list, the error message should already indicate the problem. Please contact us if you encounter obscure error messages or any other critical errors.
| Error Code | Relevant API | Handling Suggestion |
|---|---|---|
| kBackendQueryMatchConfFailed (20006) | StartMatchmaking | It means the match config name does not exist. Developers should check on web portal if the match config had been removed or renamed accidentally. |
| kBackendQueryMatchRulesetFailed (20007) | StartMatchmaking | It means the ruleset associated with the match config does not exist. Developers should check on web portal if the ruleset had been removed or renamed accidentally. |
| kBackendMemberAlreadyInMatchmaking (20008) | StartMatchmaking | It happens when the player starts matchmaking, but there is already an on-going matchmaking ticket including him. Normally the previous matchmaking ticket will be canceled to ensure the newer matchmaking ticket will be created successfully. But in the following occasions, the matchmaking service will throw this error: 1. Member(s) in a multiplayer ticket are already in another matchmaking ticket. 2. Leader in a multiplayer ticket is already in another matchmaking ticket and that ticket cannot be terminated. |
| kBackendPlayerNotInTicket (20005) | DescribeMatchmaking JoinMatchmaking RejectMatchmaking AcceptMatchmaking CancelMatchmaking | It means the player are operating the ticket not owned by him. Generally the game is tracking the wrong matchmaking ticket. |
| kBackendIllegalOperationWithEndedTicket (20009) | JoinMatchmaking RejectMatchmaking AcceptMatchmaking | It means the matchmaking ticket cannot be joined/rejected/accepted because it had been ended with the following statuses: - COMPLETED - CANCELED - TIMEDOUT - TERMINATED |
| kBackendPlayerInfoIllegal (20010) | StartMatchmaking | It means the team/playerid of players in matchmaking ticket is illegal. PlayerID cannot be empty. While team name can be empty, which means the player doesn't specify a team to join, but it cannot be a value not defined in ruleset. |
| kBackendPlayersInBattle (20014) | StartMatchmaking | It means the player(s) in matchmaking ticket are already in a battle session, during which he cannot be allowed to start matchmaking to ensure there is at most one battle session for a player. The game can prompt the player a message like "You are already in an on-going battle" and let him choose to rejoin or quit that battle. |
| kBackendPlayerNotInRequestedList (20015) | StartMatchmaking | It means the information of the leader of the matchmaking ticket is missing. |
| kBackendPlayersRepeated (20016) | StartMatchmaking | It means the matchmaking ticket includes repeated players. |
| kBackendTitleRegionIsClosed (54) | StartMatchmaking | It means the title region is closed. The game should prompt the player a message like "Server is in maintenance, please come back later". |
| kBackendPlayerCountExceedTeamLimit (20027) | StartMatchmaking | It means in group matchmaking request, the player count exceeds the team size limit in ruleset |
| kBackendPlayerInfoIllegal (20010) | StartMatchmaking | It means the player info in group matchmaking request is illegal, here are possible reasons: - Player team selections in group matchmaking are different |