Typical Use Case
The combination of Party, Lobby, Matchmaking and Battle Session composes the battle services. Party, Lobby and Matchmaking provide methods to gather players up while Battle Session assign a dedicated server for them to go for a battle.
1. Case Team Up with Friends to Start a Battle
1.1 Create a Party and Invite Friends
Players can gather together via party, in which the leader can invite friends to join him, send text messages to each other or bring party members to battle.
Each client will get notification when players join or leave a party, send a text message or the party is dismissed.
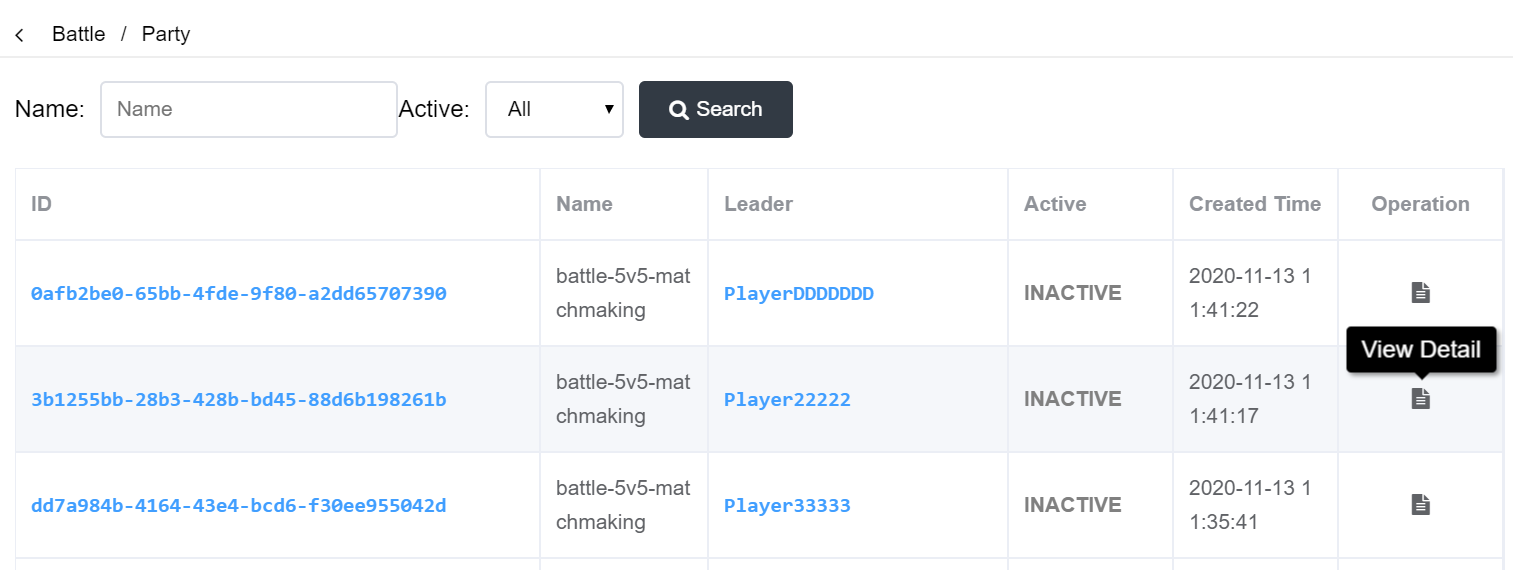
Developers can inspect the all parties ever created in web portal, which contains basic information of a party and its status change records:
After forming a party, the leader can choose to start a battle through lobby or matchmaking.
1.2 Start a Battle from Lobby
The party service is decoupled from lobby service. According to convention, the leader in a party is responsible to create a lobby as the owner, and then invite party members to the lobby.
Lobby group players by team, and each team contains limited number of slots. Owner can change the visibility of a lobby, which makes other players can or cannot see the lobby in the lobby searching results. Owner can also set a password to prevent unwanted players to join.
Lobby holds a KV data structure and sync it to all the clients. Developers can use this to temporally store settings such as the game map the players choose, or the character information of each player and so on.
It requires every lobby member to be ready for the lobby owner to start a battle, after which the status of the lobby will be switched from "waiting" to "playing", and a battlesession id will be assigned. Client can query basic information to enter a battle using the battlesession id and connect to the dedicated server.
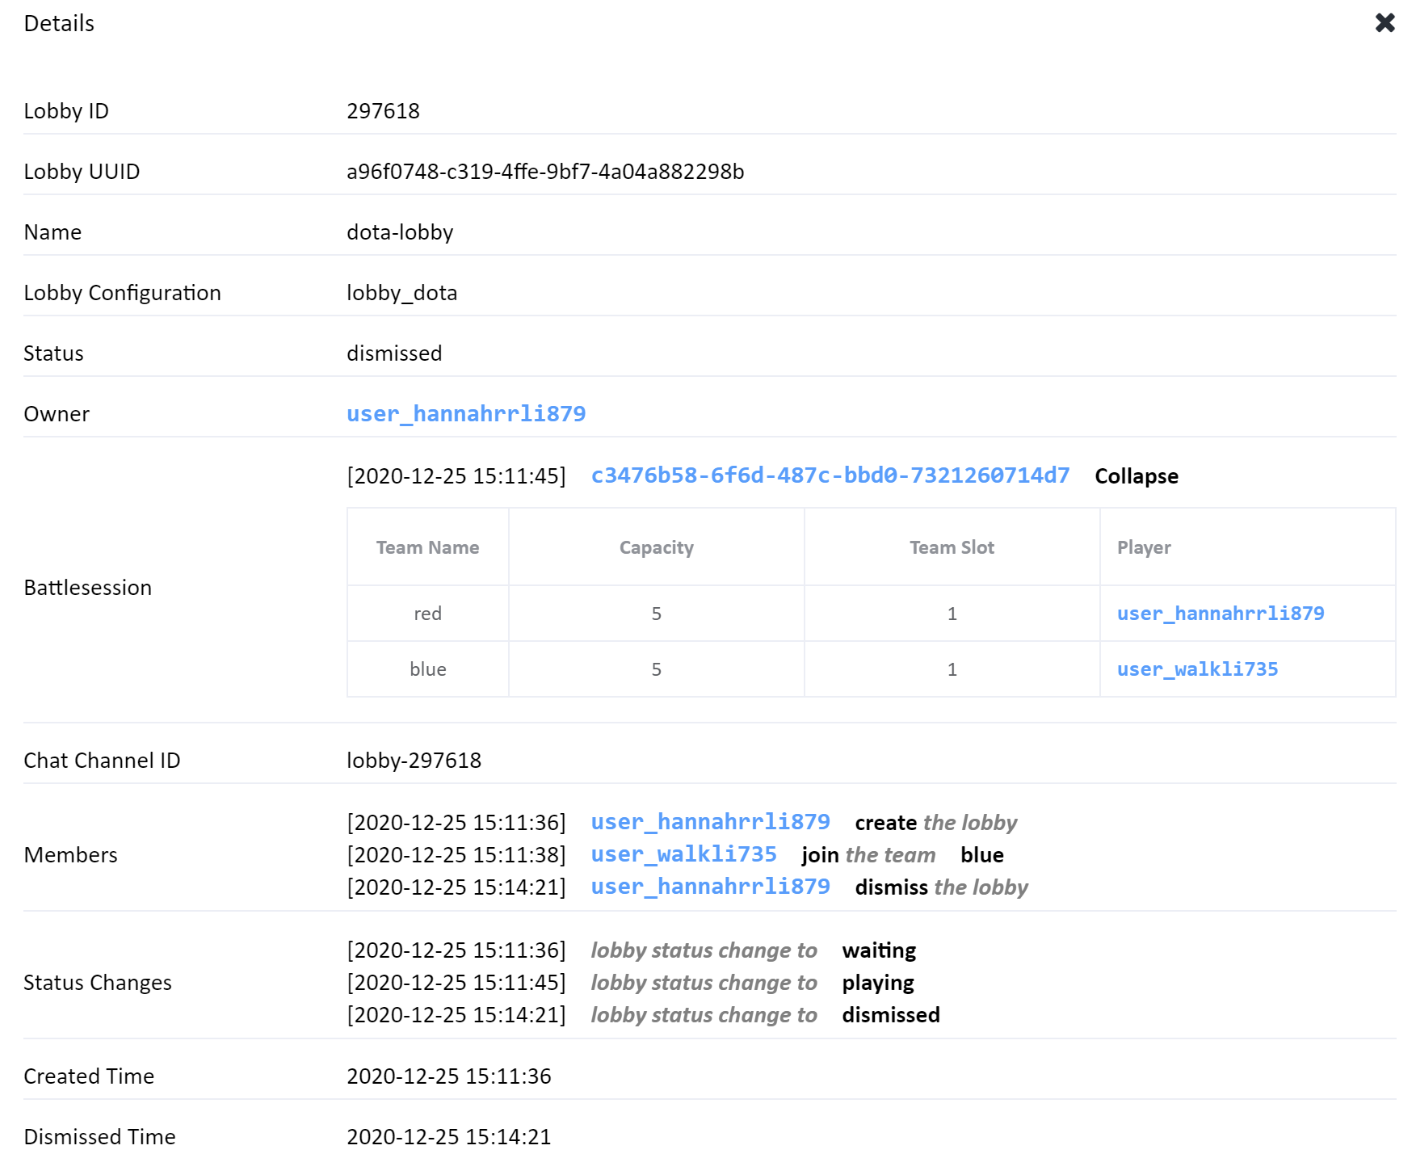
It's easier to understand the whole concept of lobby using the following lobby creation records that can be found on web portal:
1.3 Start a Battle from Matchmaking
On contrast of the lobby service letting players join manually and holds the same player constitution between each battle, the matchmaking service automatically group players together to form a battle based on a specific ruleset written by developers.
One can start a matchmaking request alone, or bring others to do matchmaking together. In the latter situation they will be in the same team in the final matchmaking result.
The matchmaking is an async process that can consume dozens of seconds. Client can trace the matchmaking progress using TicketID assigned when a matchmaking request is started.
In the following examples, complicated ruleset will be demonstrated to meet different needs.
2. Case Matching players with close MMR value
Matchmaking Rating, or MMR is a value that determines the skill level of each player. The most common need of a matchmaking service, is to match players with close MMR value, which is fair to both sides of players.
2.1 Define Player Data Template
Player data is a set of key-value data pairs associated with players. Before checking player data, Data Template should be customized for the game on the PGOS portal.
In this example, you need to define the mmr field in the player template sheet and specify a number value.
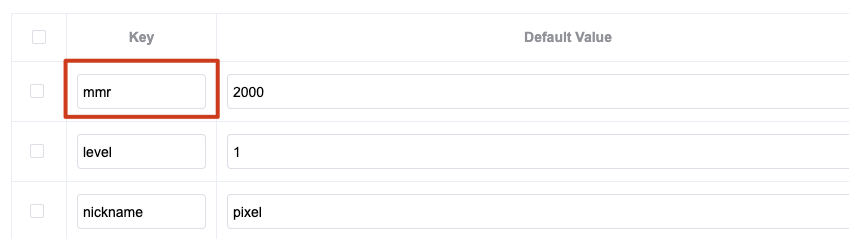
The mmr field will be used in the following matchmaking ruleset and demonstrated the usage of virtual server.
2.2 Write a Ruleset
This example illustrates how to set up two teams of players with close MMR value and set a limit for another string attribute using distanceRule and comparisonRule.
- Create two teams of players.
- Include the following player attributes. Attributes need to be passed to matchmaking service when starting a matchmaking request.
- A player’s mmr value (if not provided, default to 1). Note that since MMR is already defined and stored in backend, the client need not to pass MMR to matchmaking service. Just append the
"key": "mmr"to the end of theplayerAttributestructure, and matchmaking service will automatically read MMR attribute from player data service. - A player's vip status (if not provided, default to "no"). Note that the VIP attribute is not defined in player template, so the client need to pass VIP value to matchmaking service, or the default value will be applied.
- A player’s mmr value (if not provided, default to 1). Note that since MMR is already defined and stored in backend, the client need not to pass MMR to matchmaking service. Just append the
- Write two rules that must be both satisfied to propose a matchmaking result:
- Choose players based on whether their skill level is similar to other players. Ensure that both teams have an average mmr within 50 points difference to each other.
- Choose players whose vip status is "yes"
{
    "version": "v1.0",
    "playerAttributes": [
        {
            "name": "mmr",
            "type": "number",
            "default": 1,
            "key": "mmr"
        },
        {
            "name": "vip",
            "type": "string",
            "default": "no"
        }
    ],
    "teams": [
        {
            "name": "red",
            "maxPlayers": 3,
            "minPlayers": 3
        },
        {
            "name": "green",
            "maxPlayers": 3,
            "minPlayers": 3
        }
    ],
    "rules": [
        {
            "name": "mmrRule",
            "type": "distanceRule",
            "measurements": [
                "flatten(teams[*].players.playerAttributes[mmr])"
            ],
            "referenceValue": "avg(flatten(teams[*].players.playerAttributes[mmr]))",
            "maxDistance": 50
        },
        {
            "name": "vipRule",
            "type": "comparisonRule",
            "measurements": [
                "flatten(teams[*].players.playerAttributes[vip])"
            ],
            "referenceValue": "yes",
            "operation": "="
        }
    ],
    "expansions": []
}
2.3 Update MMR Data
MMR value is usually updated when a battle is finished and produces a win/lose result.
MMR is not a concept in PGOS, but it's easy to implement the caculation of MMR using virtual server service, which is similar to common cloud script services such as AWS Lambda and Azure Functions.
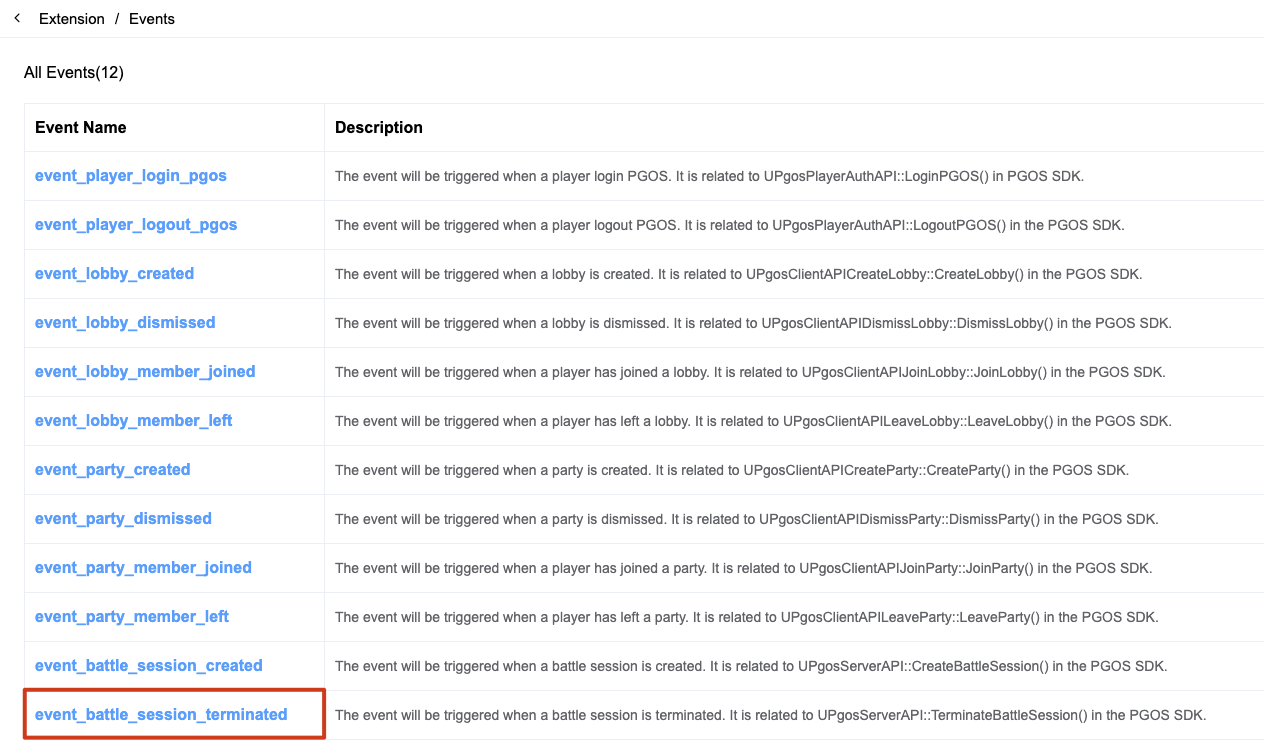
Developers can subscribe to the battle session terminated event, and set a virtual server to update the MMR value then.
3. Case Matching Players Who Choose Different Sides
This example illustrates how to group players who may select different maps into the same map with comparisonRule.
- Create two teams of players.
- Include the following player attributes:
- A player’s level level (if not provided, default to 0).
- A player's side ("attacker" or "defender").
- Write the following rules that must be all satisfied to propose a matchmaking result:
- Choose players based on whether their level level is similar to other players. Ensure that both teams have an average player level within 3 levels of each other.
- The
side_bindingrule limits that players in the same team must choose the same side. - The
side_binding_redrule limits that the red team are all attackers. - The
side_binding_bluerule limits that the blue team are all defenders.
{
    "version": "v1.0",
    "playerAttributes": [
        {
            "name": "level",
            "type": "number"
        },
        {
            "name": "side",
            "type": "string"
        }
    ],
    "teams": [
        {
            "name": "red",
            "maxPlayers": 4,
            "minPlayers": 4
        },
        {
            "name": "blue",
            "maxPlayers": 4,
            "minPlayers": 4
        }
    ],
    "rules": [
        {
            "name": "mmr_calc",
            "type": "distanceRule",
            "measurements": [
                "flatten(teams[*].players.playerAttributes[level])"
            ],
            "referenceValue": "avg(flatten(teams[*].players.playerAttributes[level]))",
            "minDistance": 0,
            "maxDistance": 3
        },
        {
            "name": "side_binding",
            "type": "comparisonRule",
            "measurements": [
                "teams[*].players.playerAttributes[side]"
            ],
            "operation": "="
        },
        {
            "name": "side_binding_red",
            "type": "comparisonRule",
            "measurements": [
                "flatten(teams[red].players.playerAttributes[side])"
            ],
            "referenceValue": "attacker",
            "operation": "="
        },
        {
            "name": "side_binding_blue",
            "type": "comparisonRule",
            "measurements": [
                "flatten(teams[blue].players.playerAttributes[side])"
            ],
            "referenceValue": "defender",
            "operation": "="
        }
    ],
    "expansions": []
}
4. Case Matching Players Initiating Matchmaking Within A Short Time Into The Same Battle
This example illustrates how to group players who started matchmaking within a short time into the same match using expansion feature.
- This ruleset wants 1~6 players for each battle
- Limit the team consists of at least 6 players
- Expand the limitation from 6 to 1 gradually
If the minPlayers configuration is set to 1 without using the expansion feature, the matchmaking algorithm will immediately start and generate a game session that meets the minPlayers requirement for the first player who initiates matchmaking. Even if backfill is attempted to add subsequent players to the game session, there is a tendency to generate new game sessions and backfill older ones, which cannot guarantee that all new players will be backfilled into the older game session.
By using the expansion feature, the player who initiates matchmaking first can wait briefly and start the game session with other players who initiate matchmaking within a short period of time.
{
    "version": "v1.0",
    "playerAttributes": [],
    "teams": [
        {
            "name": "SoloTeam",
            "minPlayers": 6,
            "maxPlayers": 6,
            "minQuantity": 1,
            "maxQuantity": 1
        }
    ],
    "rules": [],
    "expansions": [
        {
            "target": "teams[SoloTeam].minPlayers",
            "steps": [
                {
                    "waitTimeSeconds": 1,
                    "value": 5
                }
            ]
        },
        {
            "target": "teams[SoloTeam].minPlayers",
            "steps": [
                {
                    "waitTimeSeconds": 2,
                    "value": 4
                }
            ]
        },
        {
            "target": "teams[SoloTeam].minPlayers",
            "steps": [
                {
                    "waitTimeSeconds": 3,
                    "value": 3
                }
            ]
        },
        {
            "target": "teams[SoloTeam].minPlayers",
            "steps": [
                {
                    "waitTimeSeconds": 4,
                    "value": 2
                }
            ]
        },
        {
            "target": "teams[SoloTeam].minPlayers",
            "steps": [
                {
                    "waitTimeSeconds": 5,
                    "value": 1
                }
            ]
        }
    ]
}
5. Case Reconnect to a Battle Session
A typical scenario is that a player needs to find the ongoing game and reconnect to the DS, after he has just experienced an crash of the game or an abnormal restart of the computer.
- If the DS wants to kick off the disconnected player
- PGOS saves the player's session information in a battle session, until the game calls the
UPgosHostingAPI::RemovePlayerBattleSessioninterface in the DS SDK to remove the player from the battle session.
- PGOS saves the player's session information in a battle session, until the game calls the
- If the Client wants to reconnect to DS to continue the previous battle session
- Developers could find the battle sessions that is going on with a certain player by calling
UPgosBattleAPI::DescribeBattleSessionsinterface in the Client SDK. There is the connection address(IP & Port) of the battle session in the return data of the interface.
- Developers could find the battle sessions that is going on with a certain player by calling
6. Case Avoid Writing Contradictory Rules
A contradictory rule will result in 100% timeout of all matchmaking requests.
There is more than one way to cause conflicts. So carefully check to correctness of a ruleset and avoid writing contradictory ones.
In the following case, the first rule limits the difference range of MMR within [0, 0.5] and the second rule limits that to [0.6, 1].
{
    "version": "v1.0",
    "playerAttributes": [
        {
            "name": "mmr",
            "type": "number"
        }
    ],
    "teams": [
        {
            "name": "team1",
            "maxPlayers": 3,
            "minPlayers": 3
        },
        {
            "name": "team2",
            "maxPlayers": 3,
            "minPlayers": 3
        },
        {
            "name": "team3",
            "maxPlayers": 3,
            "minPlayers": 3
        }
    ],
    "rules": [
        {
            "name": "mmr_calc",
            "type": "distanceRule",
            "measurements": [
                "flatten(teams[*].players.playerAttributes[mmr])"
            ],
            "referenceValue": "avg(flatten(teams[*].players.playerAttributes[mmr]))",
            "minDistance": 0,
            "maxDistance": 0.5
        },
        {
            "name": "mmr_calc2",
            "type": "distanceRule",
            "measurements": [
                "flatten(teams[*].players.playerAttributes[mmr])"
            ],
            "referenceValue": "avg(flatten(teams[*].players.playerAttributes[mmr]))",
            "minDistance": 0.6,
            "maxDistance": 1
        }
    ],
    "expansions": []
}
7. Build Battle History with Battle Data Service
7.1 Data Sample of Battle History Records
Our goal is to obtain the historical data of the battles that the player has participated in from the game client. The format is as follows.
| Date | Uptime | Game Mode | My KDA (Kill / Death / Assist) |
|---|---|---|---|
| 2022-2-3 | 30min 30s | Imba | 0/5/3 |
| 2022-2-2 | 15min 15s | Ladder | 10/5/3 |
| 2022-2-1 | 59min 59s | Ladder | 2/0/15 |
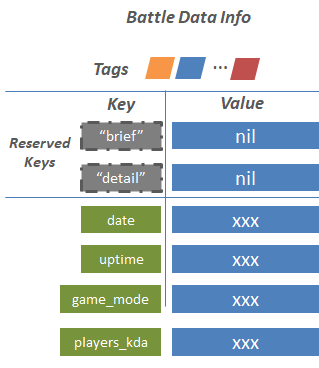
7.2 Define Data Structure of Battle History Records
We use the keys in battle data to describe the title in the table above. We got 4 keys:
- data
- uptime
- game_mode
- players_kda
It should be noted that even if only the kda data of the current player is displayed, the KDA of all players needs to be saved for the battle history data.
Therefore, describe the battle record item structure in json format i.e.
{
    "date": "",
    "uptime": "",
    "game_mode": "",
    "players_kda": [
        "player_id": "",
        "kda": ""
    ]
}
7.3 Build Battle History
We recommend writing battle history data as the last link in the battle session process, and make sure everything is done before calling the ProcessEnding interface.
First, call the UpdateBattleData interface to write battle data for a battle session. The sample code is as below:
#include "PgosServerAPI.h"

void OnBattleEnd() {
    ...
    TMap<FString, FString> record_data;
    record_data["date"] = "fake_date_2022_02_03";
    record_data["uptime"] = "fake_uptime_1830";
    record_data["game_mode"] = "Imba";
    TArray<TMap> players_kda;

    foreach (auto player: in battle_players) {
        auto player_kda_data;
        player_kda_data["player_id"] = player.id;
    }

    record_data["players_kda"] = players_kda;
    auto battle = IPgosSDKCpp::Get().GetServerBattleAPI();
    battle->UpdateBattleData("fake_battle_session_id",
                      record_data,
                      [](const FPgosResult& Ret){})
}
Then, call UpdateBattleRecord to bind the battle data to the specified player list, only players in the list can access this data on the client side. The sample code is as below:
#include "PgosServerAPI.h"

void OnBattleEnd() {
    ...
    TArray<FString> player_ids;
    foreach (auto player: in battle_players) {
        auto player_kda_data;
        player_ids.append(player.id);
    }
    tags;
    auto battle = IPgosSDKCpp::Get().GetServerBattleAPI();
    battle->UpdateBattleRecord("fake_battle_session_id",
                      player_ids,
                      tags,
                      [](const FPgosResult& Ret){})
}
Through the above two steps, we have completed the work of adding a battle history record item for the specified players.
After playing several battles, players can pull their own battle history data.
7.4 Get Battle History Data from Game Client
After the game is over, call GetBattleRecordList from game client to get current player's battle history data.
#include "PgosSDKCpp.h"
#include "Core/PgosErrorCode.h"

void SomeUObjectClass::GetBattleRecordList()
{
    auto battle = IPgosSDKCpp::Get().GetClientBattleAPI();
    if (battle)
    {
        FString PlayerID = "fake_my_player_id";
        TArray<FString> Tags;
        TArray<FString> Keys;
        int32 Offset = 0;
        int32 Count = 20;
        battle->GetBattleRecordList(PlayerID, Tags, Keys, Offset, Count, [](const FPgosResult& Ret, const FClientBattleListInfo* Data) {
            if (Ret.err_code == (int32)Pgos::PgosErrCode::kSuccess) {
                UE_LOG(LogTemp, Log, TEXT("GetBattleRecordListSuccess"));
            } else {
                UE_LOG(LogTemp, Log, TEXT("GetBattleRecordListFailed: err_code=%d, err_msg=%s"), Ret.err_code, *Ret.msg);
            }
        });
    }
}
8. Matchmaking Standalone Integration
Typically, the matchmaking service and DS Hosting service are used together, as a BattleSession is created upon the completion of matchmaking, and DS Hosting can find a suitable DS to run the BattleSession.
However, if developers only want to use the matchmaking service and manage matches on their own DS Hosting platform, they can follow the steps below.

- First, select NoPlacer in the placer option of MatchConfig. This way, after the matchmaking is completed, the DS Hosting service will not be automatically called to place the match.

- Next, find the
event_matchmaking_completedin the Event list, and associate it with a WebHook or Virtual Server.

- Finally, try to initiate a match using a client. Upon successful matchmaking, the matchmaking service will package the results (including matched teams and members, member attribute information, and BattleProperties information) into an event and trigger your WebHook or VirtualServer. If your VirtualServer logs Event information, you can check the logs to verify if the event details meet your expectations and proceed with further logic processing and development.
To create a Virtual Server that responds to the matchmaking completion event, you need to handle HTTP requests with the URI of /pgos_event.
If you are using Golang, Python, or NodeJS for development, you can refer to the sample code provided here.