Typical Use Case
1. Case A Game Campaign By Using Virtual Server
1.1 Campaign Description
Campaign Name: Game campaign for new weapon trial Campaign Brief: We designed a new weapon for our game. We want to get feedback from players for this weapon. The feedback will be conducted as a in-game vote. Campaign Rules:
- If players login game between 20:00 pm to 20:59 pm, they will be granted the new weapon for trial and notified by a in-game prompt
- We record the playing count of this weapon for every player. Each time players join a battle and use this weapon to fight, the playing count will be incremented one.
- Once the playing count equals 5, a vote message box will be prompted to let the player posting the trial score which is from 0 to 5.
- The Campaign will last a week, and then we can calculate the final score for the weapon.
1.2 Tech Design
New weapon granting: Create a Virtual Server to handle the granting. It need to be configured to bind with PGOS Event
event_player_login_pgoson the Portal. This Virtual Server will be triggered when a player login and then notify the player that the new weapon is granted with a in-game prompt message.sequenceDiagram Game Client ->> PGOS Backend: Login PGOS Backend ->> Virtual Server: Trigger Login Event Virtual Server ->> Virtual Server: Grant New Weapon (if in defined time range) Virtual Server->> Game Client: Notify Client(by PushMsg API)Playing count handling: Define a new key named
NewWeaponPlayCountand defaulted with value 0 in the Player Data Template page. Each time a player joins a battle with this weapon, the dedicated server will update it.Vote: If the NewWeaponPlayCount field of a player equals 5, the Virtual Server will notify the game client to prompt a vote message box for the player by using PushMsg API. Once the player posts the vote result, the game client will access the Virtual Server to recored the vote result.
Vote result recording: We record the vote result in
Title Region Config Dataas the fieldsTotalScoreandTotalPlayers. The final score for the new weapon will be the value of TotalVoteScore/TotalVotePlayers.sequenceDiagram Game Client ->>+ Game Dedicated Server: Join Battle Game Dedicated Server ->>- Virtual Server: Update Play Count (End of Battle) Virtual Server ->> Player Data: Set NewWeaponPlayCount+=1 Virtual Server ->> Game Client: Notify Vote (if NewWeaponPlayCount==5) Game Client ->> Game Client: Prompt Vote UI Game Client ->> Virtual Server: Post Vote Result Virtual Server ->> TitleData: Update TotalVoteScore & TotalVotePlayers
1.3 Key Source Code
Fields definition in
Player DataandTitle Region Config DataIn the page
Players/Data Template, we add a key named NewWeaponPlayCount which is defaulted value 0 and with theInternalpermission.In the page
Title Region/Config Data, we add the keys namedTotalVoteScoreandTotalVotePlayers. All these keys are defaulted value 0 as well.Virtual Server
Create a Virtual Server named CampaignServer, its key source code is shown as below:
Grant Weapon:
// grant weapon when player login, triggered by event_player_login_pgos
exports.login_grant = async (args, context) => {
    // check if in desired time range
    var dt = new Date(context.event.data.start_time)
    var h = dt.getHours()
    if ( h != 20) {
        return "no granting"
    }

    // grant weapon to player
    grant_res = await server.GrantItemsToPlayer(req)
    if (grant_res.result != 0) {
        return "granting failed"
    }

    let msg = {
        name: "new_weapon_grant",
        item_instance_id: grant_res.body.item_instances[0].instance_id
    }

    // notify game client
    let pushMsgData = {
        player_id_list: [context.event.data.player_id],
        msg: JSON.stringify(msg)
    }
    return await server.PushMsg(pushMsg)
}
Update Play Count:
// update NewWeaponPlayCount and notify player to vote, accessed by game dedicated server
exports.update_play_count = async (args, context) => {
    if (args.player_id === "") {
        return "failed"
    }
    let reqData = {
        "player_items": [
        {
            "items": [
            {
                "key": "NewWeaponPlayCount",
                "incr": 1
            }
            ],
            "player_id": args.player_id
        }
        ]
    }
    let notifyVote = false
    let res = await server.IncrPlayerKVDataInt(reqData);
    if (res.result == 0) {
        if (res.body.data.data_list.length > 0) {
            if (res.body.data.data_list[0].key == "NewWeaponPlayCount") {
                if (parseInt(res.body.data.data_list[0].value) == 5) {
                    notifyVote = true
                }
            }
        }
    }

    if (notifyVote) {
        // notify game client to vote
        let msg = {
            name: "new_weapon_vote"
        }

        let pushMsgData = {
            player_id_list: [context.event.data.player_id],
            msg: JSON.stringify(msg)
        }
        return await server.PushMsg(pushMsgData)
    }
}
Post Vote:
// post vote, accessed by game client
exports.post_vote = async (args, context) => {
    if (args.player_id === "" || args.score === "") {
        return "failed"
    }
    let reqData = {
        "data": [
            {
                "key": "TotalVoteScore",
                "incr": args.score
            },
            {
                "key": TotalVotePlayers,
                "incr": 1
            }
        ]
    }
    let notifyVote = false
    let res = await server.IncrTitleData(reqData);
    if (res.result == 0)
        return "success"
    else
        return "failed"
}
2. Case Open a Chest and Obtain Random Coins
Chest is a common concept in many games. Opening a chest will grant the player many kinds of items. Let's see how to build a chest item with random coins in it using PGOS Economy and Extension services.
2.1 Define the Chest Item on Web Portal
Create the chest item on Web Portal and fill the basic information. Make sure that the item is consumable and assign a Virtual Server with it.
On the right side is the example argument passed to Virtual Server after the item is consumed.

2.2 Implement the Granting Logic Using Virtual Server
The next step is writing the code to grant the player random coins.
The script below handles the item consumer action in 3 steps:
- Query the wallet balance of the player.
- Grant random number of coins to the player.
- Query the wallet balance again.
The whole process can be confirmed by checking virtual server execution logs on web portal.
"use strict";
const server = require('virtual-server-framework/api')
var {CustomError} = require('exception')
/**
 * @author pgos
 * @interface main_handler
 * @description xxxxxx
 * @time 2021.01.01
 */
exports.main_handler = async (args, context) => {
    console.log("Hello World");
    console.log(args);
    console.log(context);
    return args;
};

/**
 * @author pgos
 * @interface test
 * @description xxxxxx
 * @time 2021.01.01
 */
exports.test = async (args, context) => {
    console.log("TEST");
    console.log(args);
    console.log(context);
    throw new CustomError(999, "my err msg")
    return args;
};

exports.InventoryTest = async function (args, context)  {
    var req = {"player_id":args.player_id}
    var data = await server.GetPlayerCurrency(req)
    console.log("GetPlayerCurrency", JSON.stringify(data))
    req = {"player_id":args.player_id,
        "granted_currency": {
            "currency_code": "BTC",
            "amount": Math.random()*10
        }}
    data = await server.GrantCurrencyToPlayer(req)
    console.log("GrantCurrencyToPlayer", JSON.stringify(data))
    data = await server.GetPlayerCurrency(req)
    console.log("GetPlayerCurrency", JSON.stringify(data))
    return data
}
3. Case Implement a Simple Battle Season Mechanism
Linked to Sample Page.
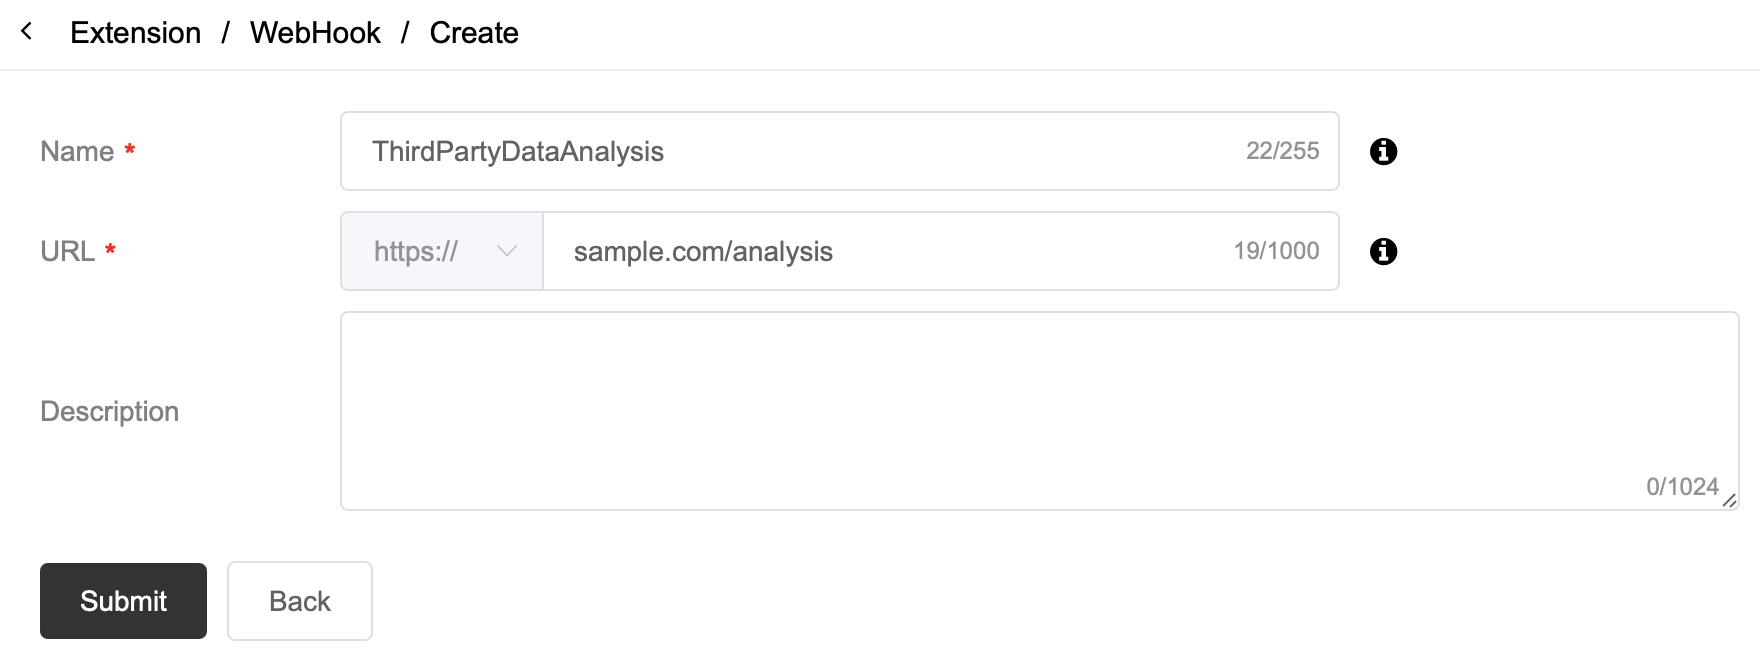
4. Case Monitor DAU/PCU Data on Third Party Platform
In most cases events happened on PGOS stays on PGOS. Except for processing these events using virtual server of PGOS, it's also possible to consume these events on third party platforms.
Let's take monitoring DAU/PCU data as example.
First, create a webhook and specify the URL to send HTTP request to.
Then add the webhook to the actions of event_player_login_pgos event.
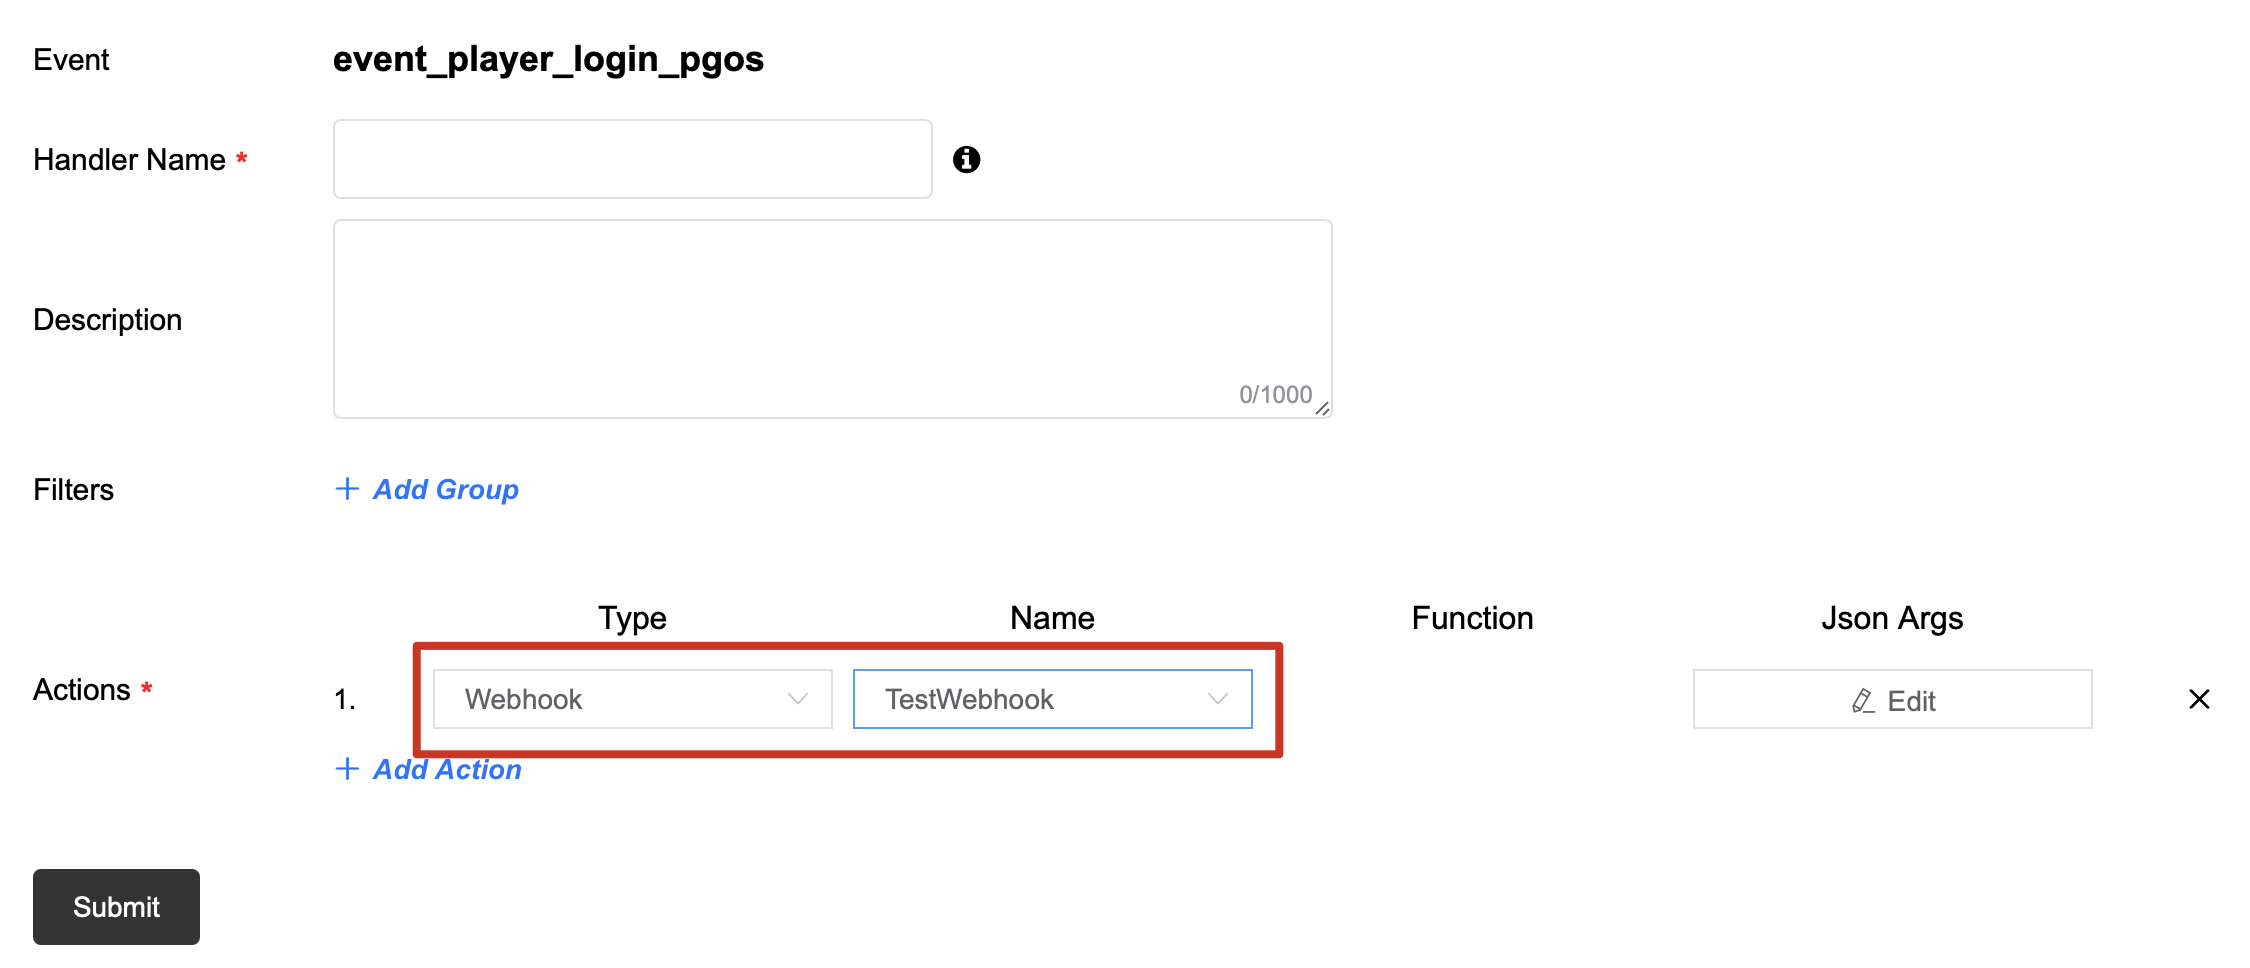
Do the same thing with the event_player_logout_pgos event.
After configured, the player login and logout data will be continuously reported to the third party platform specified in webhook.