Implementation of Key Features
1. Battle Chat
Related topic:
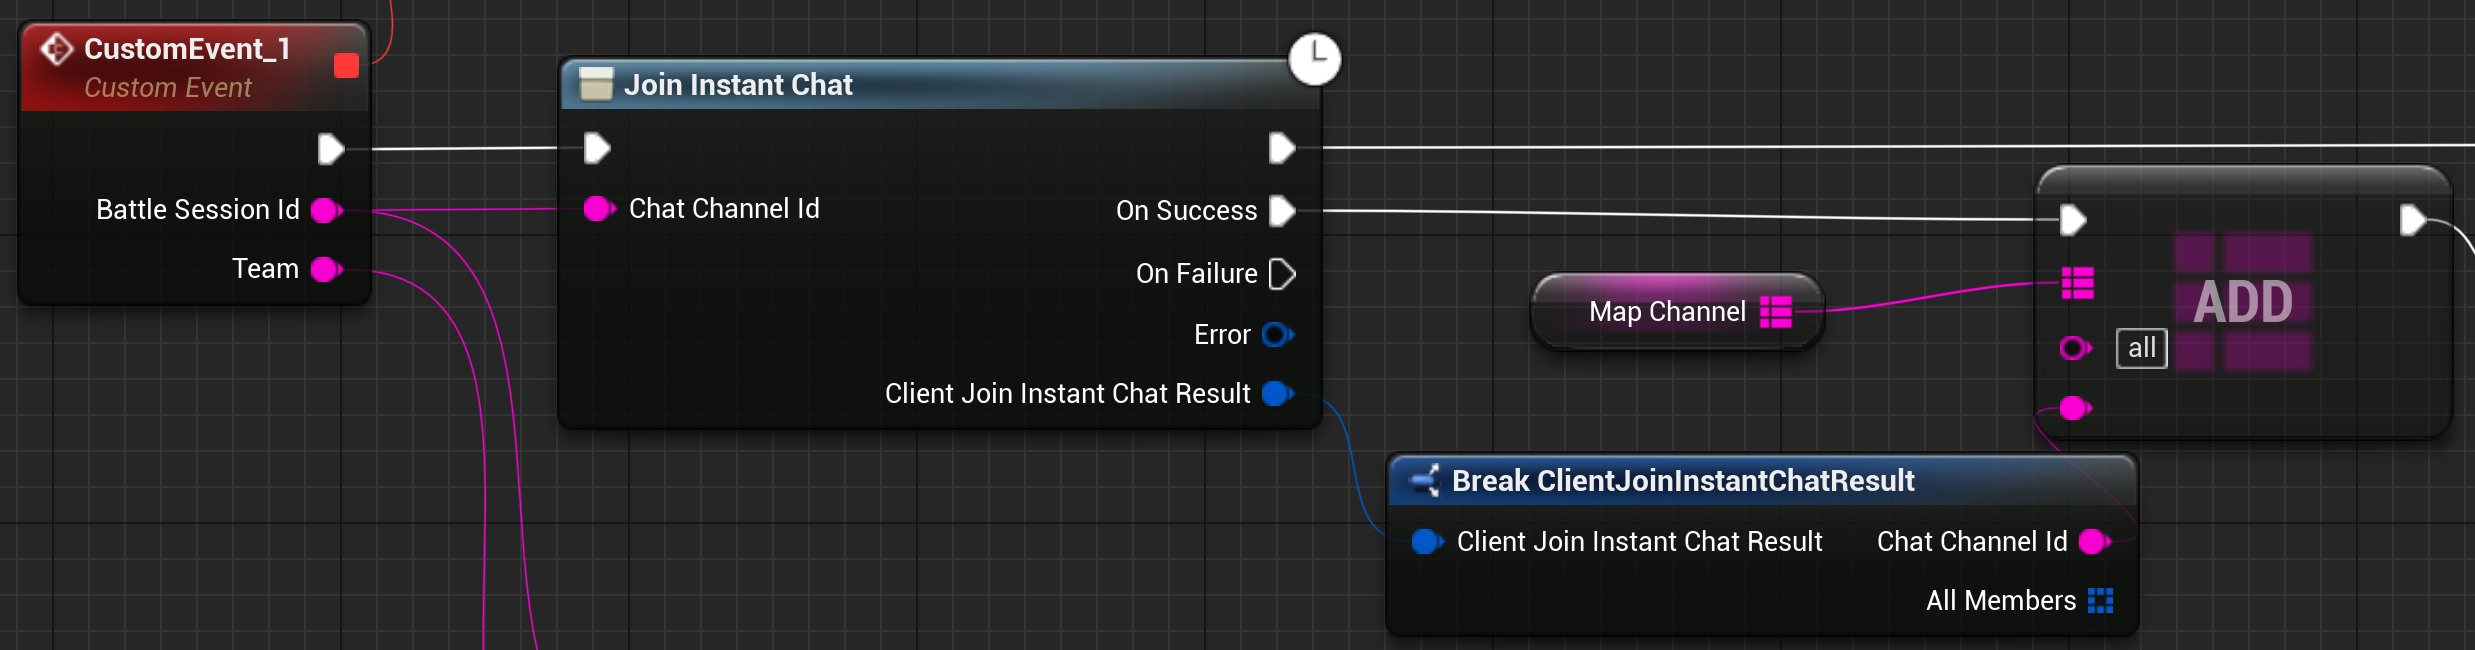
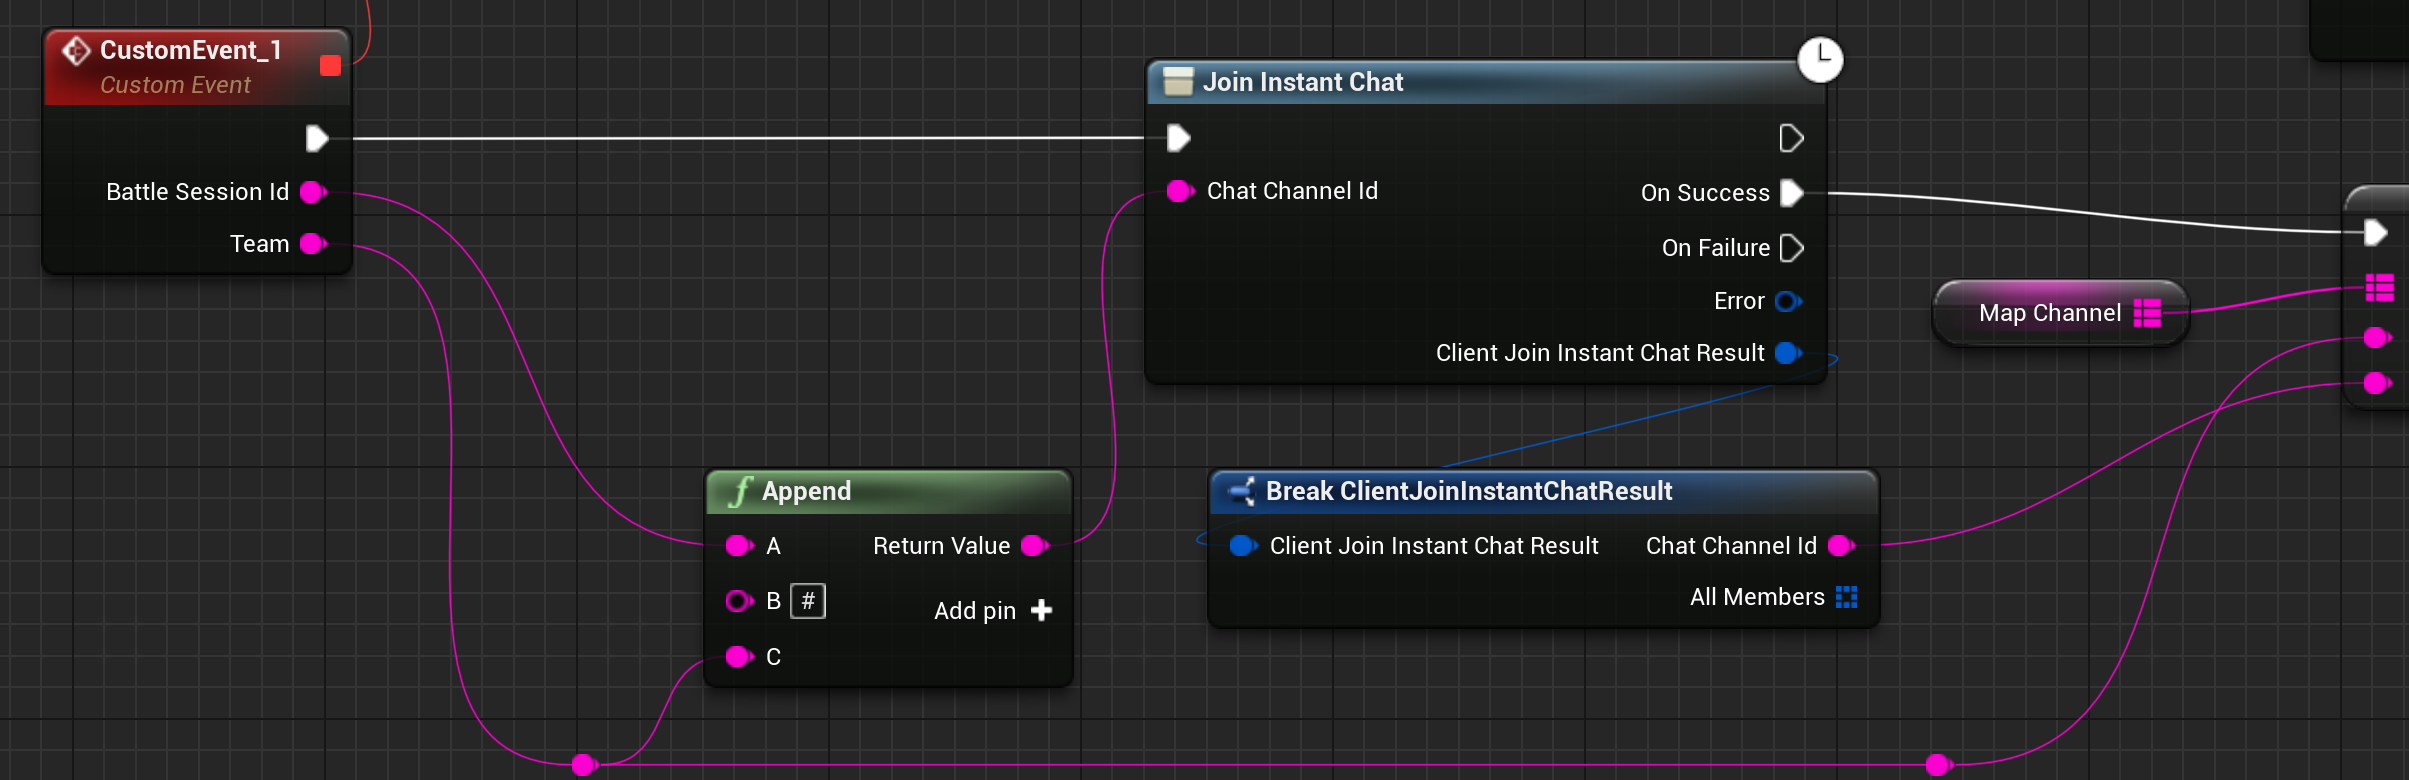
1.1 Gerenate chat channel ID
In the battle, each player joins 2 channels,palyers in the channel "All" can chat with all the players in the battle. Team channel "GREEN" or "RED" is used for chatting with players in the same team.
- The
ChatChannelIdfor the "ALL" channel is simply theBattleSessionId(for example: "8031bde8-190e-4776-881b-e5ef8a6545f9"). - The
ChatChannelIdfor the "RED" channel can use "8031bde8-190e-4776-881b-e5ef8a6545f9#RED". - The
ChatChannelIdfor the "GREEN" channel can use "8031bde8-190e-4776-881b-e5ef8a6545f9#GREEN".
1.2 Join Chat in the Client
Players can join the specific channel using ChatChannelId
Join the channel "All"
Join the channel "RED" or "GREEN":
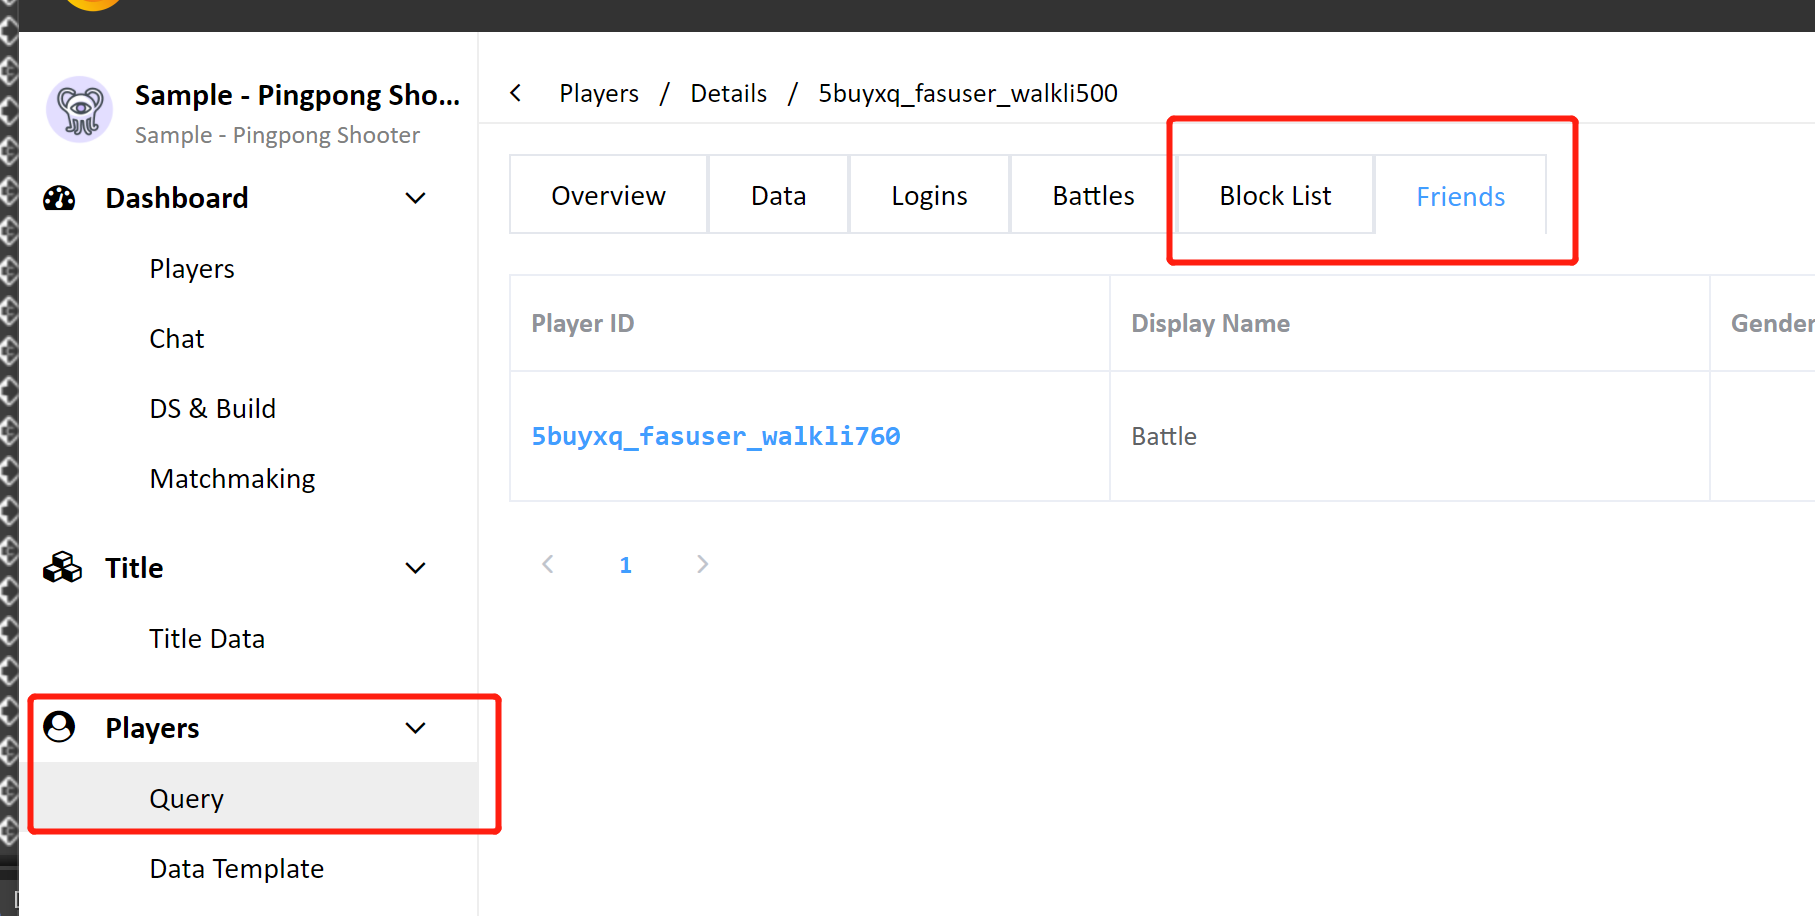
2. Friends & Blocklist
Pingpong Shooter provides a friend list and blocklist.
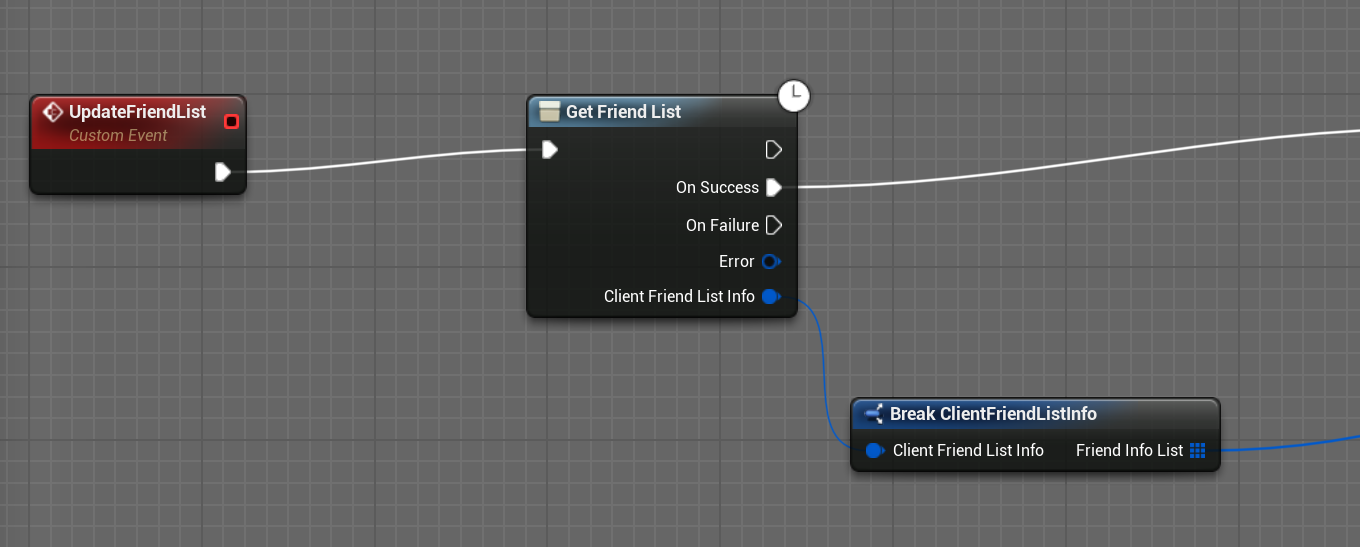
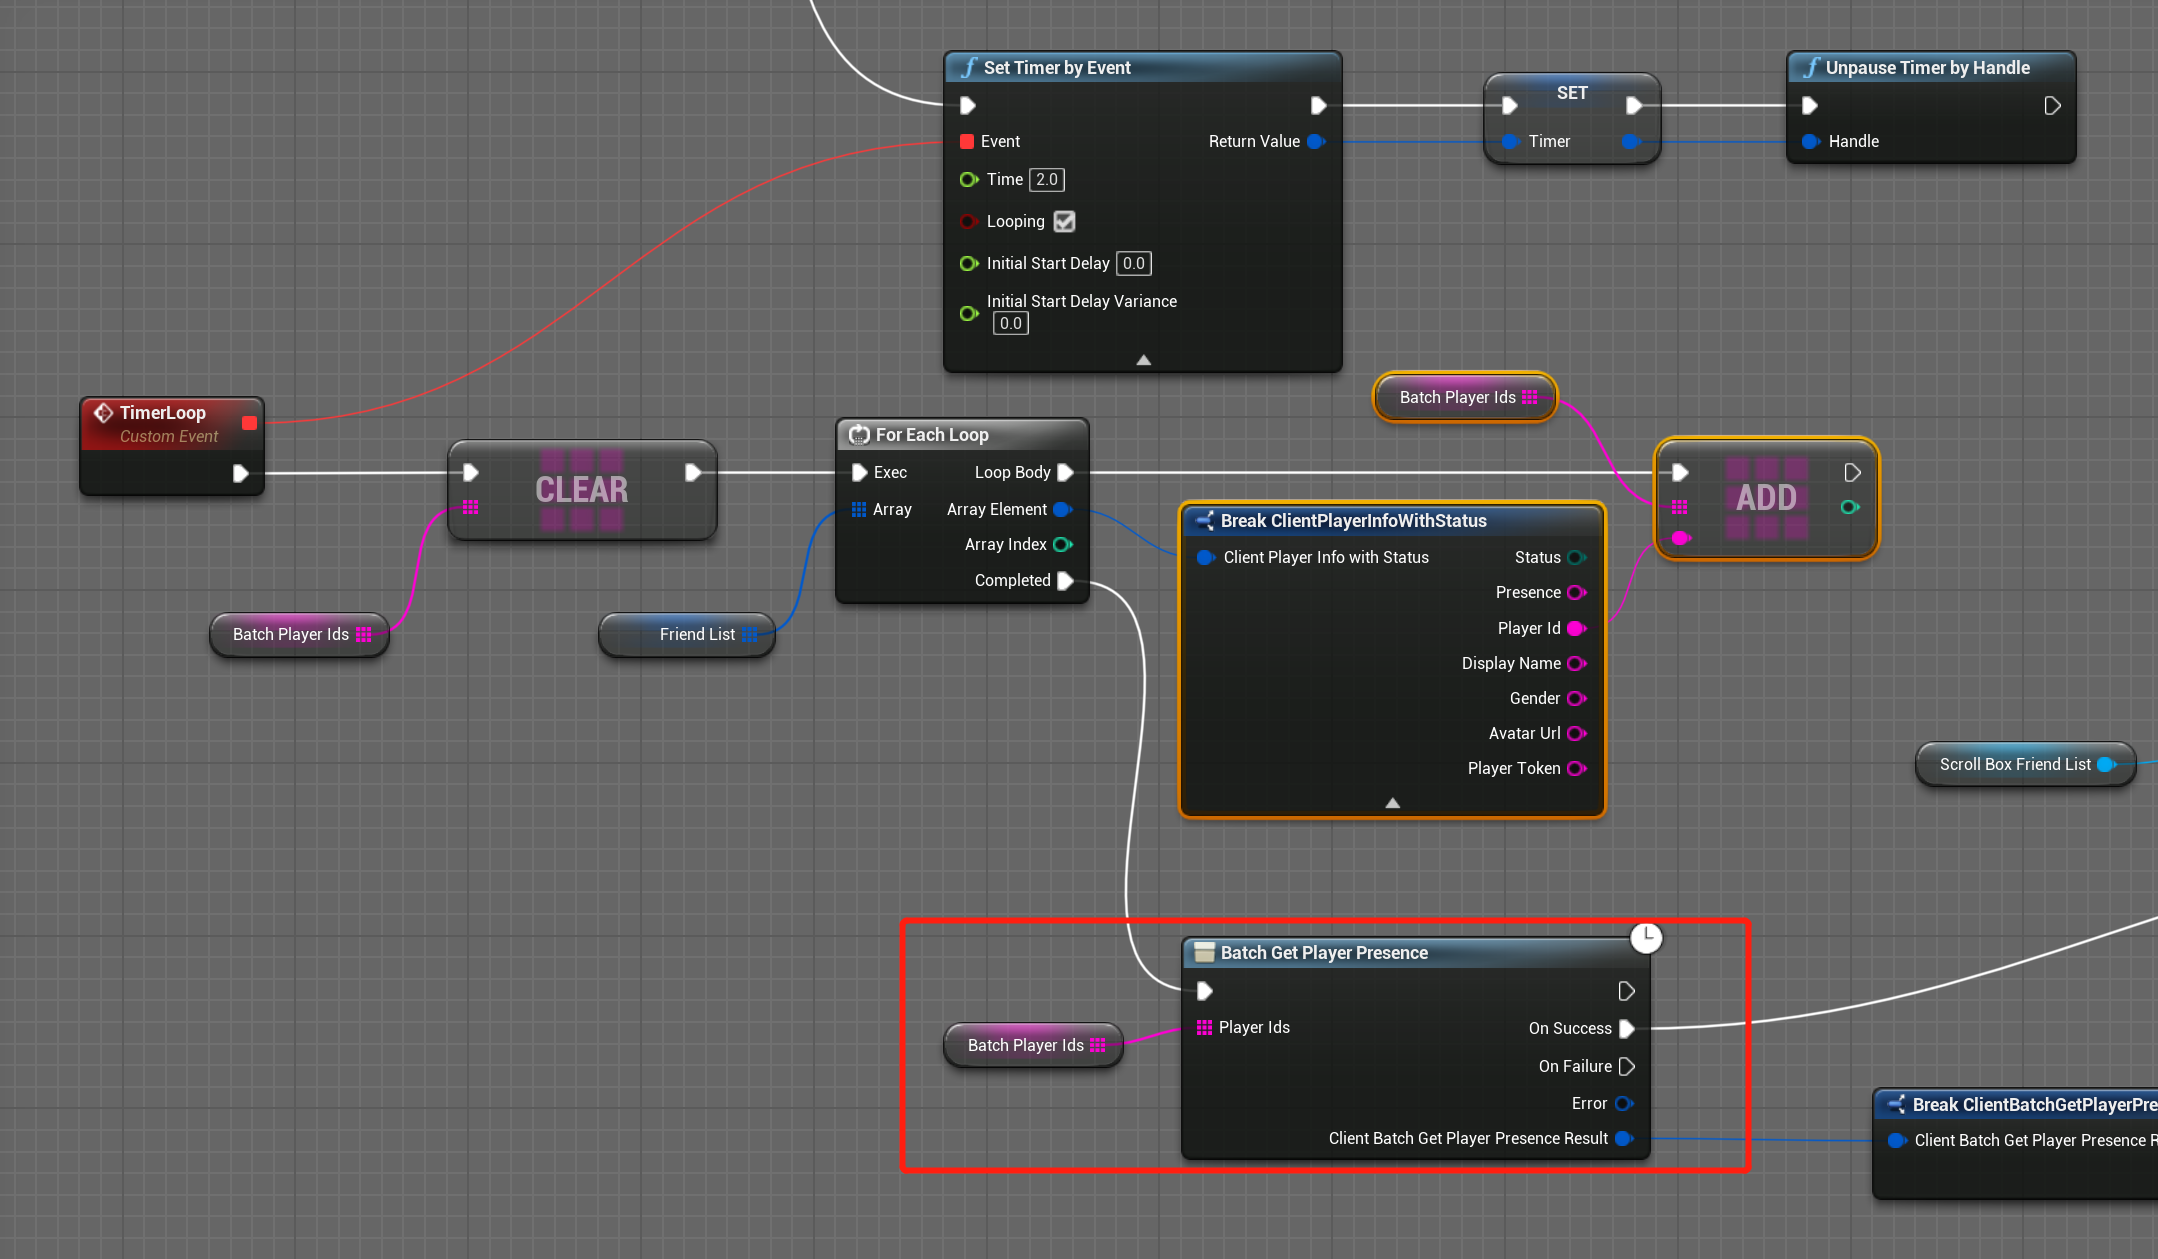
Get Friend List is called in WidgetBlueprint'/Game/PGOS/UI/Friend/FriendList.FriendList'
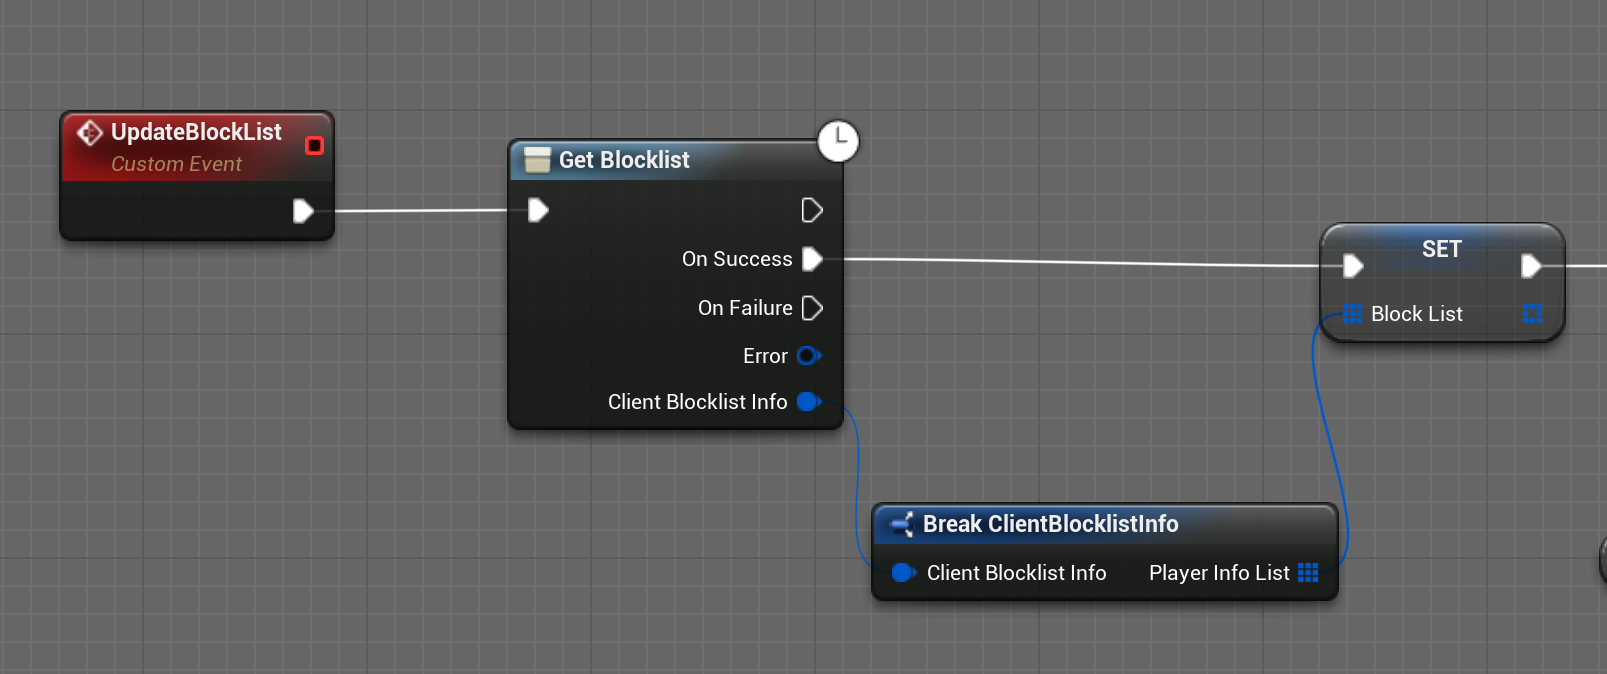
Get Blocklist is also called in WidgetBlueprint'/Game/PGOS/UI/Friend/FriendList.FriendList'
Developers can also check a player's friends and blocklist in the PGOS web portal.
Update Player Presence
it is called in WidgetBlueprint'/Game/PGOS/UI/Friend/FriendList.FriendList'
3. Lobby
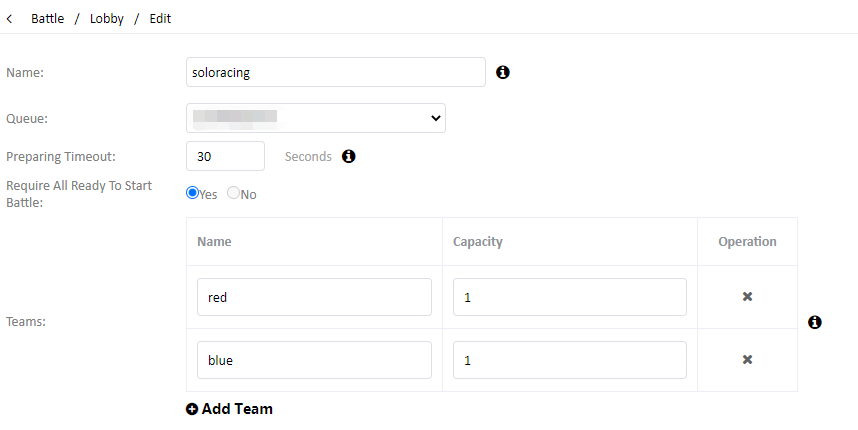
3.1 Set a Lobby Configuration
Pingpong Shooter allows two types of lobbies to be created. Each lobby type corresponds to a Lobby Configuration on the PGOS web portal.
| Lobby Type | Lobby Configuration Name |
|---|---|
| Lobby with 5v5 Game Mode | lobby_dota |
| Lobby with 1v1 Game Mode | soloracing |
Using Lobby with 1v1 Game Mode as an example, the lobby configuration details are as follows:
3.2 Creating Lobby
Blueprint reference path:
WidgetBlueprint'/Game/PGOS/UI/Lobby/CreateLobbyUI.CreateLobbyUI'
Generate the lobby configuration name:
Create the lobby with the lobby configuration name and lobby data:
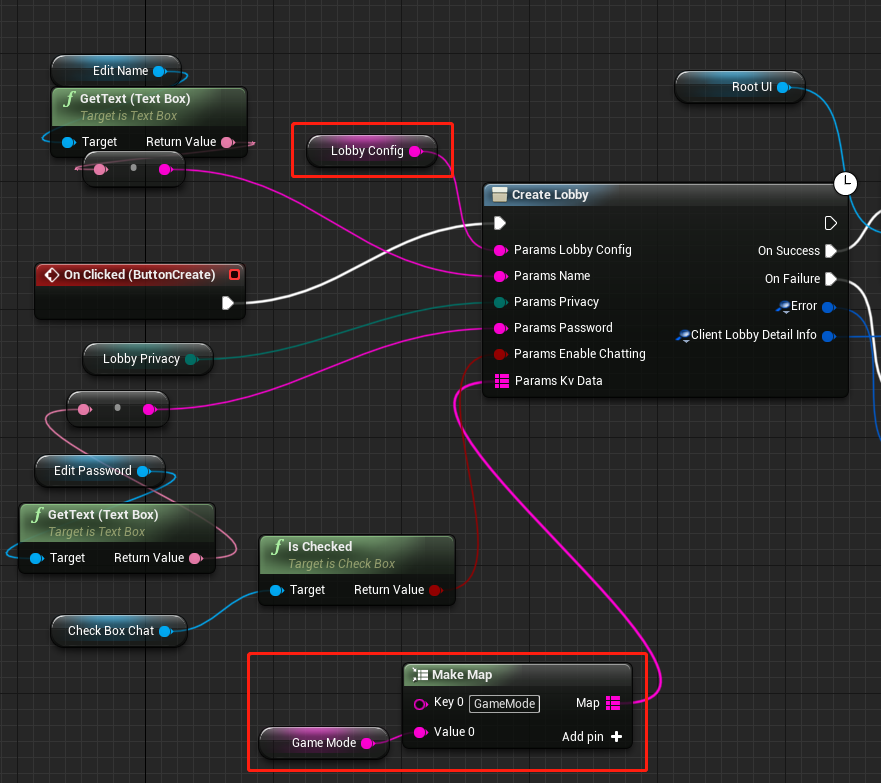
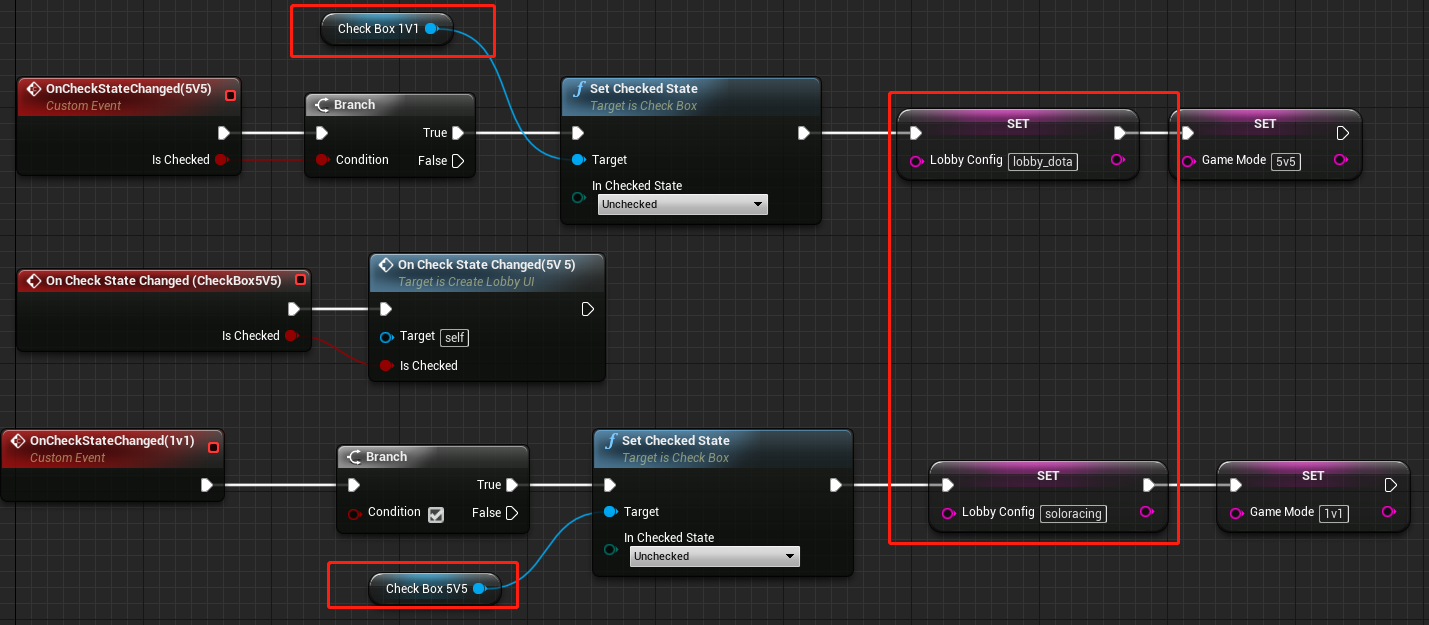
3.3 Lobby Data
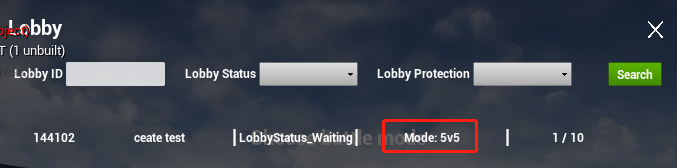
Pingpong Shooter uses lobby data to store the Game Mode which is displayed in both the lobby list and the lobby creation page.
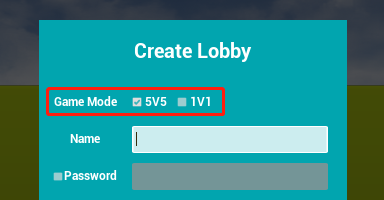
Using the 5v5 Game Mode as an example:
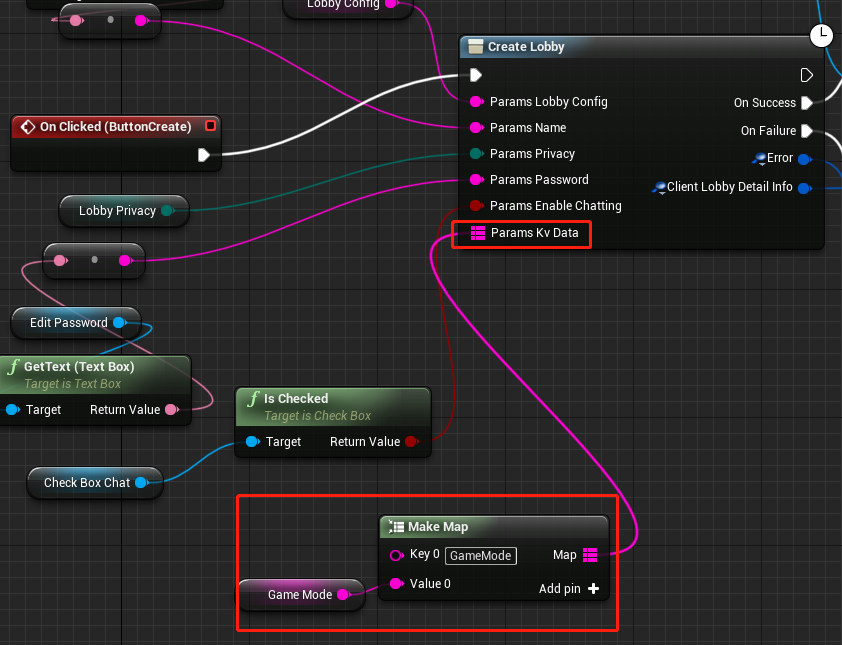
- Save the Game Mode when creating the lobby

Input the lobby data with Key-Value pairs
4. Simple Battle Season
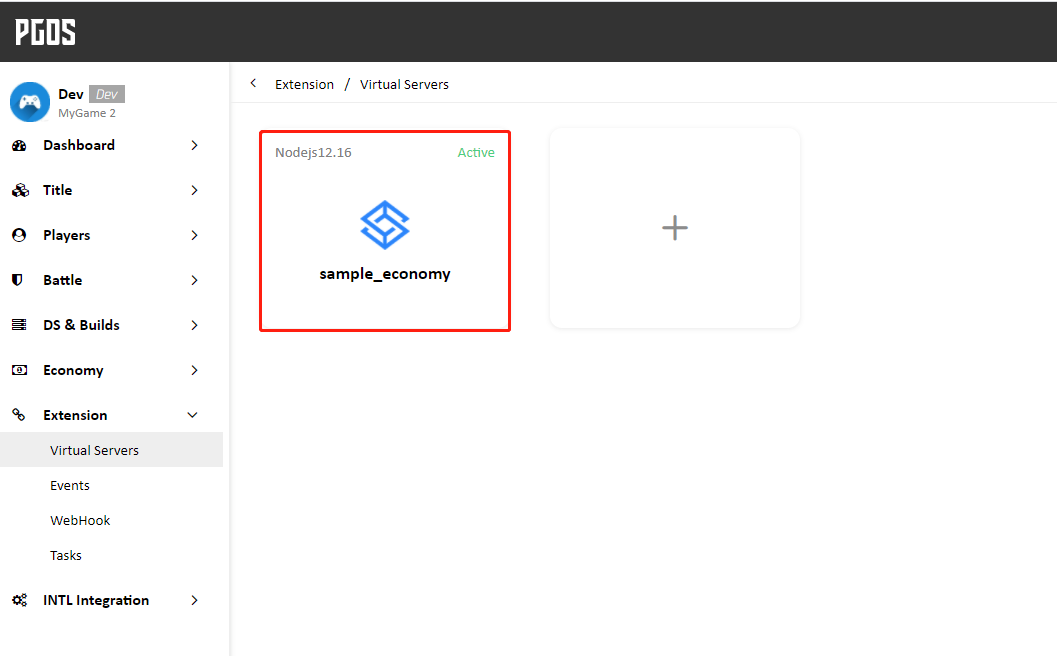
4.1 Virtual Servers
Virtual currencies rewarded to players for login and battle result calculation are implemented by using virtual servers. You must create virtual servers and Virtual currencies on the web portal to implement this function.
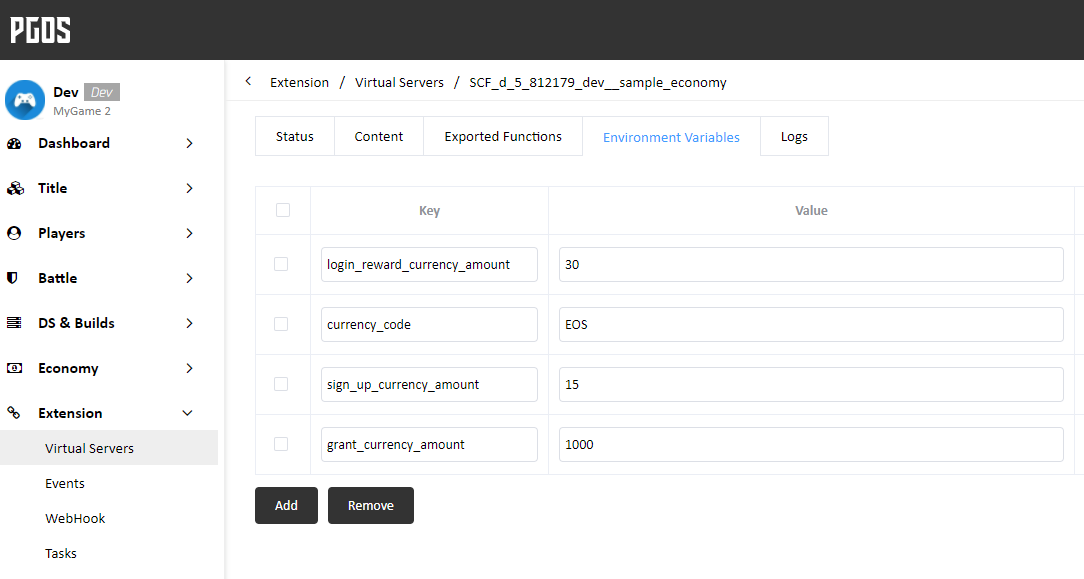
4.2 Environment Variables
Set required environment variables for economy_battle_season virtual servers.
login_reward_currency_amount: The amount of currency reward to players when the player logs in.
currency_code: Defined by developers.
sign_up_currency_amount: The amount of currency required to join the season.
grant_currency_amount: The amount of currency that the player will be rewarded after winning the game.
5. Player Data Templates
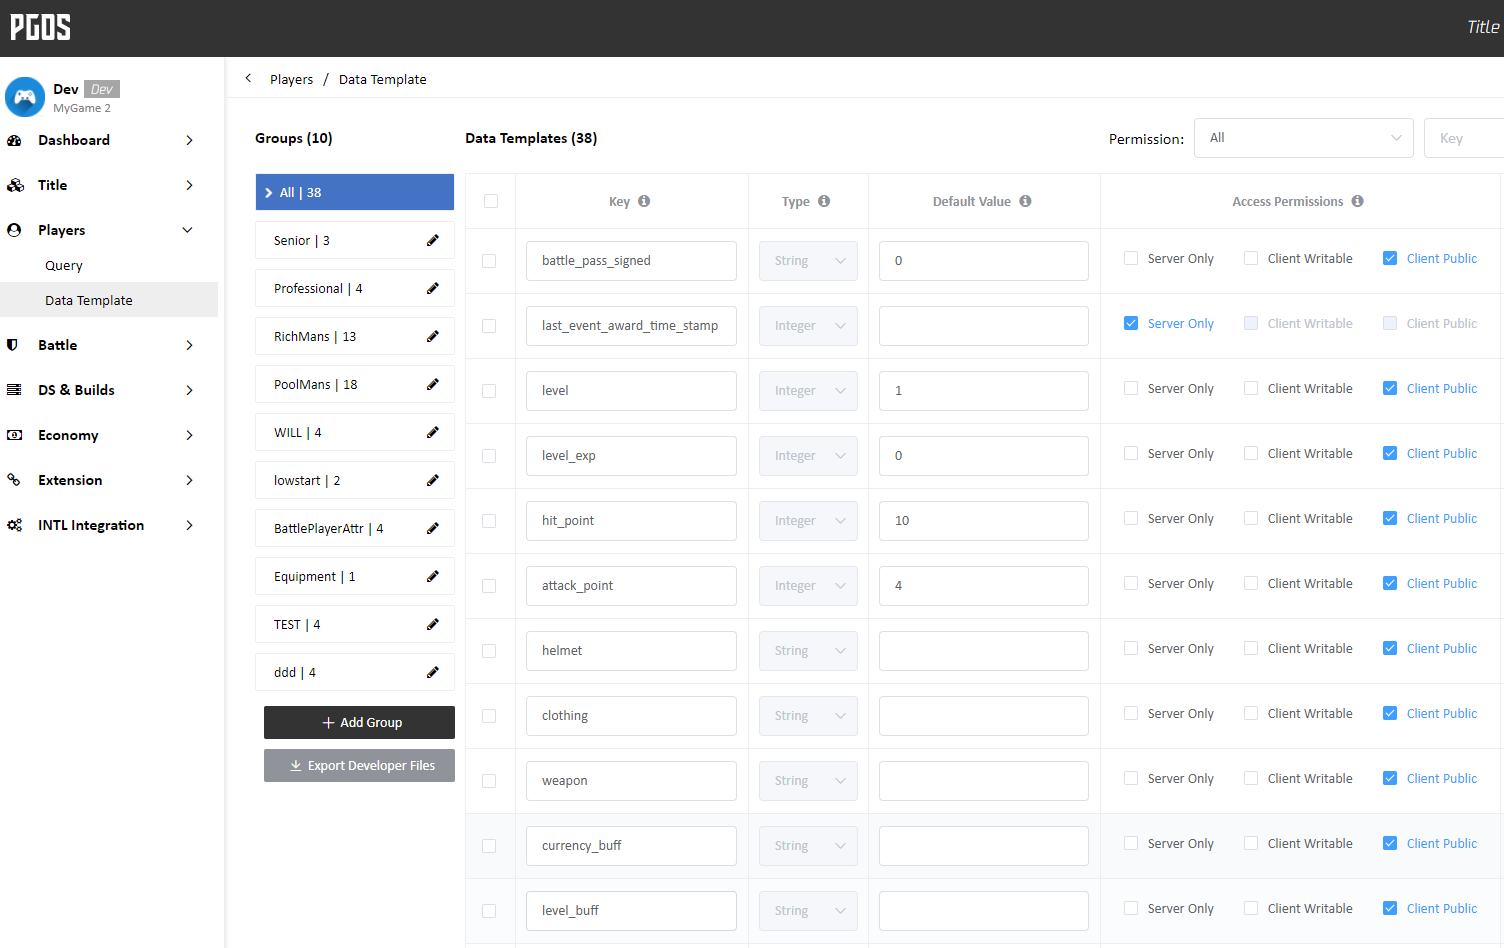
Set the data for needed for the battle season in the player data template.
- battle_pass_signed: Used to indicate whether the player has joined the season. 1 means player has joined the season. Other values mean the player has not.
- last_event_award_time_stamp: The last login timestamp for the player.
- level
- level_exp
- hit_point
- attack_point
- helmet
- clothing
- weapon
- currency_buff
- level_buff
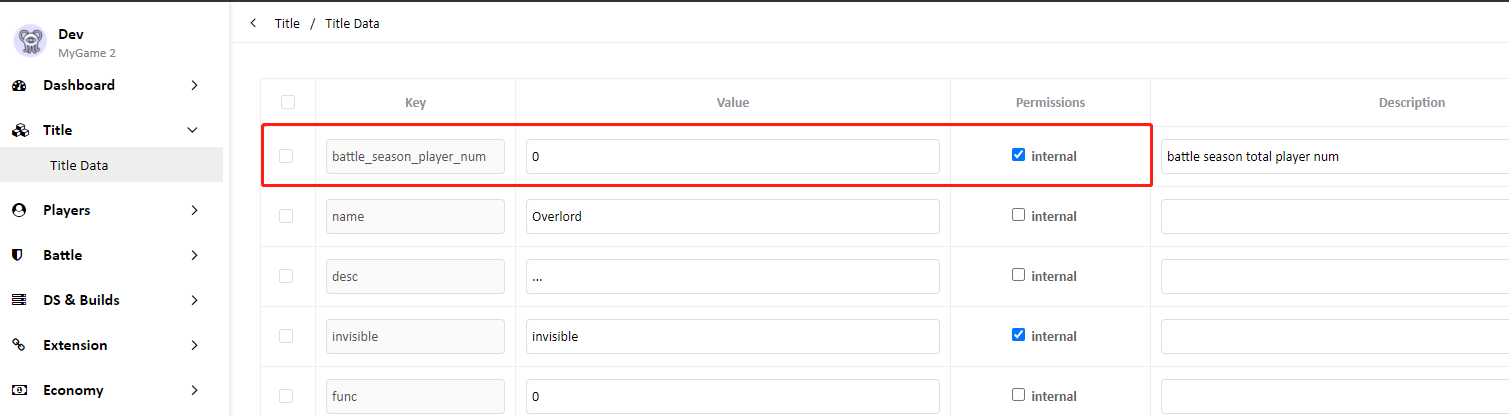
5.1 Title Region Config Data
Set the data for needed for the battle season in the title region config data.
- sign_up_battle_season_gold: The number of gold coins required to join the battle season.
- login_reward_gold: The number of gold coins to reward players who log in within the specified time frame.
- battle_season_player_num: The total number of players signed into the season.
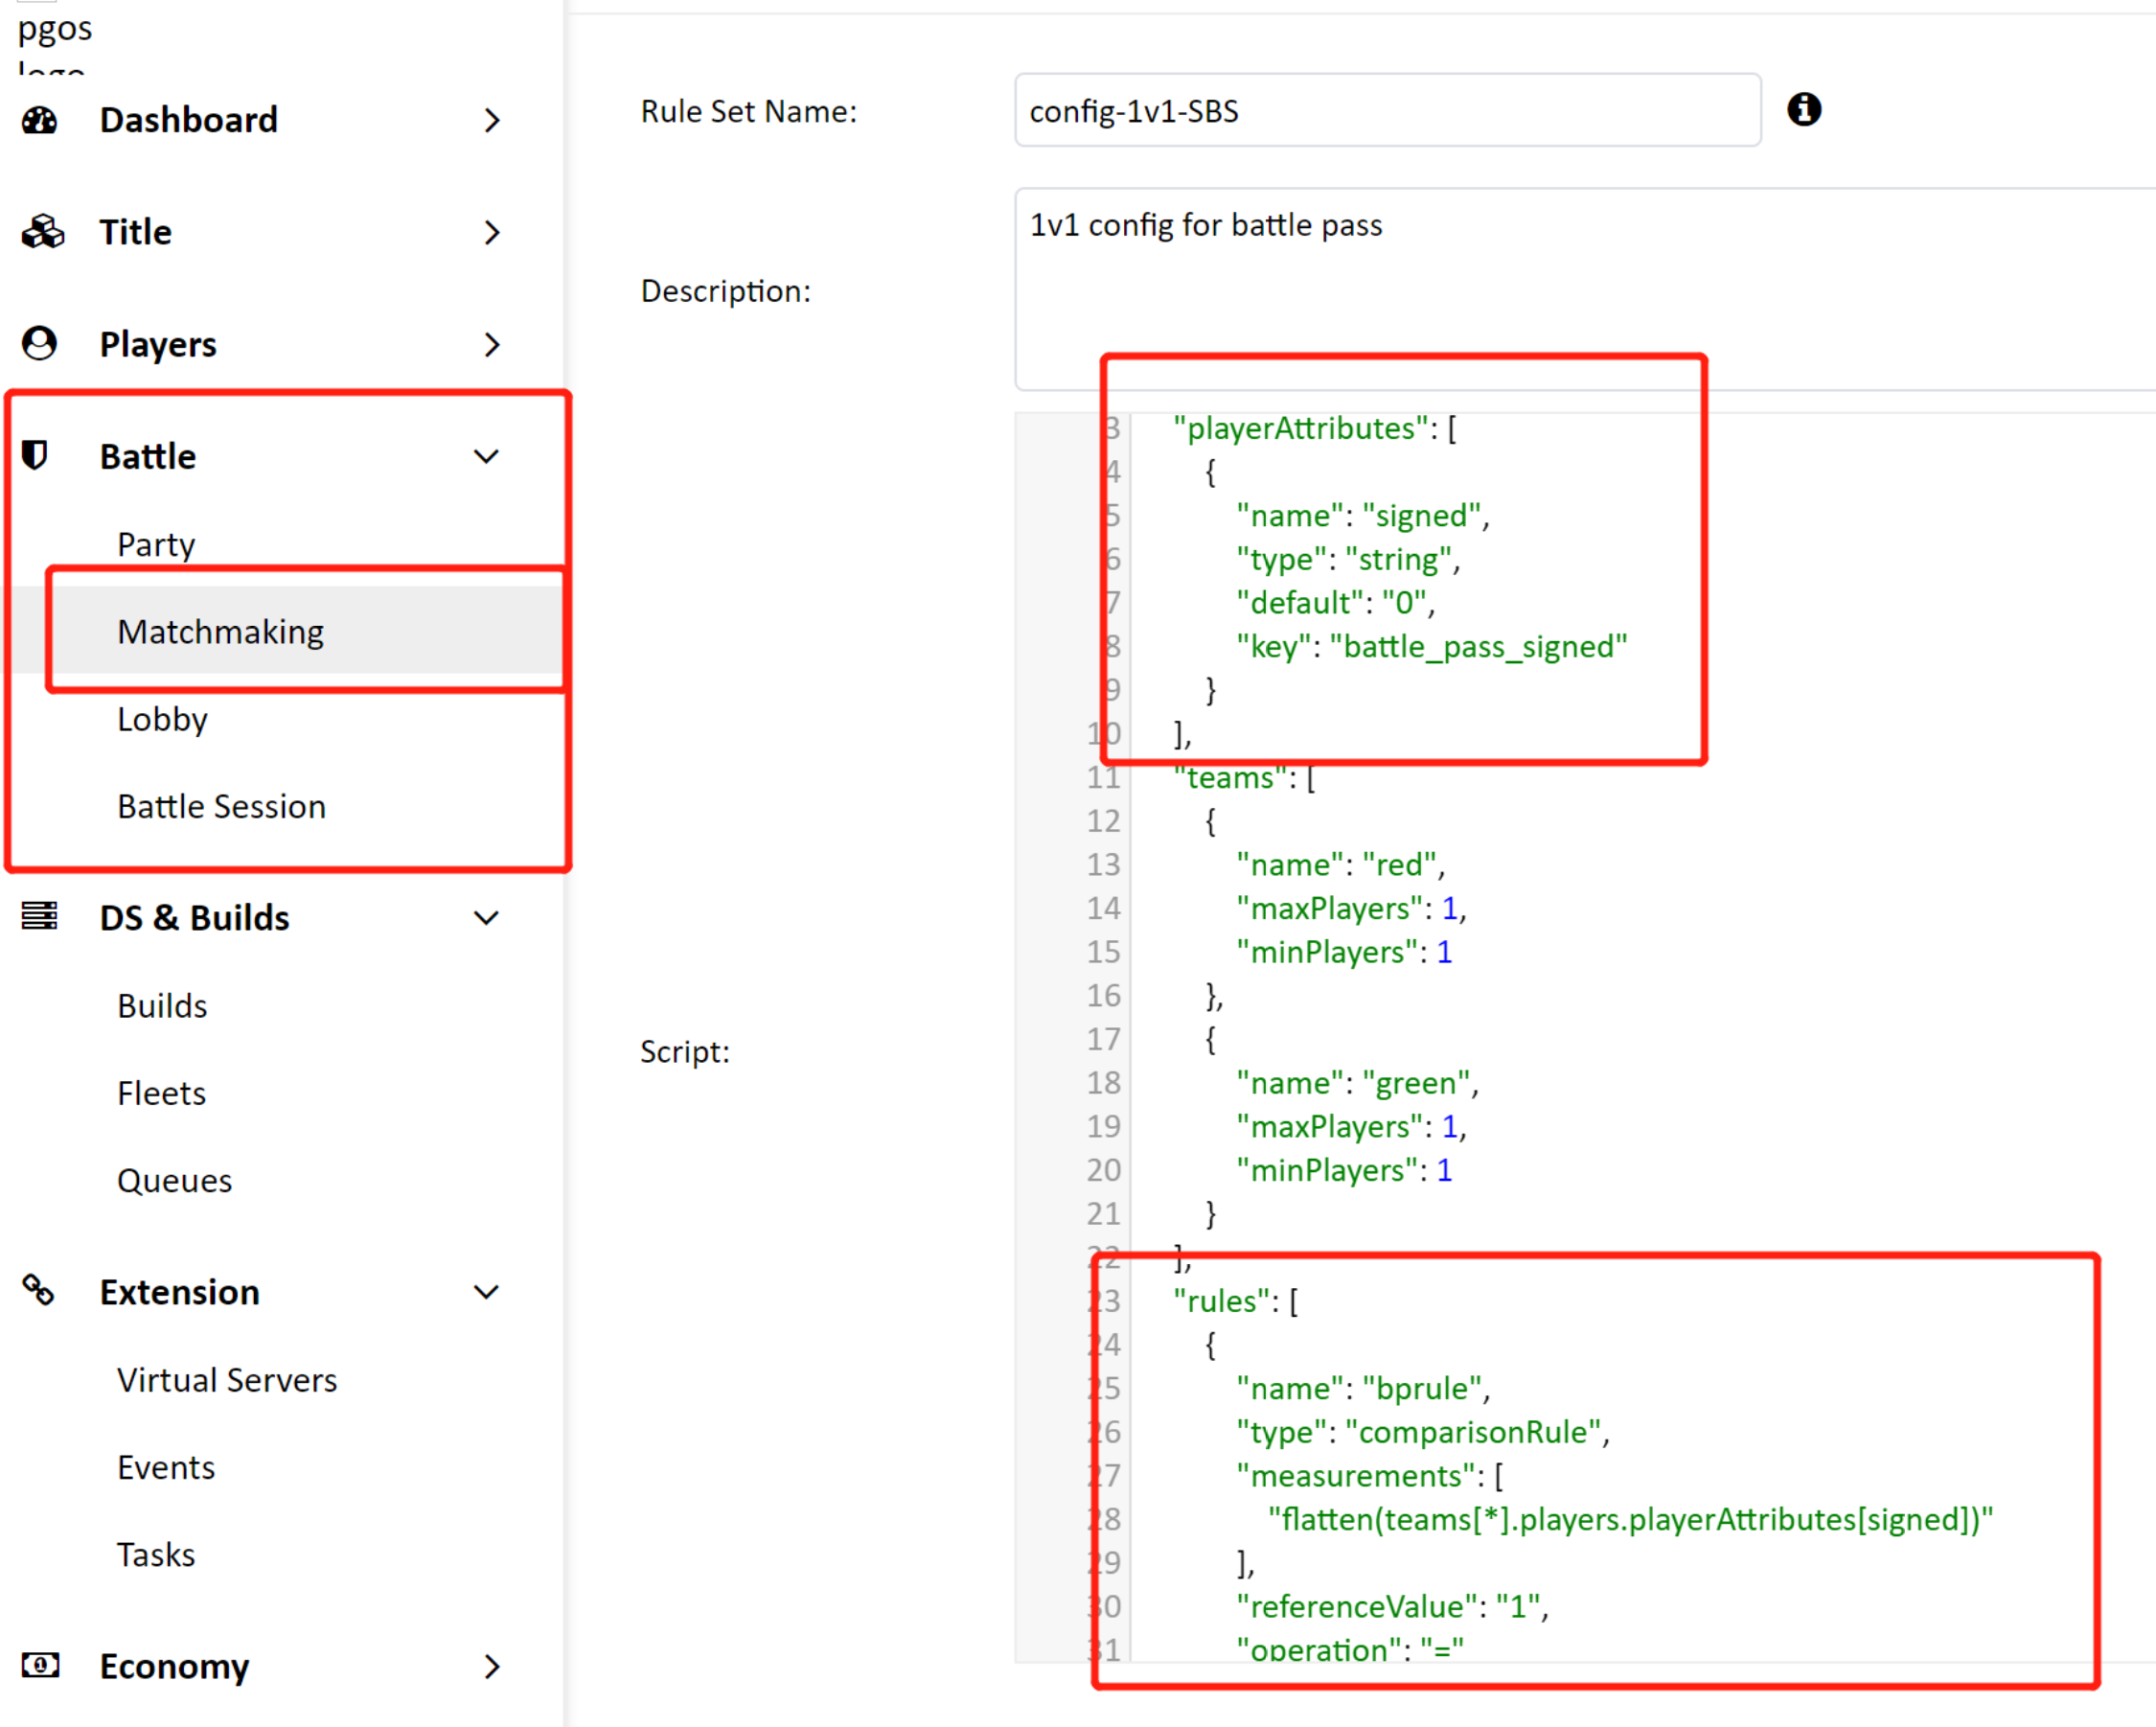
5.2 Set a Matchmaking Rule
In addition, a matchmaking rule for the battle season must be created to stipulate that only players who have joined the season can be matched in a battle. The rule filters players using the player's "battle_pass_signed" value.
5.3 Sample
How to get season information in the sample client:

Season data are saved in "Func Result", which is JSON format.
How to set the battle on the sample DS:
// PGOSBattleGameMode.cpp
UPgosServerAPIInvokeVirtualServer* Proxy = UPgosServerAPIInvokeVirtualServer::InvokeVirtualServer(
            CurrentBattleSession.battle_session_id,
            TEXT("sample_battle_report_process"),
            TEXT("battle_report_process"),
            json_args);
Proxy->OnSuccess.AddDynamic(this, &APGOSBattleGameMode::OnInvokeVirtualServerCallback);
Proxy->OnFailure.AddDynamic(this, &APGOSBattleGameMode::OnInvokeVirtualServerCallback);
Proxy->Activate();
6. Economy
6.1 Balances
6.1.1 Add Currency
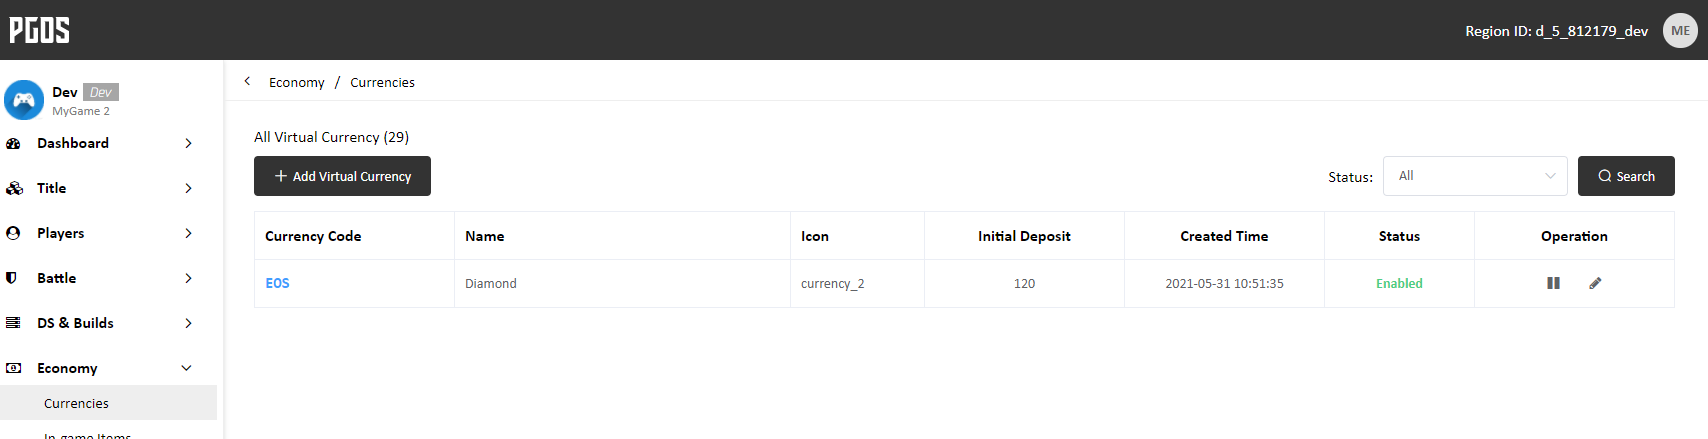
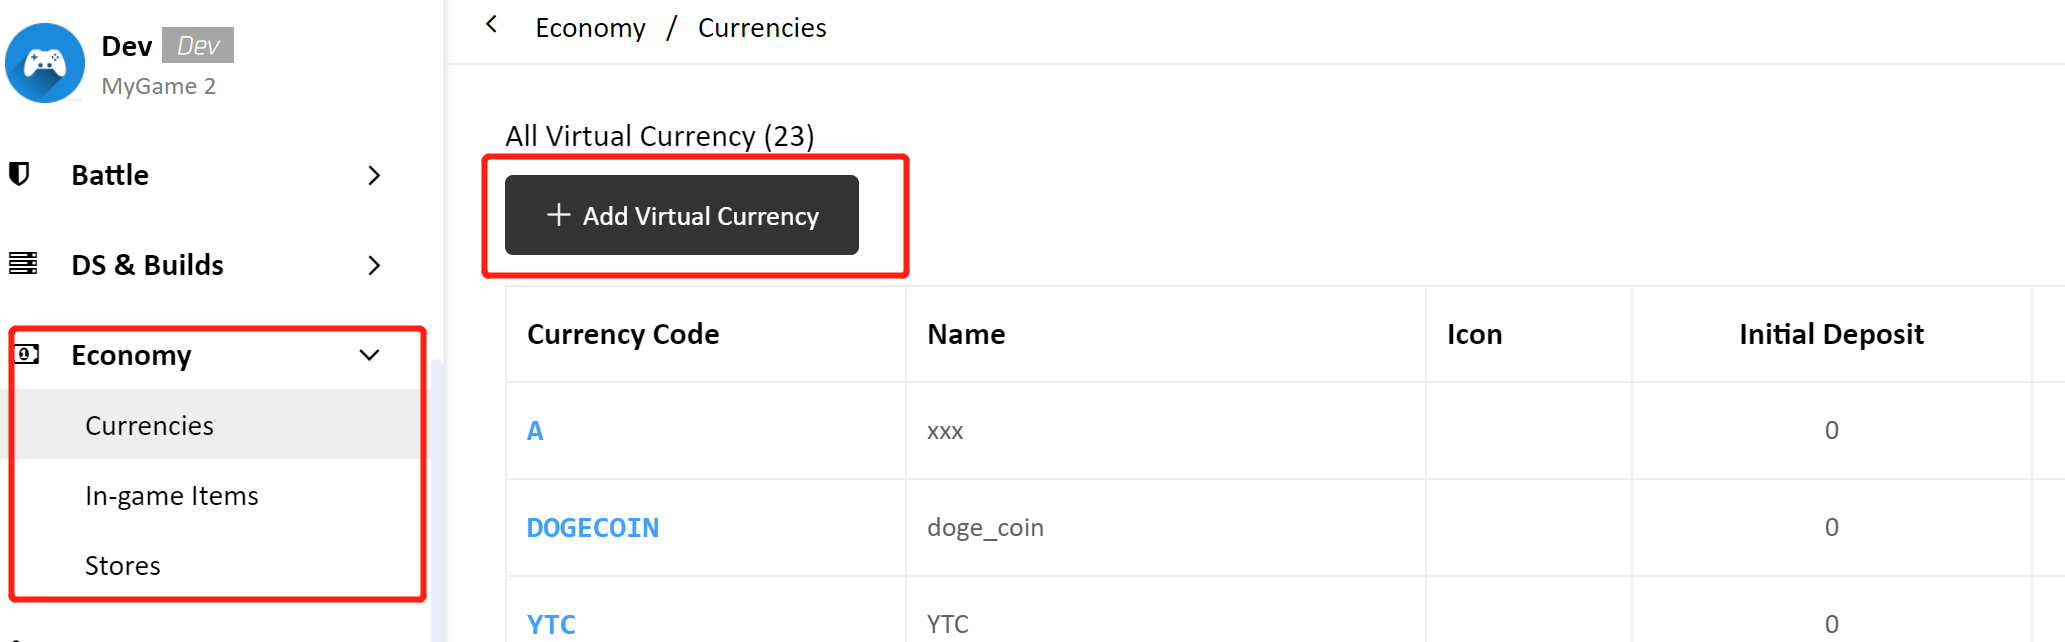
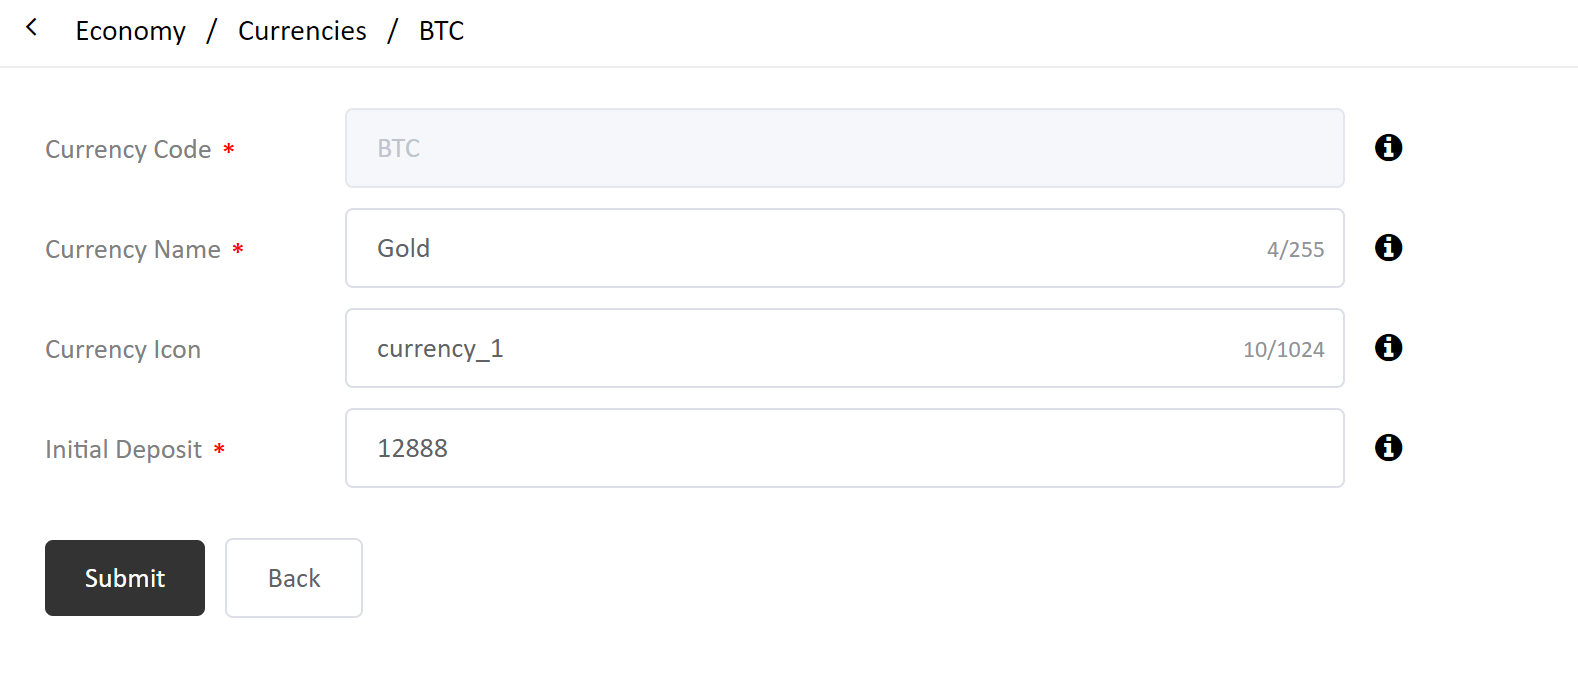
On the Portal, go to Economy -> Currencies and click "Add Virtual Currency" to create a currency.
Here, Currency Icon indicates the path of the in-game currency icon resource. An example is the GetCurrencyIcon display in the Sample's Content/PGOS/Util path.
Blueprint'/Game/PGOS/Util/Utils.Utils'
6.1.2 Display Currency
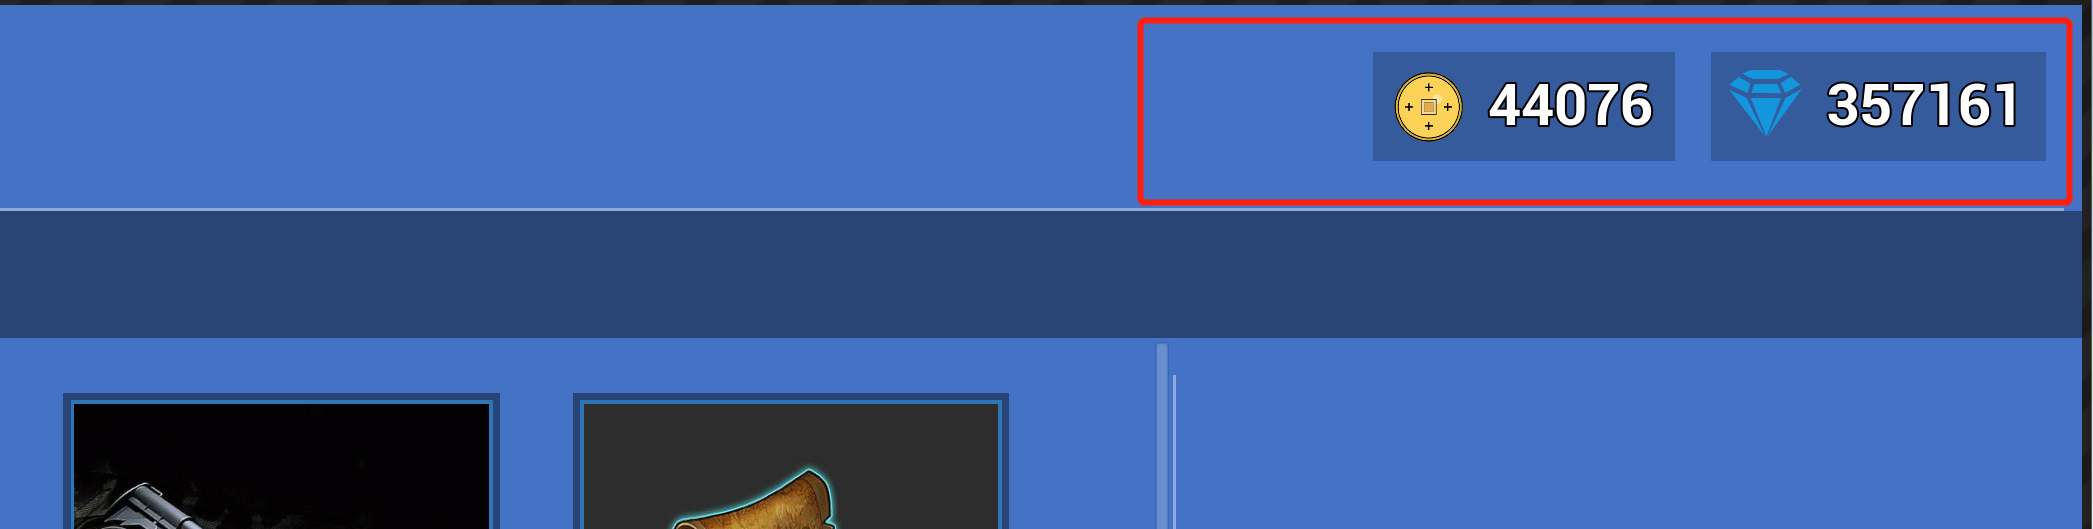
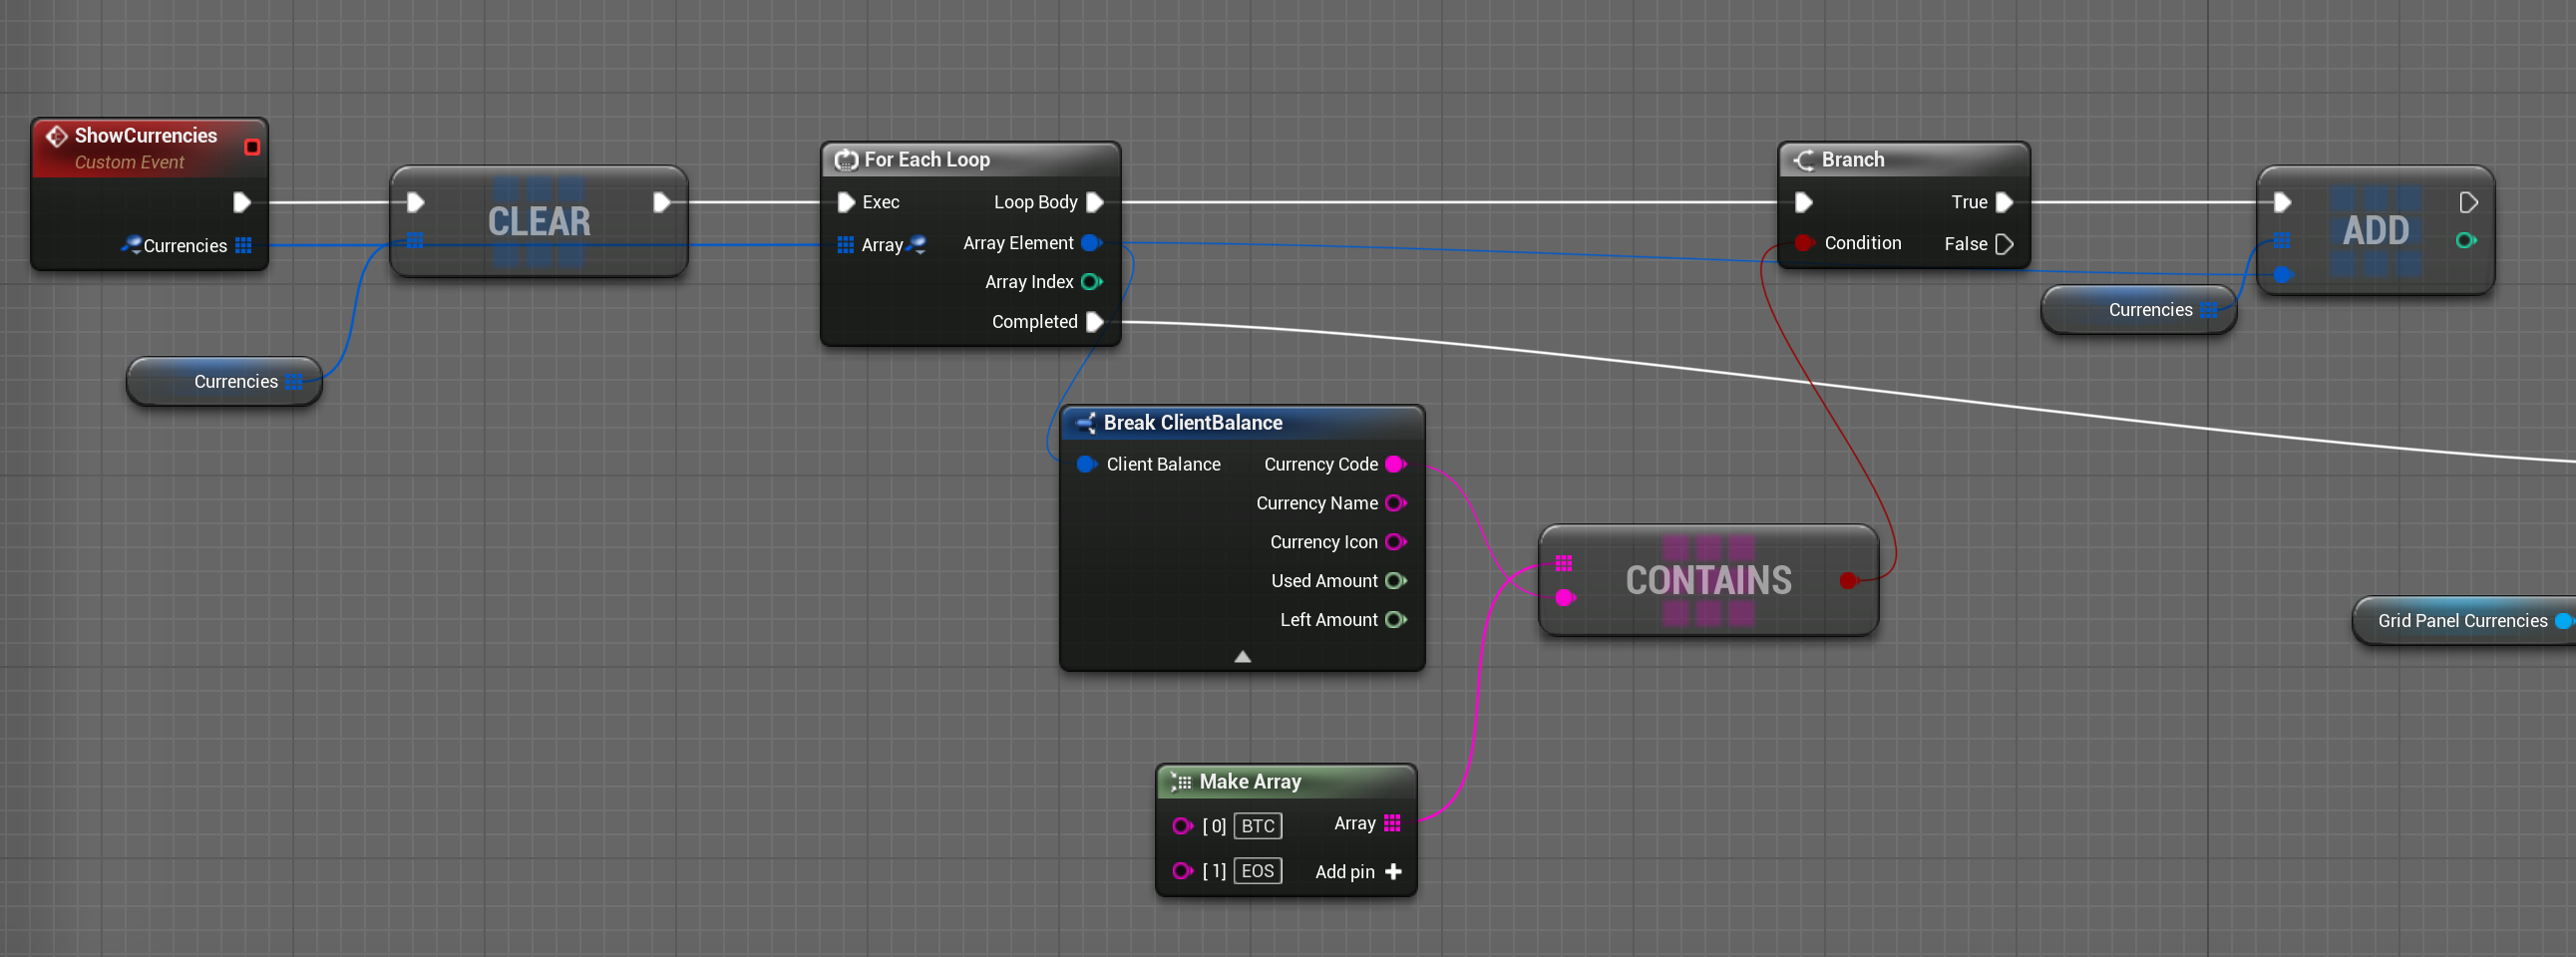
After creating a currency, the Sample will acquire Player Balances and filters the currencies to use by Currency Code. The valid currencies are shown in the upper-right of the Store and Inventory pages.
Display and filter Currency's blueprint code location:
WidgetBlueprint'/Game/PGOS/UI/Economy/BaseEconomyUI.BaseEconomyUI'
6.2 Store
6.2.1 Create InGameItem
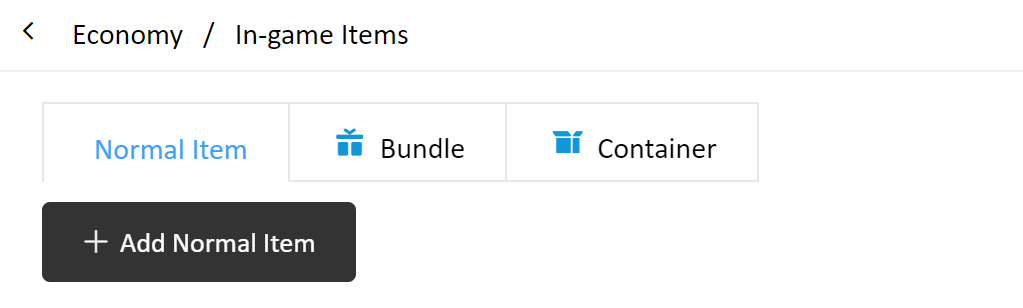
On the Portal, go to Economy -> In-game Items and click "Add Normal Item" to create scrolls and gear for this Sample. Then, go to the Bundle and Container tabs to create containers and bundles.
An example of InGameItem creation is provided below:
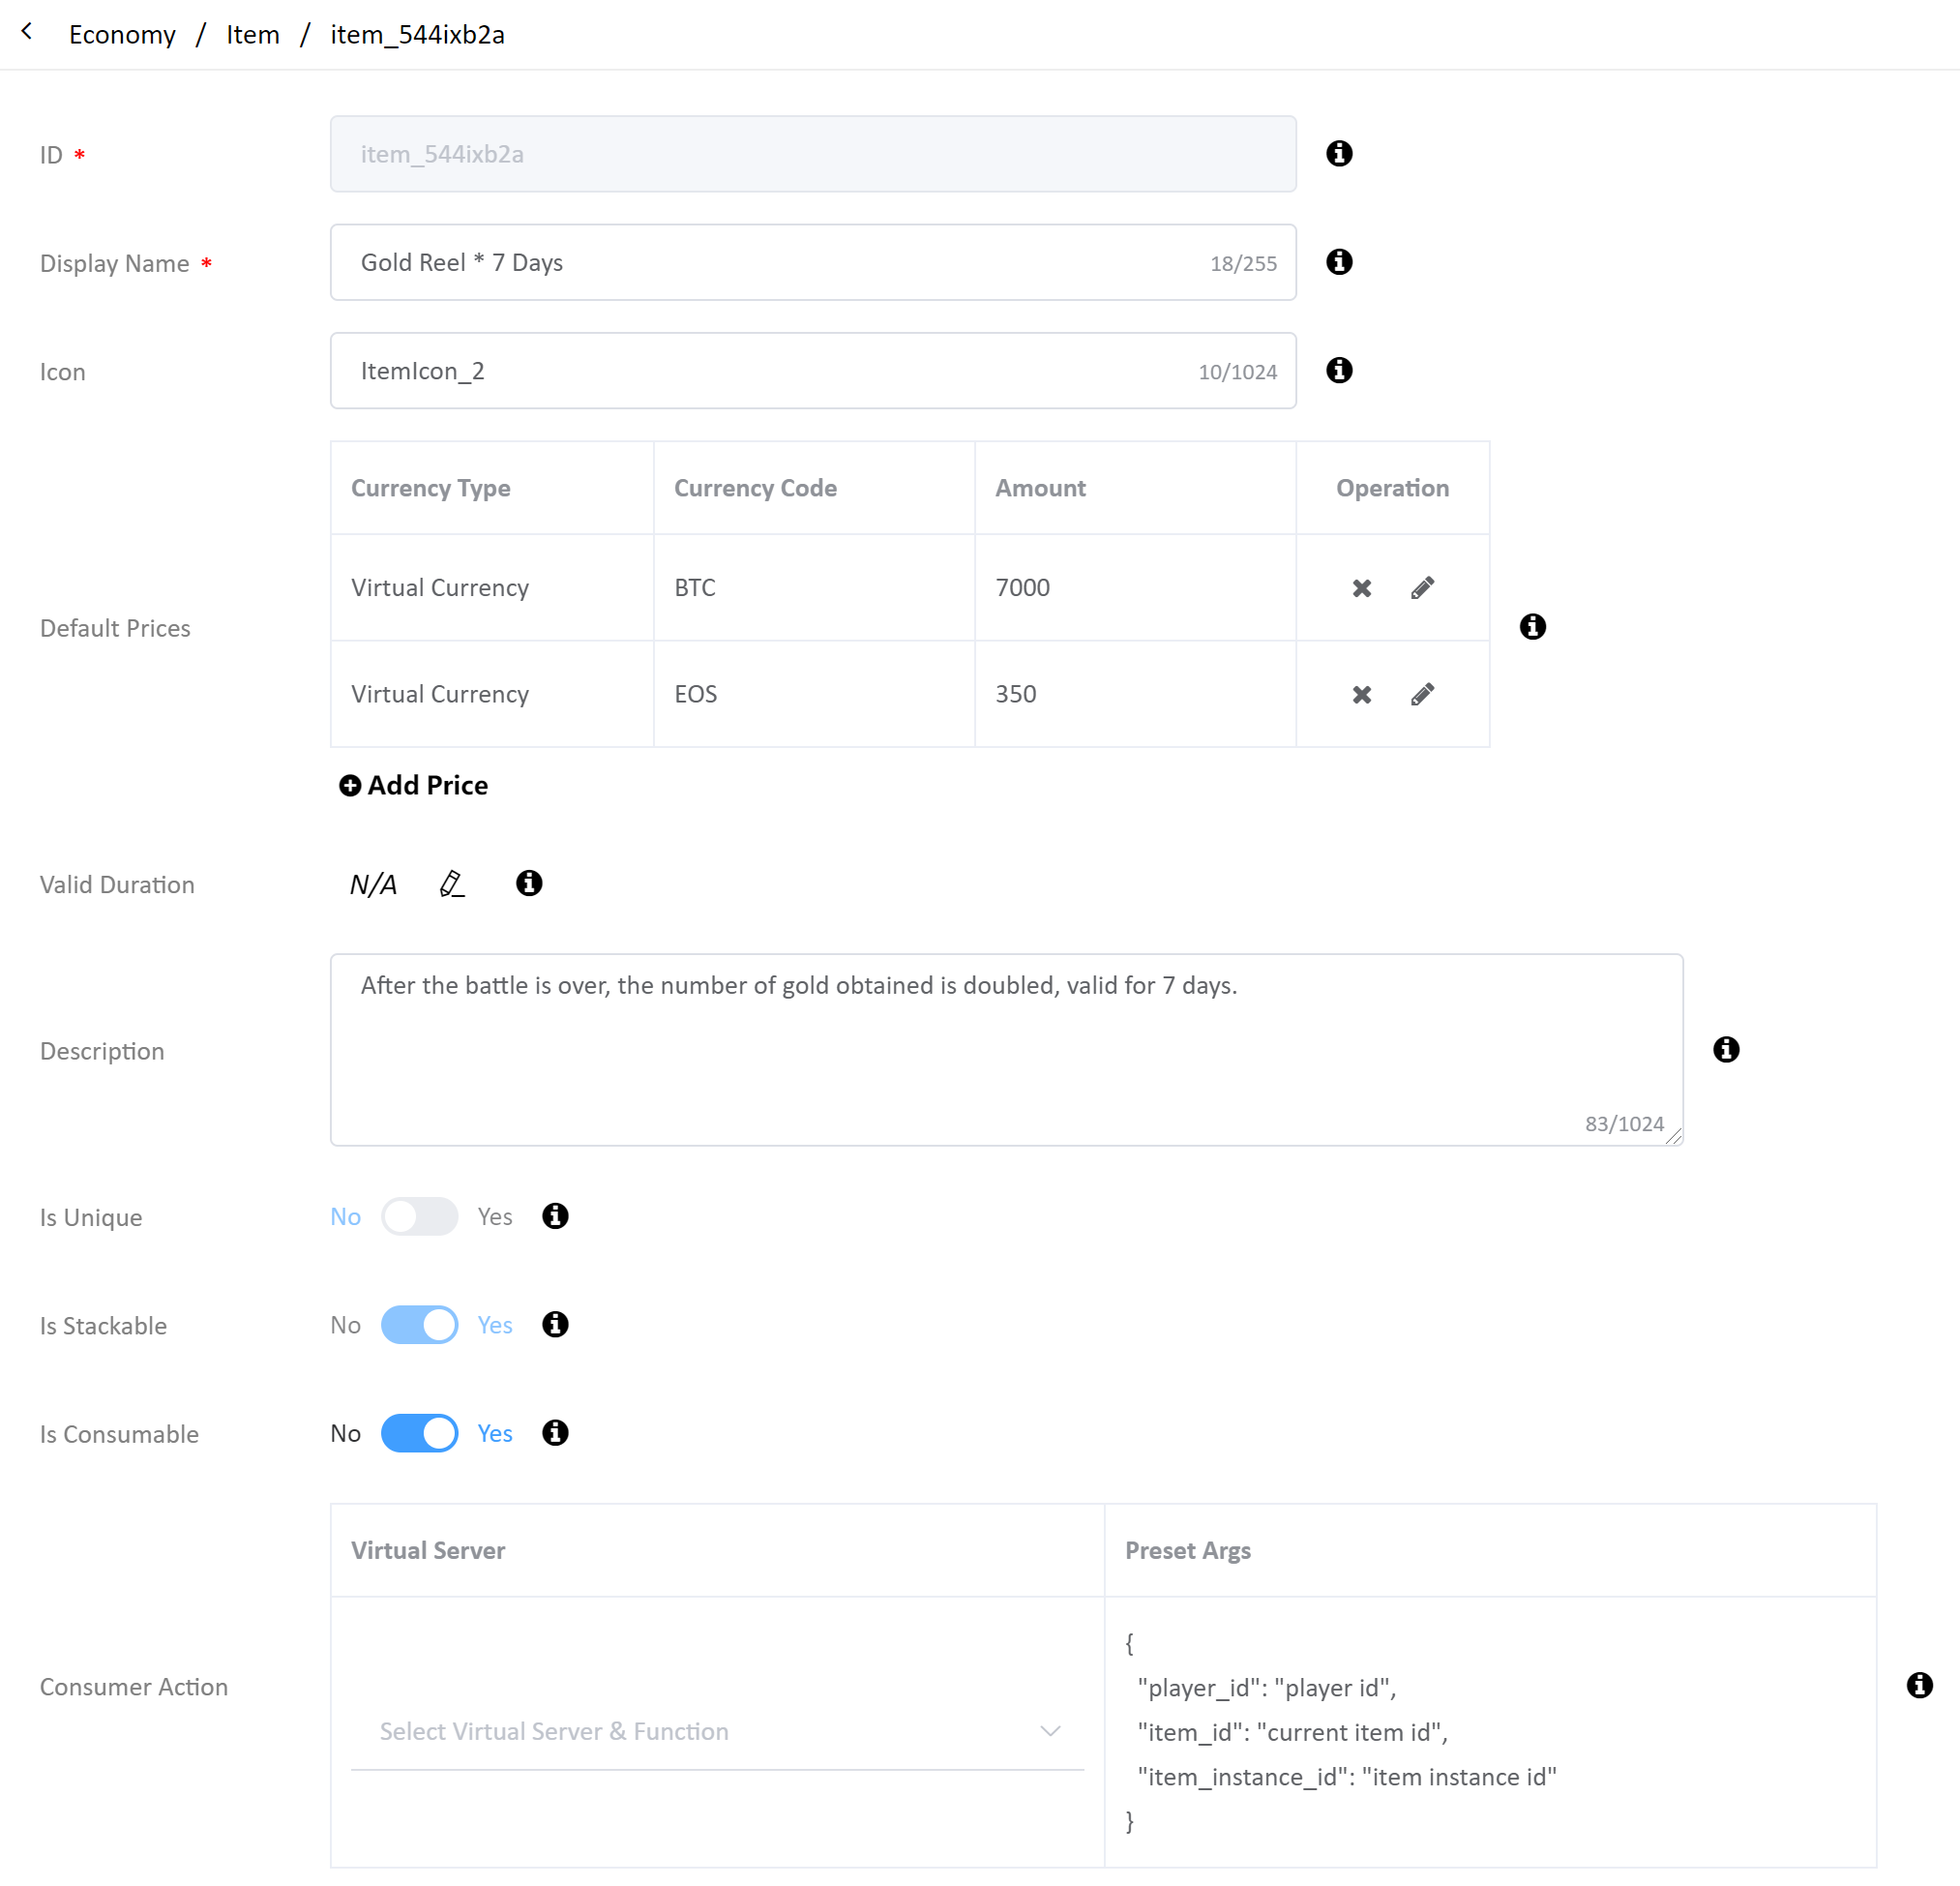
Pay special attention to the following fields:
- Default Prices: Set the default price of the item.
- Valid Duration: The validity time of the item instance after it is placed in the player inventory.
- Consumer Action: Set the virtual server function to call when a player consumes this item instance.
6.2.2 Create Container/Bundle
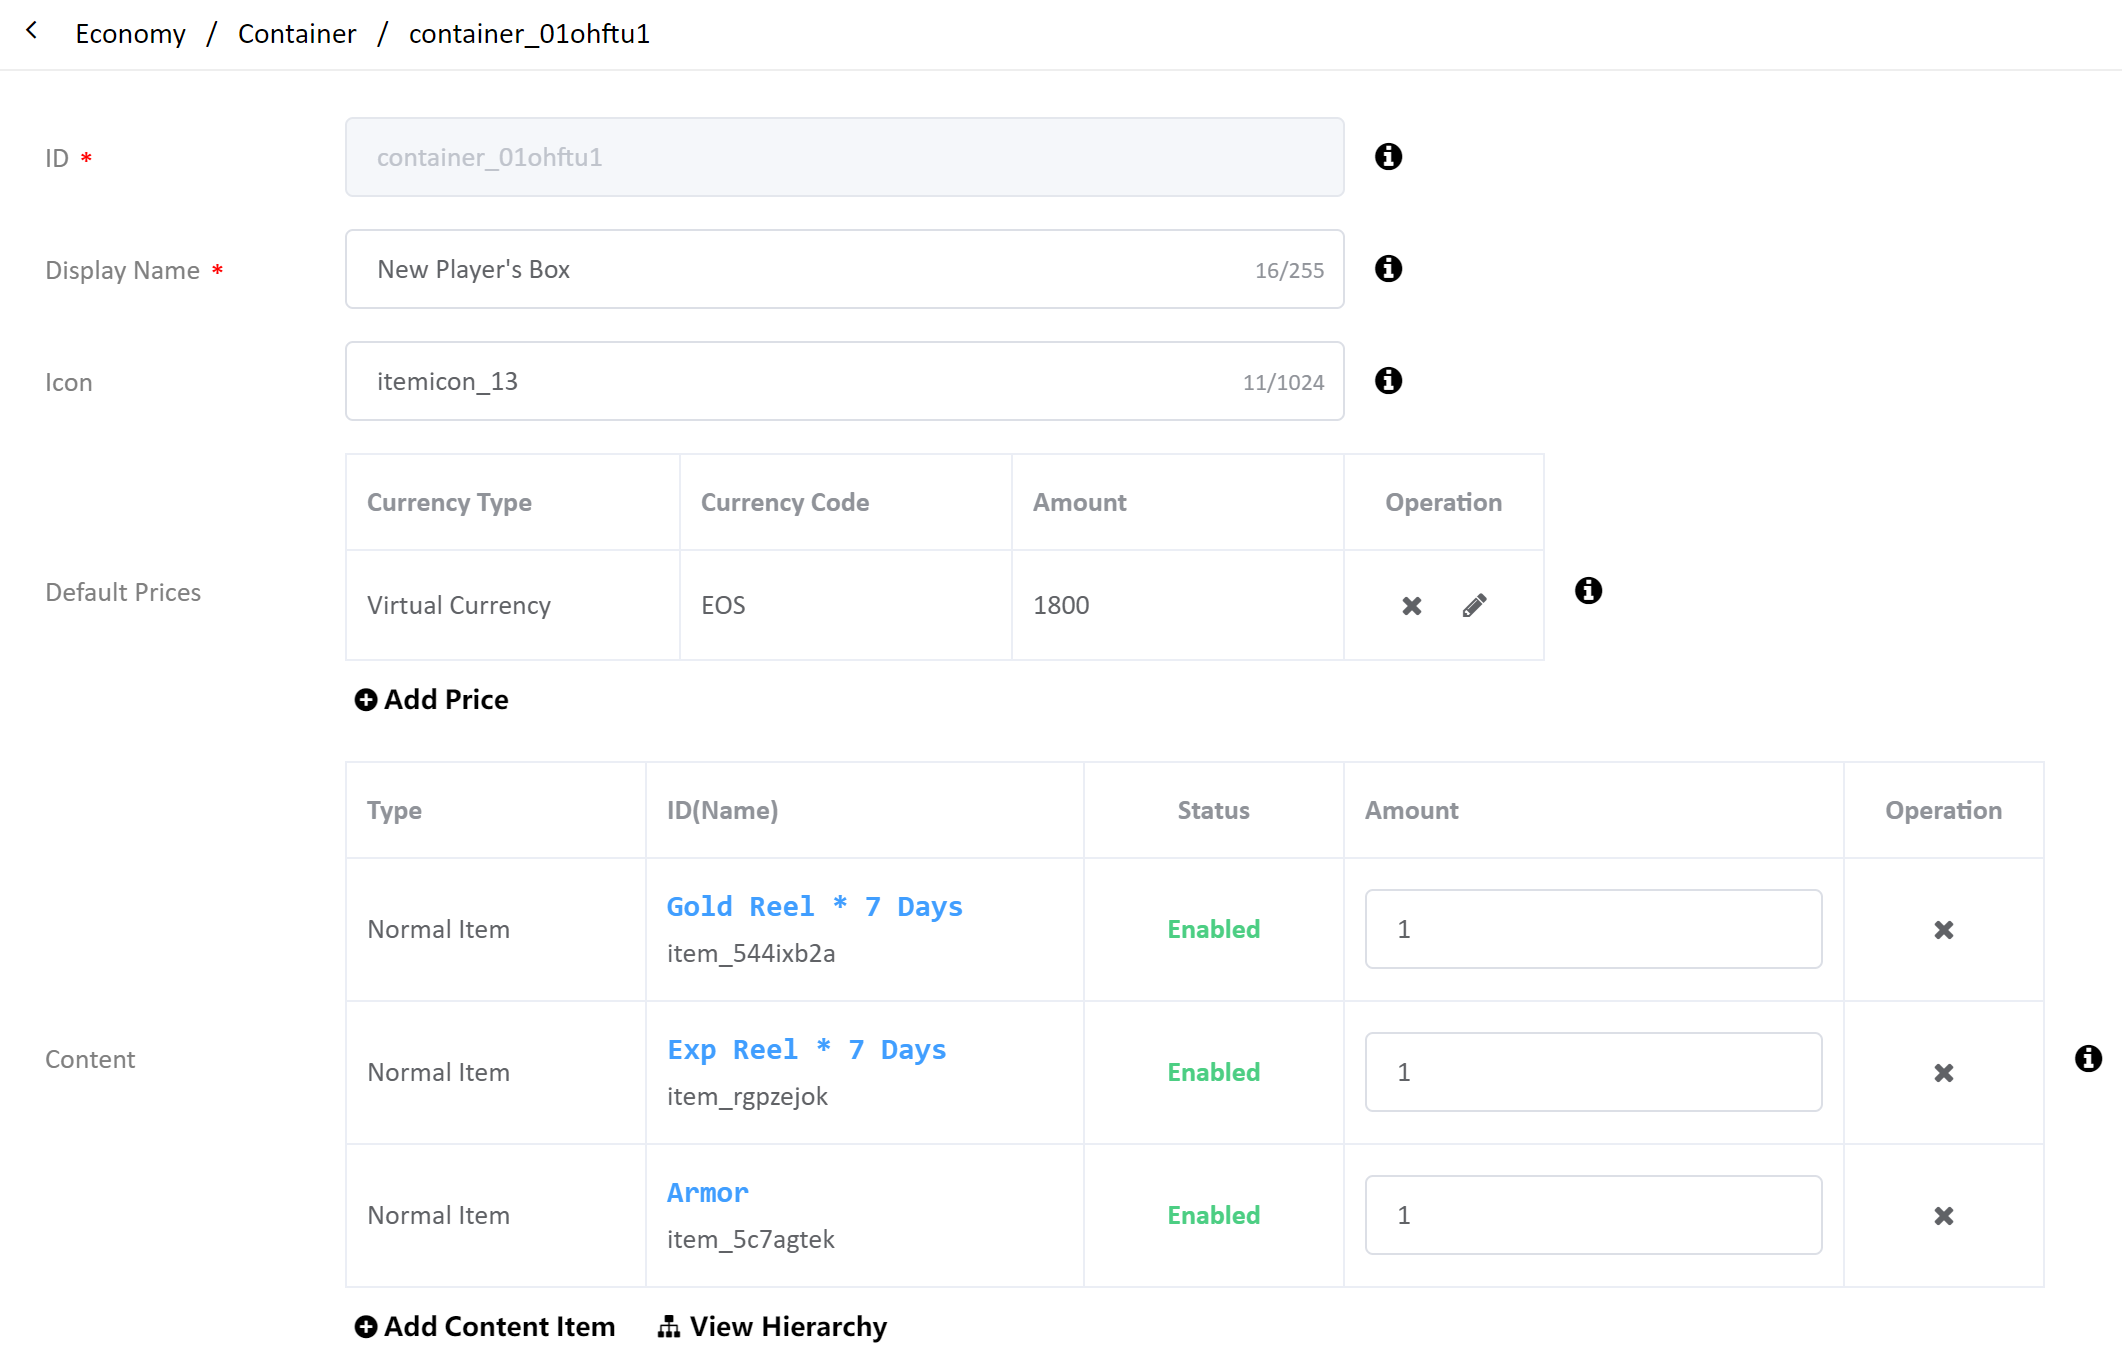
Pay special attention to the following fields:
- Content: Set the content of the Container/Bundle by adding previously defined InGameItems and setting their quantities.
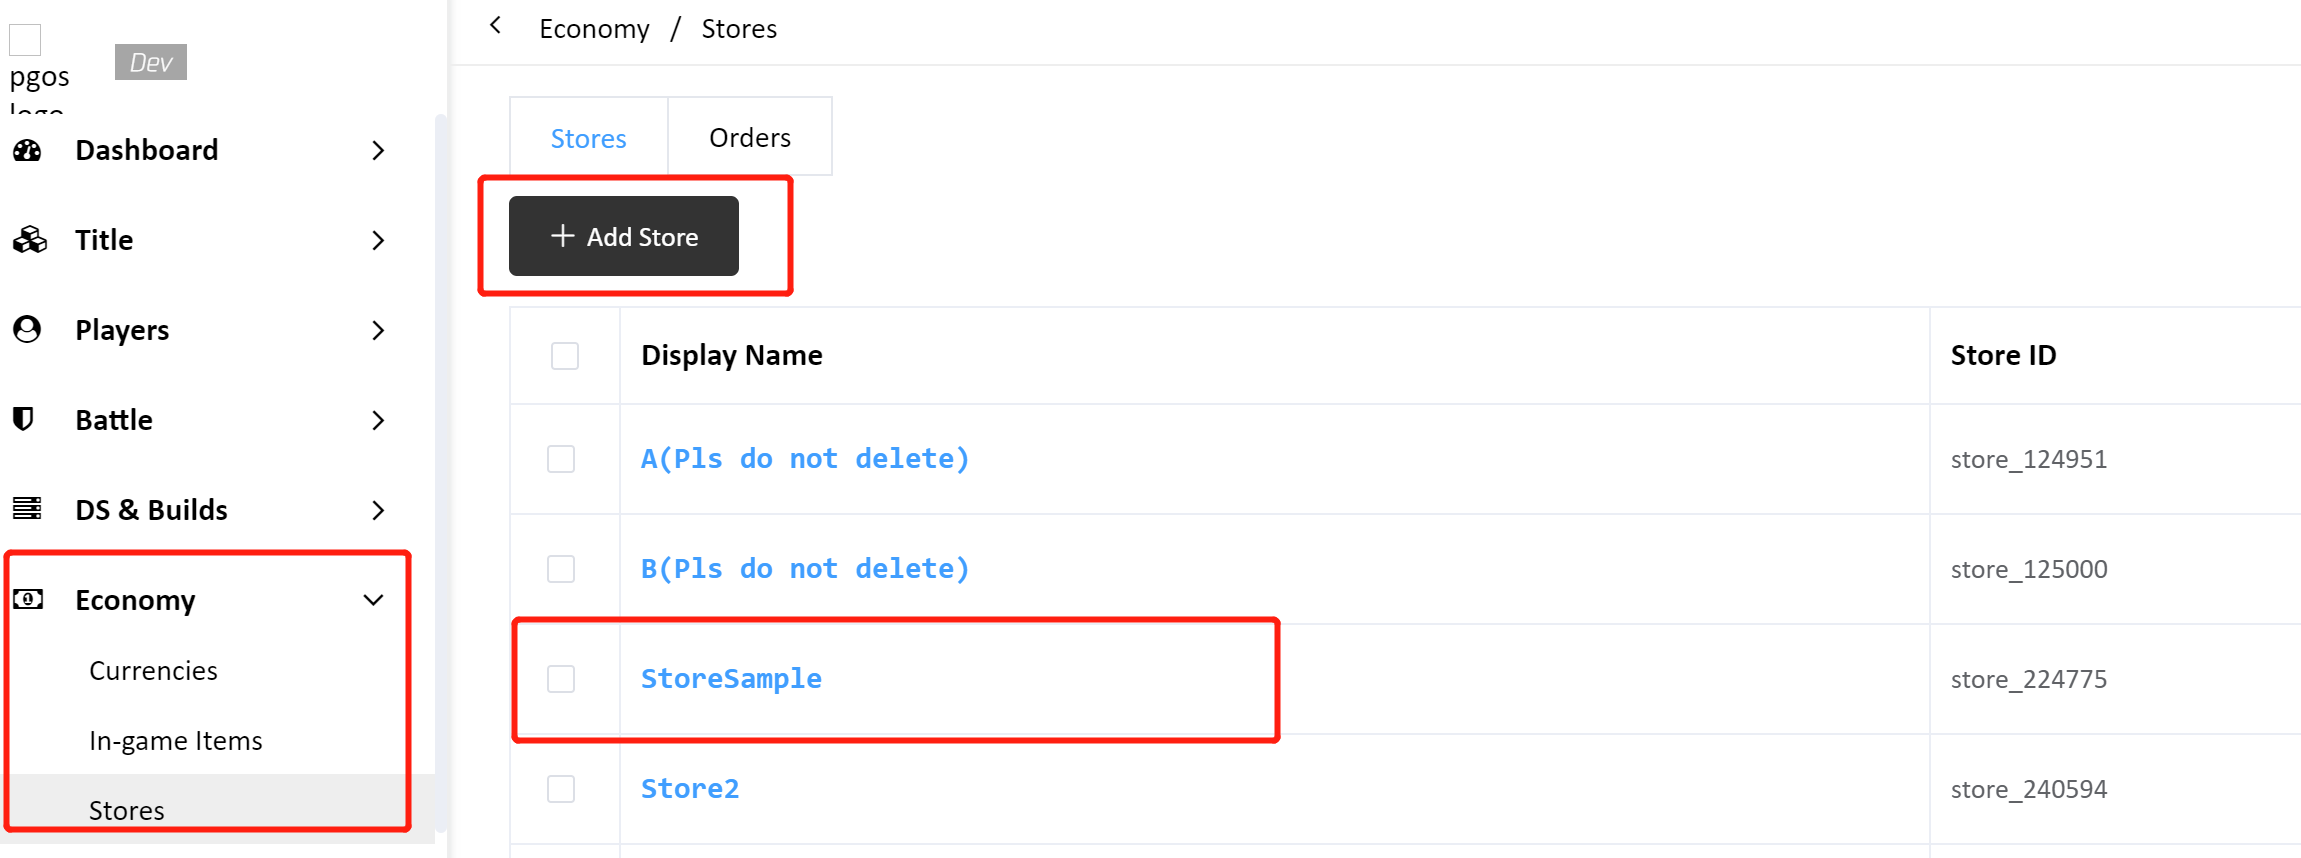
6.2.3 Add Store
On the Portal, go to the Economy -> Stores page.Click "Add Store" to add a store and get the Store ID. Use the Store ID in the game to call the GetStore API of the PGOS SDK Client and obtain the store information.
6.2.4 Add Item
Click an added store in the store list to go to the store details page.
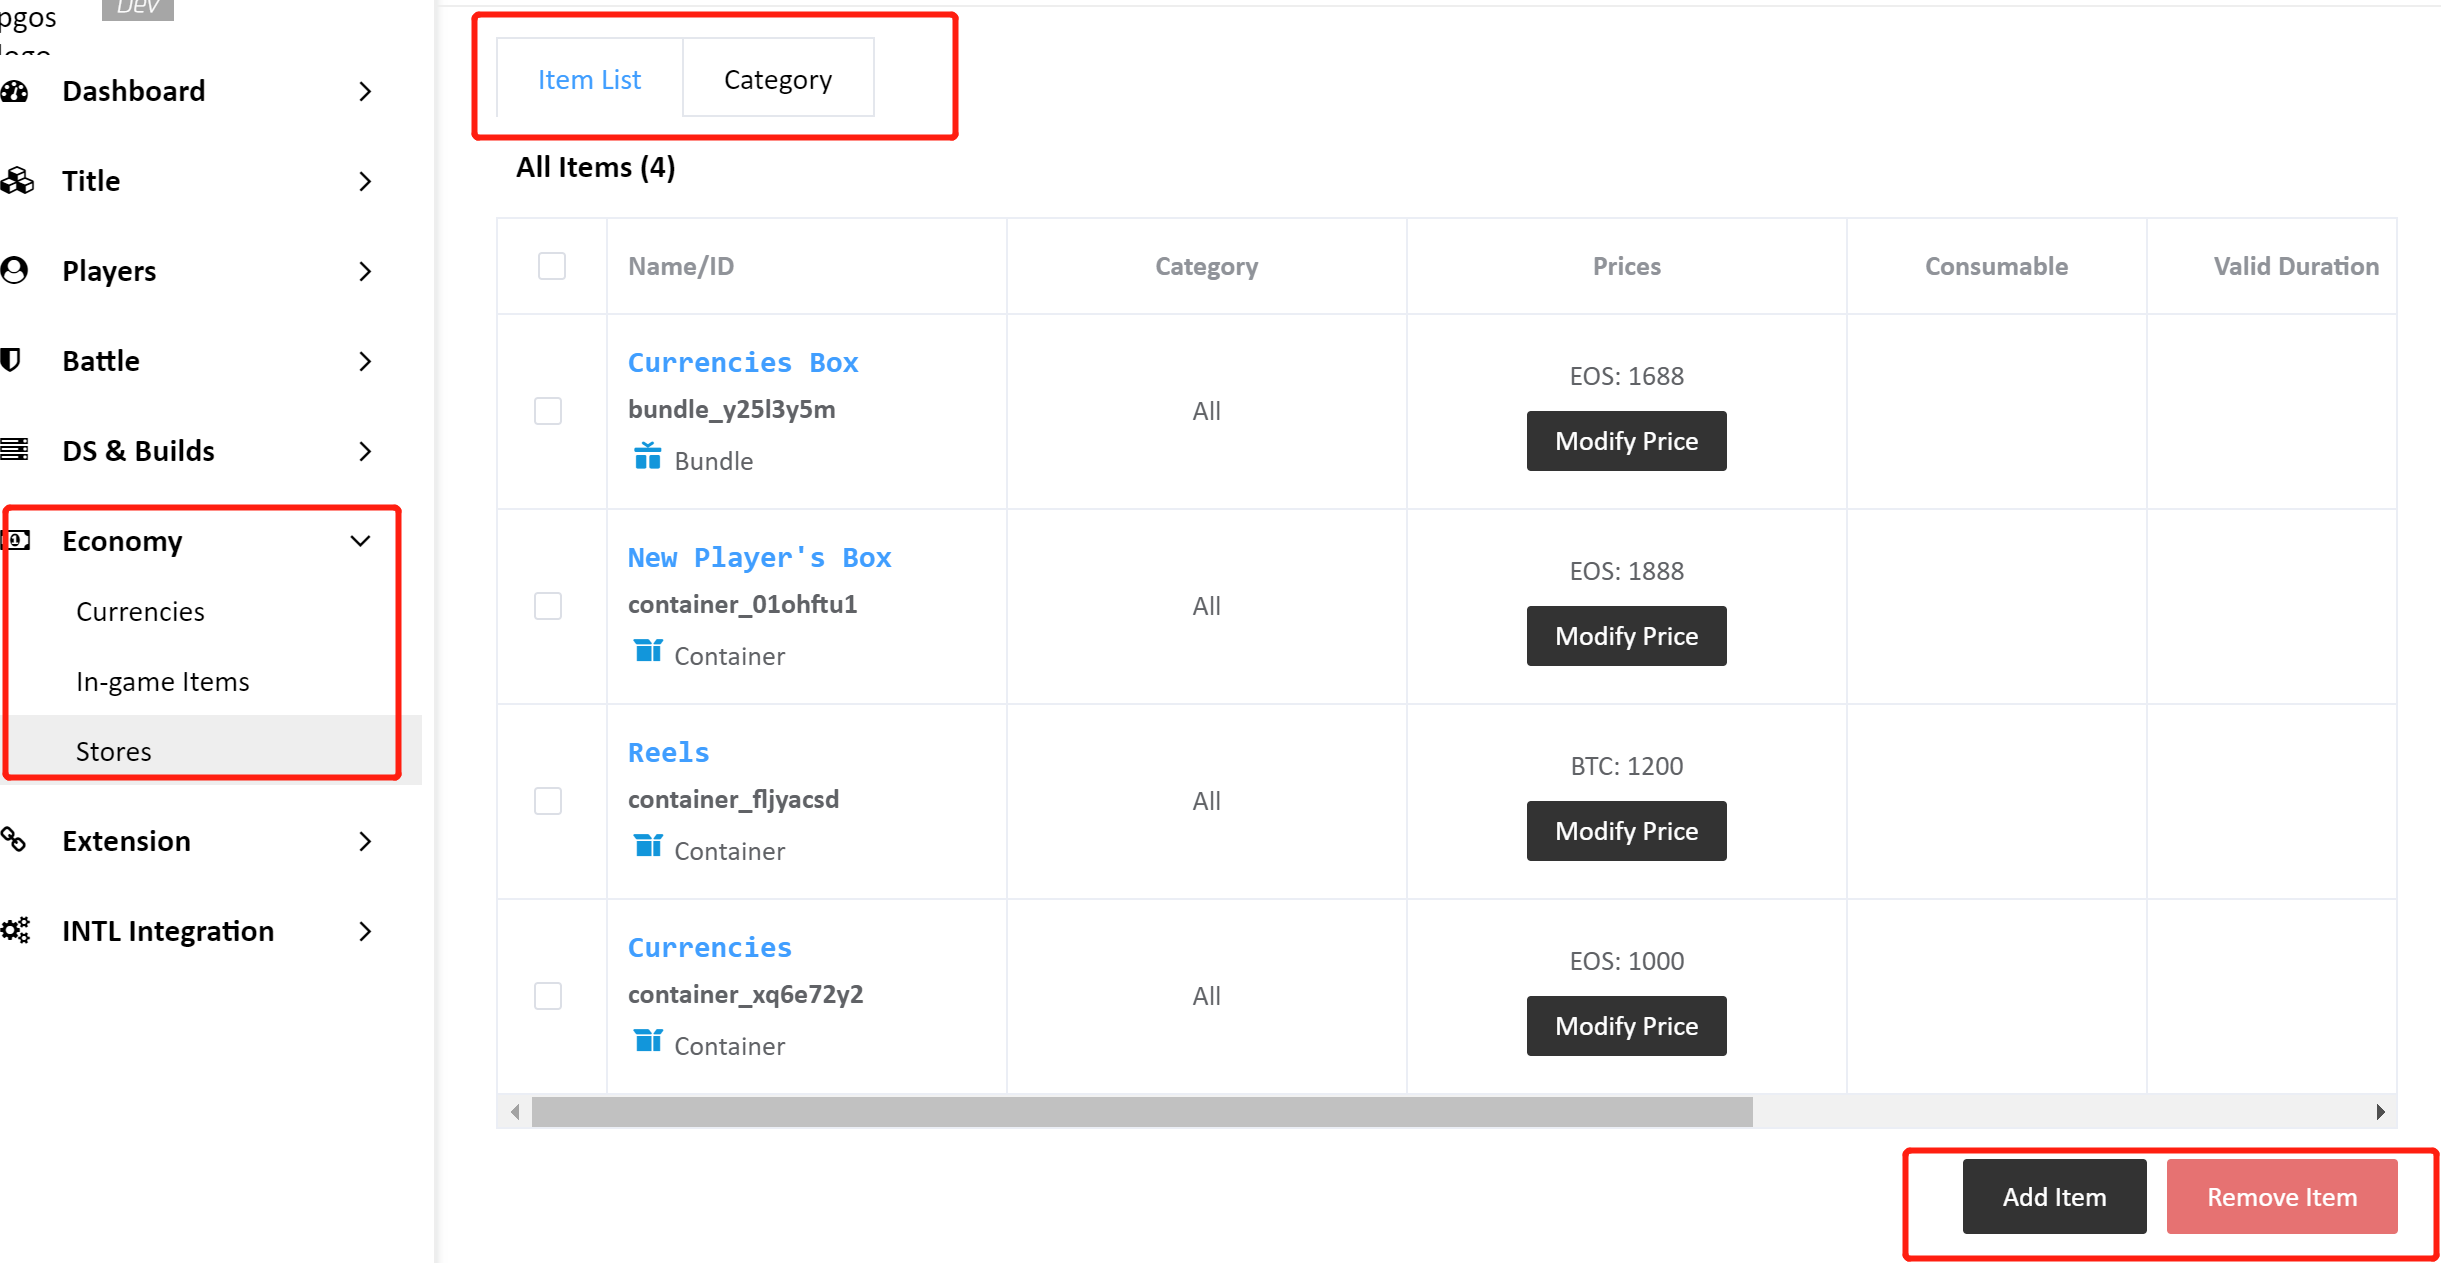
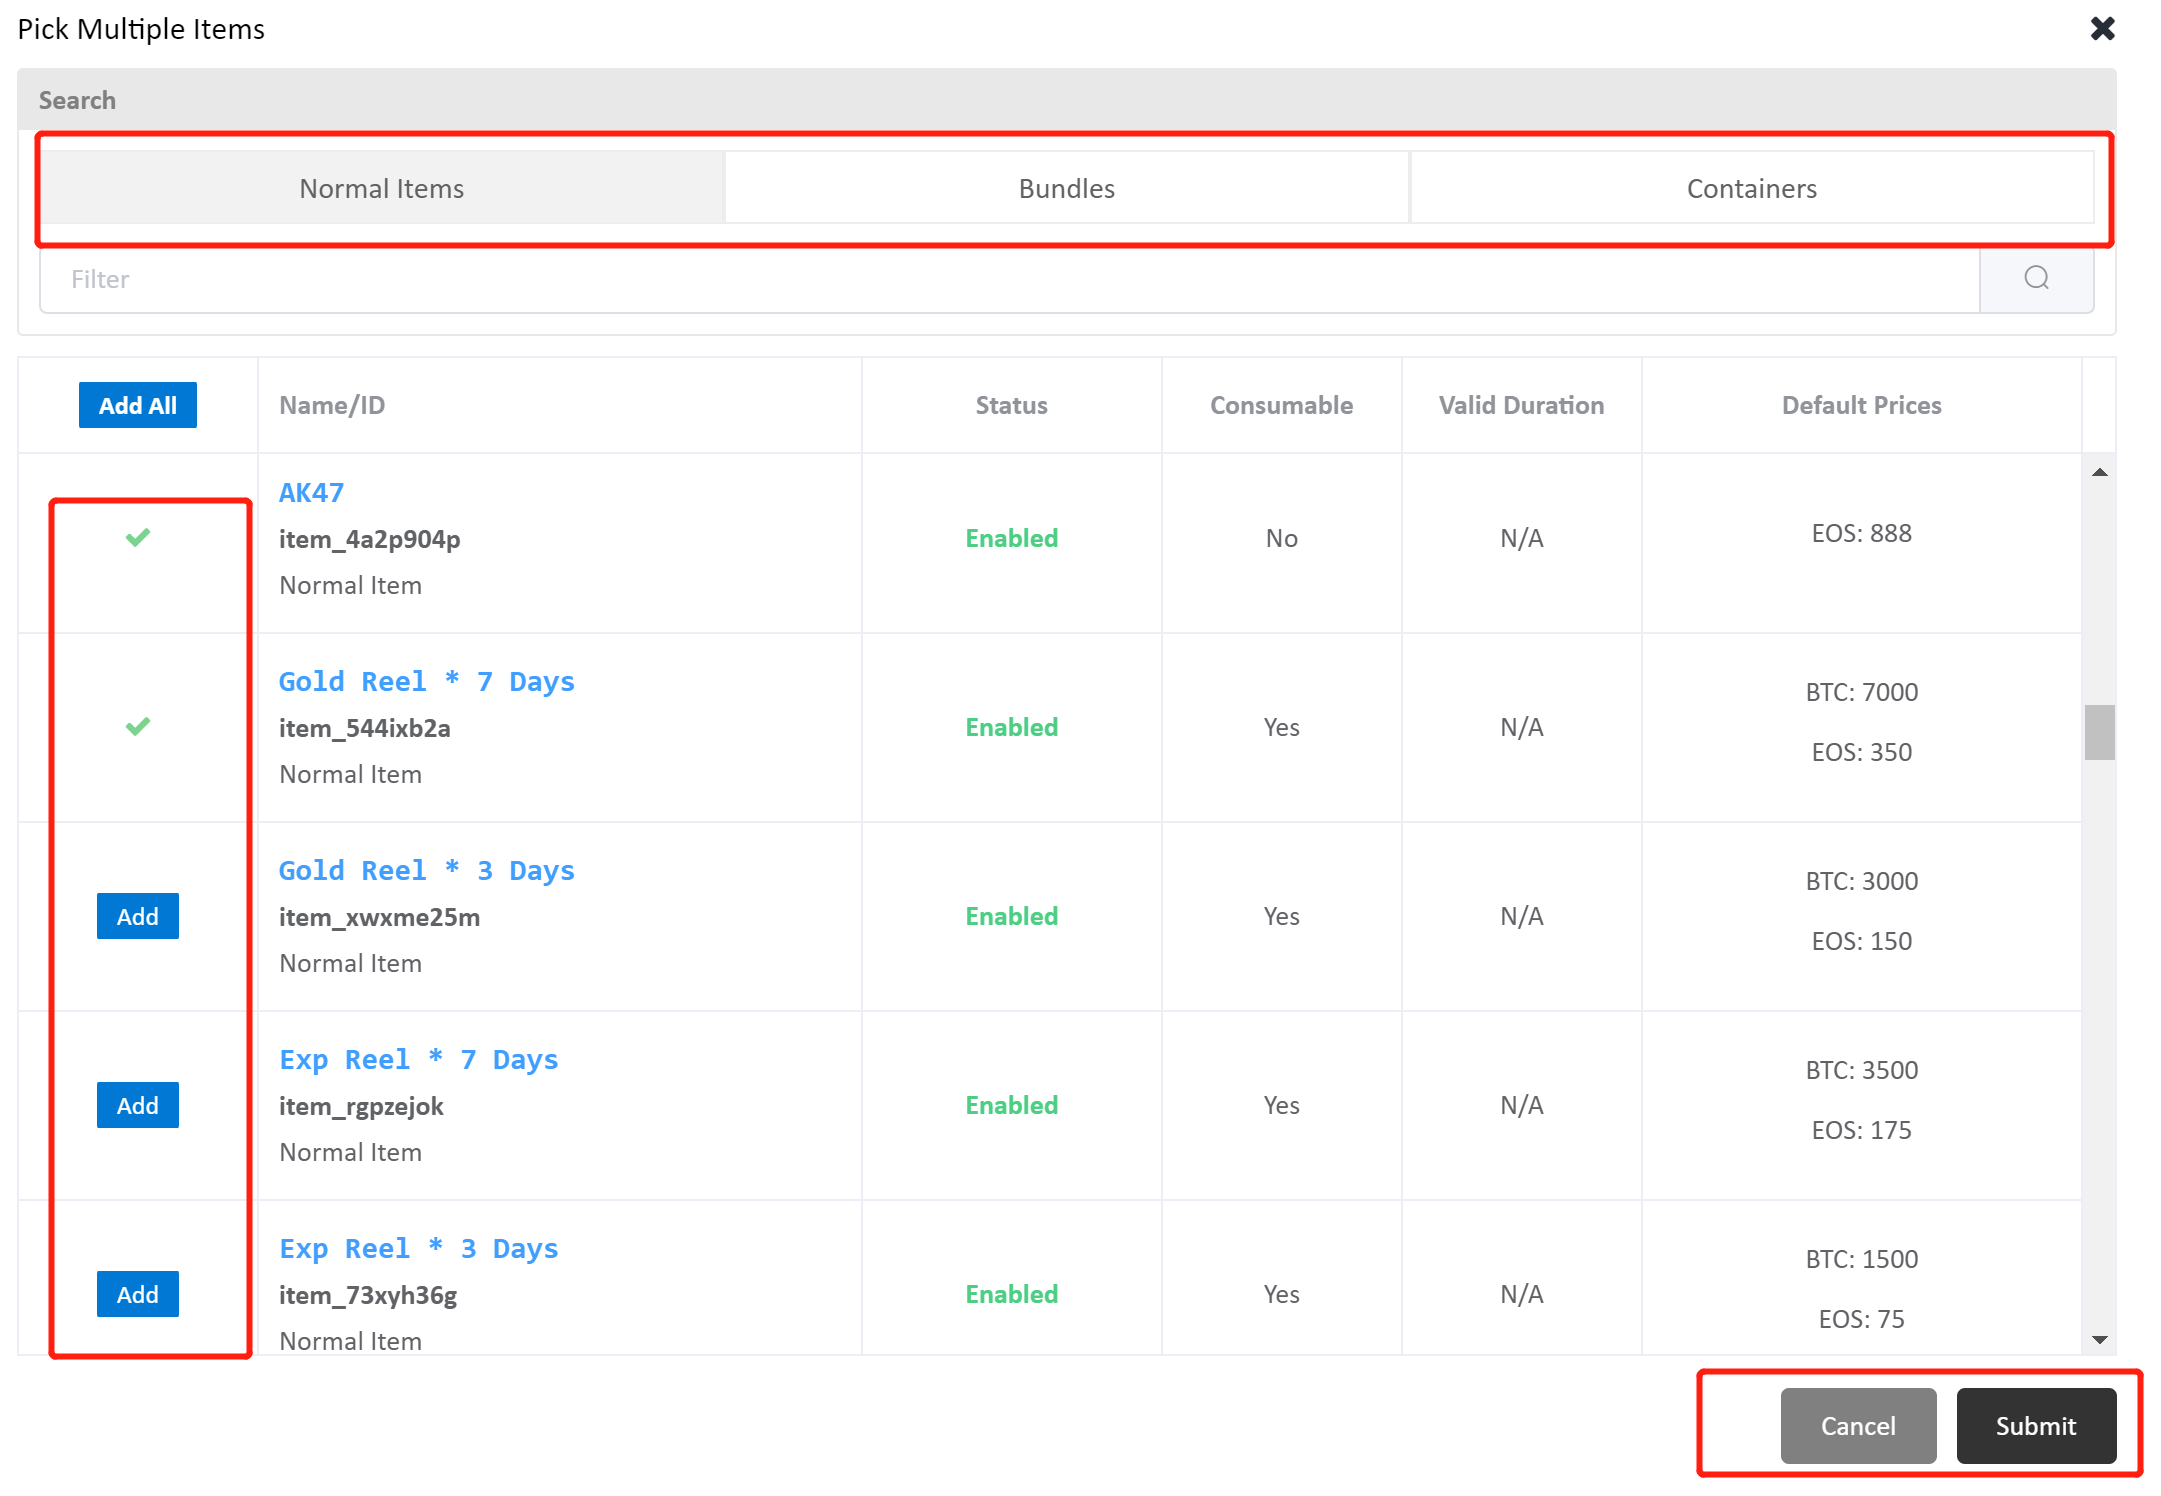
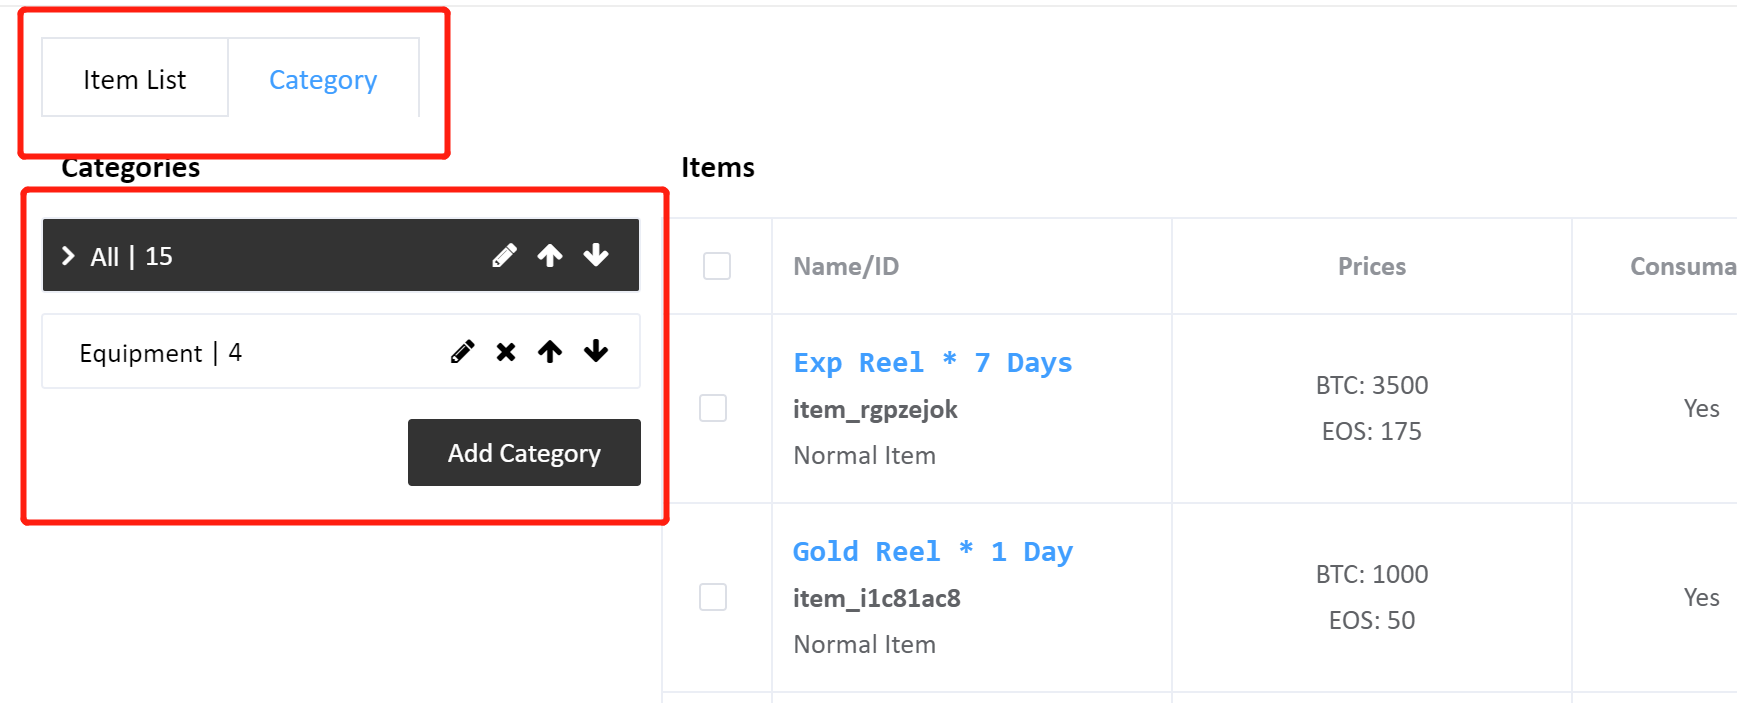
Click "Add Item" to go to the item selection page. Select to add a normal item/bundle/container created in the previous step.
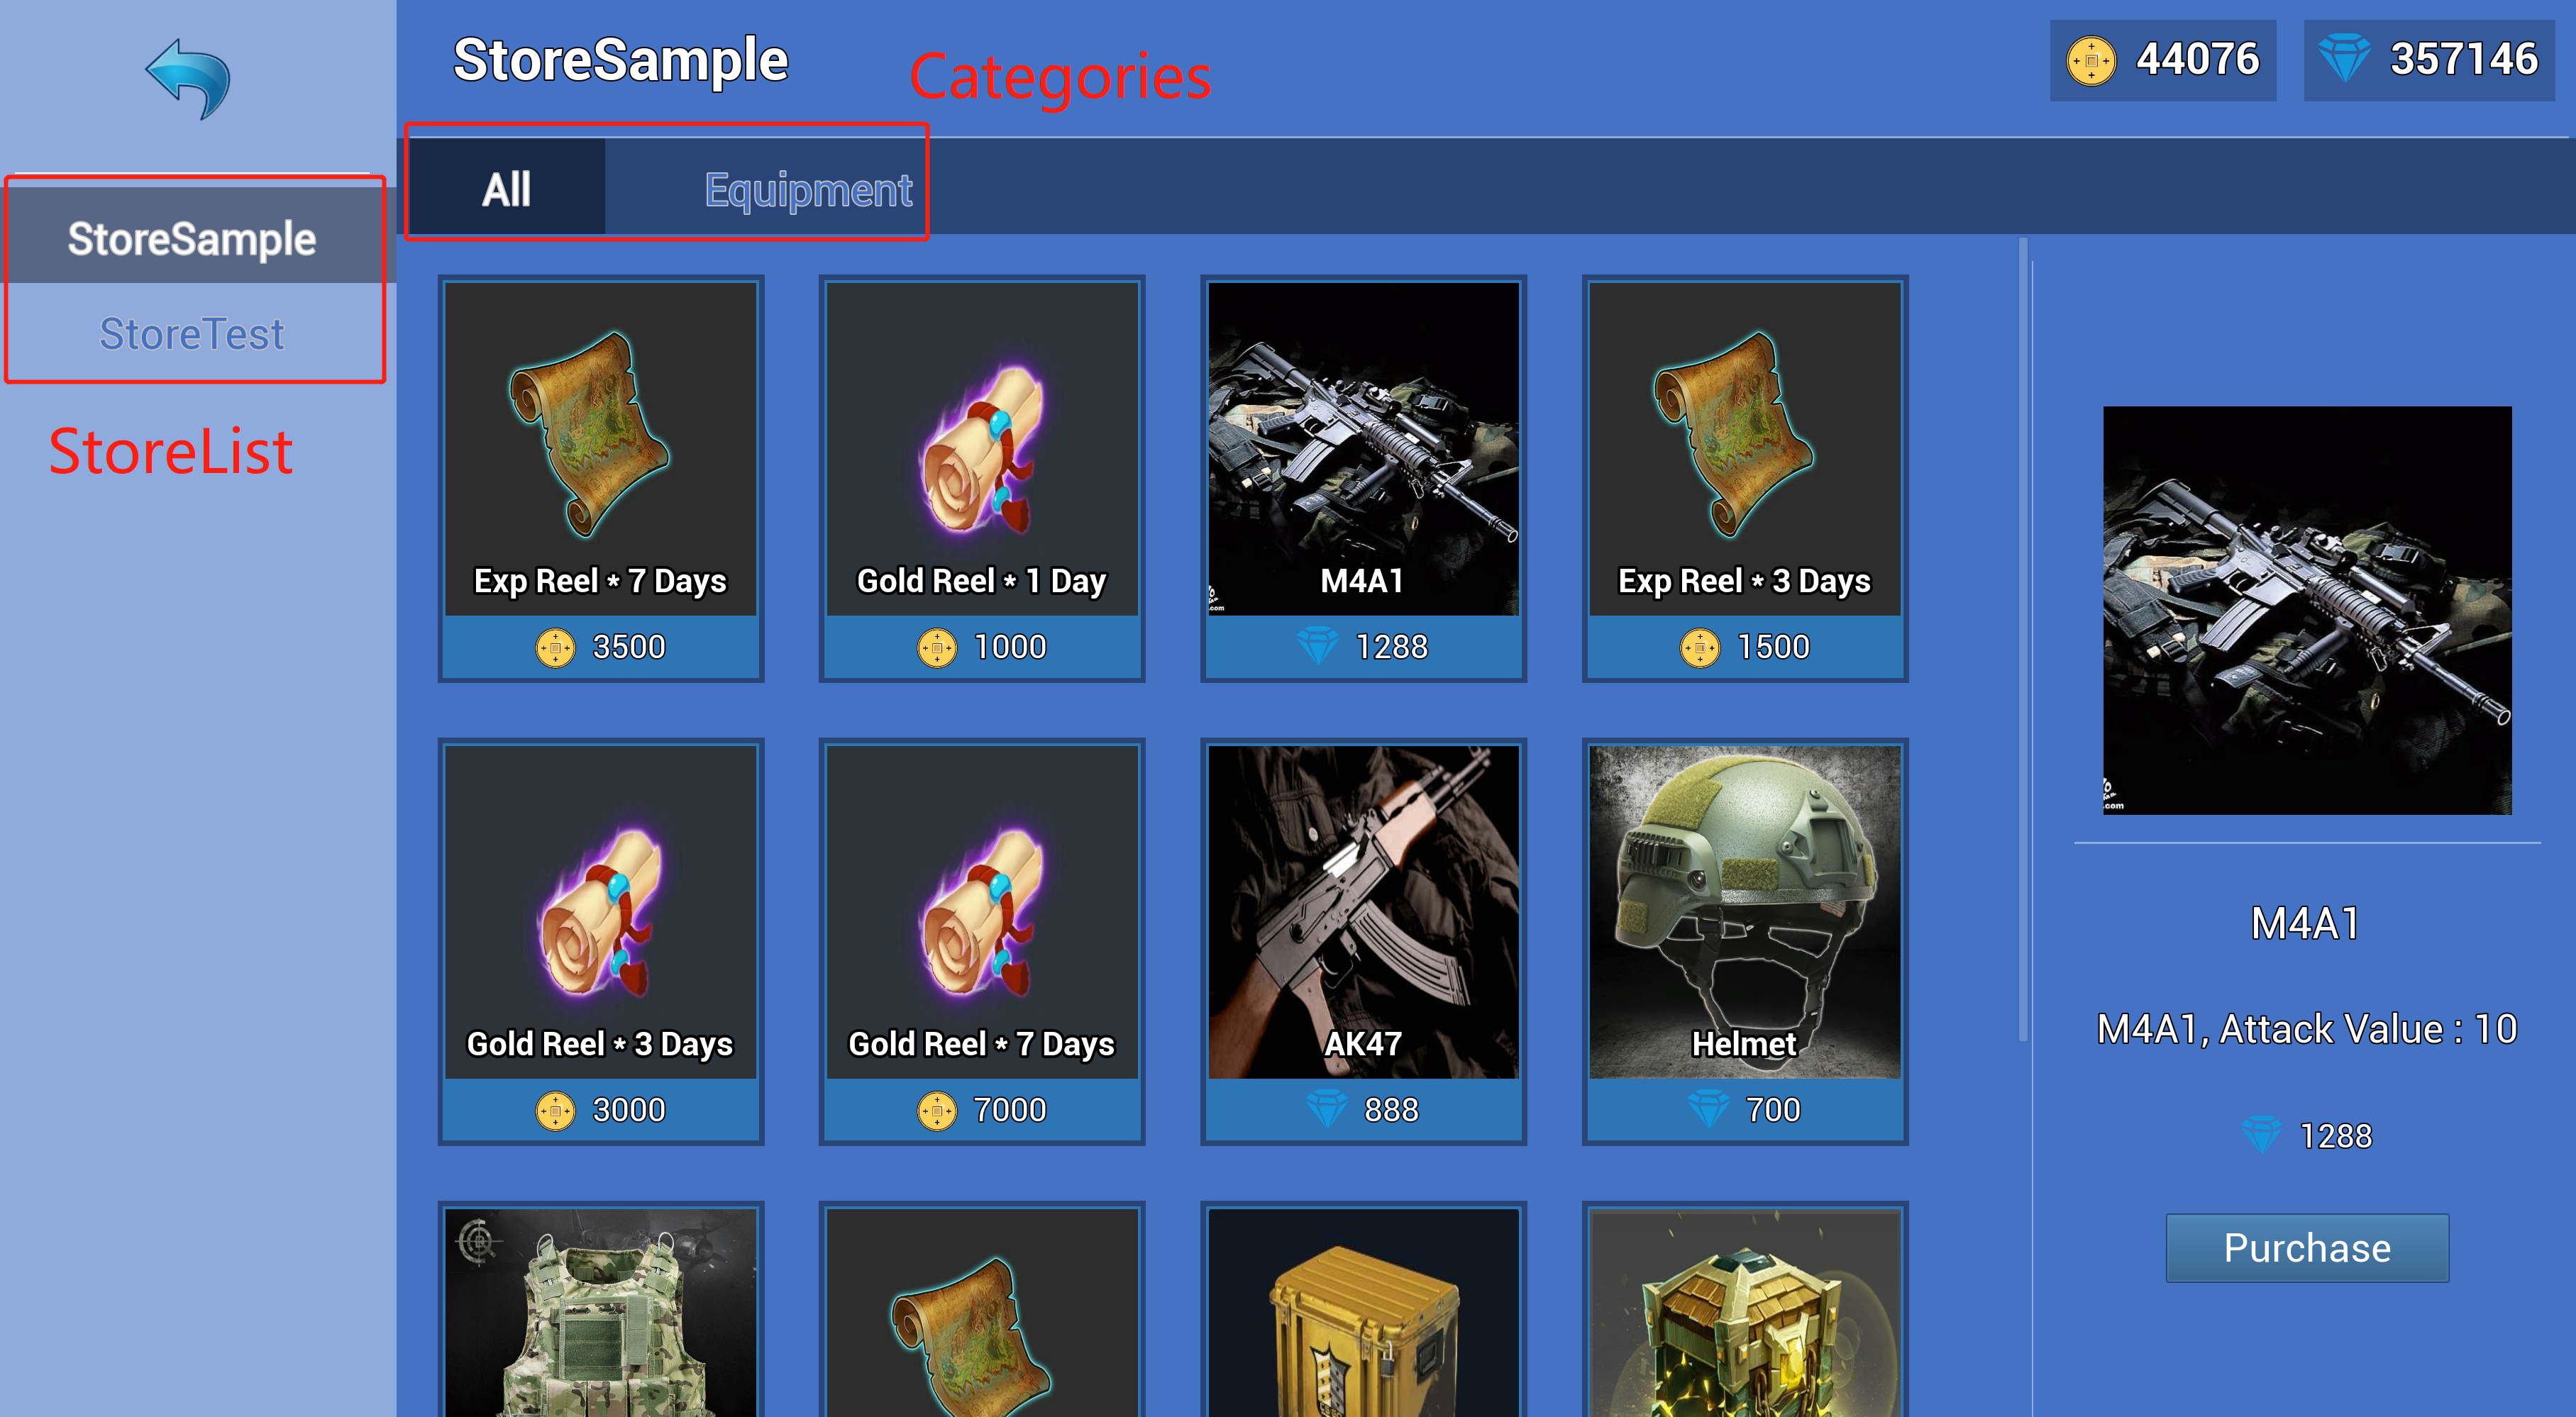
By default, each store has an "All" category. Developers can independently edit the categories in store as needed.
6.2.5 Display Store
Store's blueprint code location in the Sample:
WidgetBlueprint'/Game/PGOS/UI/Economy/StoreUI.StoreUI'
6.3 Inventory
The inventory stores all the item instances of a player. Currently, all item instances in this Sample are obtained by purchasing from the store.
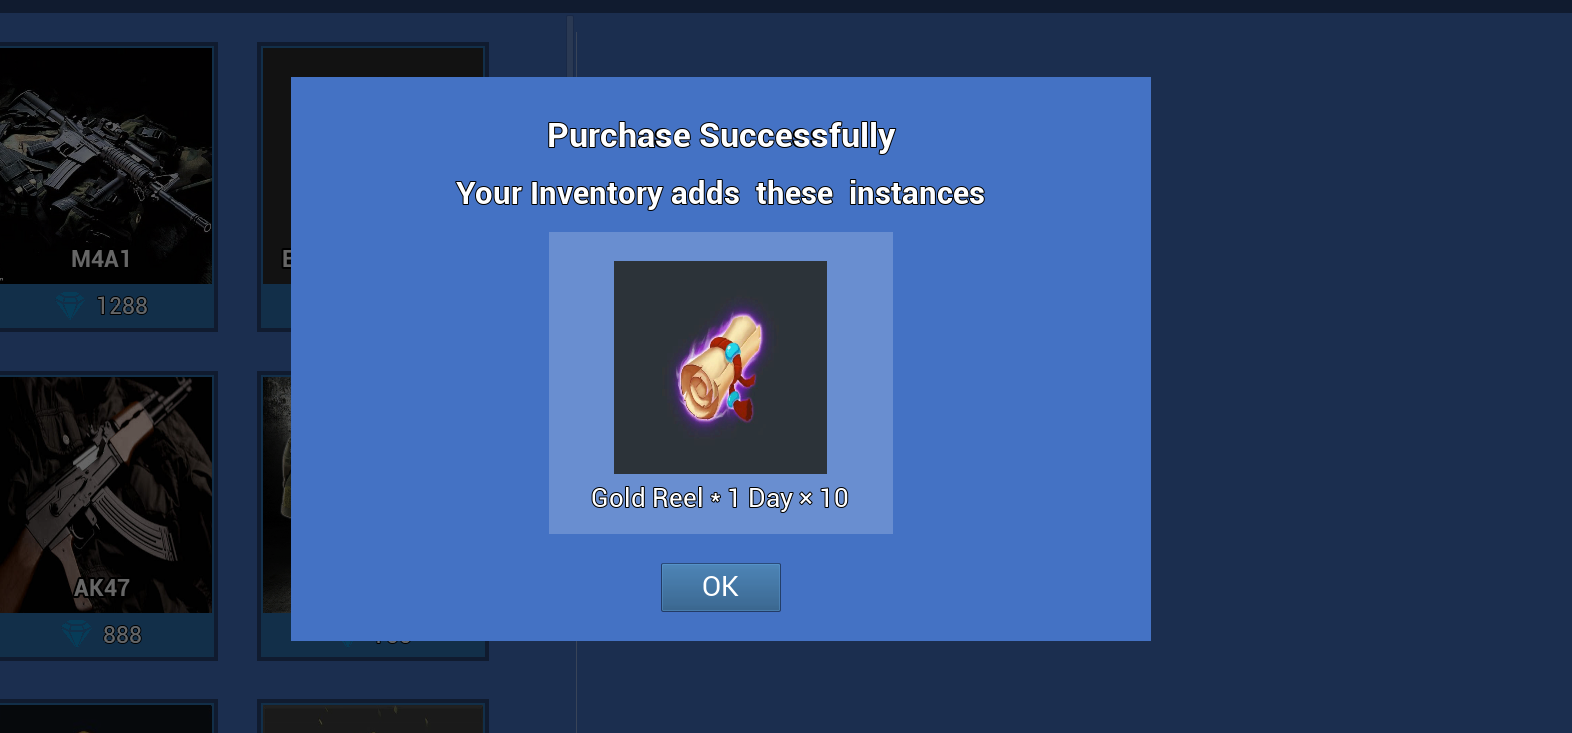
6.3.1 Purchase Item
First, buy 10 items from the store and add them to your inventory.

After purchase, the number of item instances in the inventory will increase correspondingly.
6.3.2 Display Inventory
Open your inventory to view the new item instances just added.
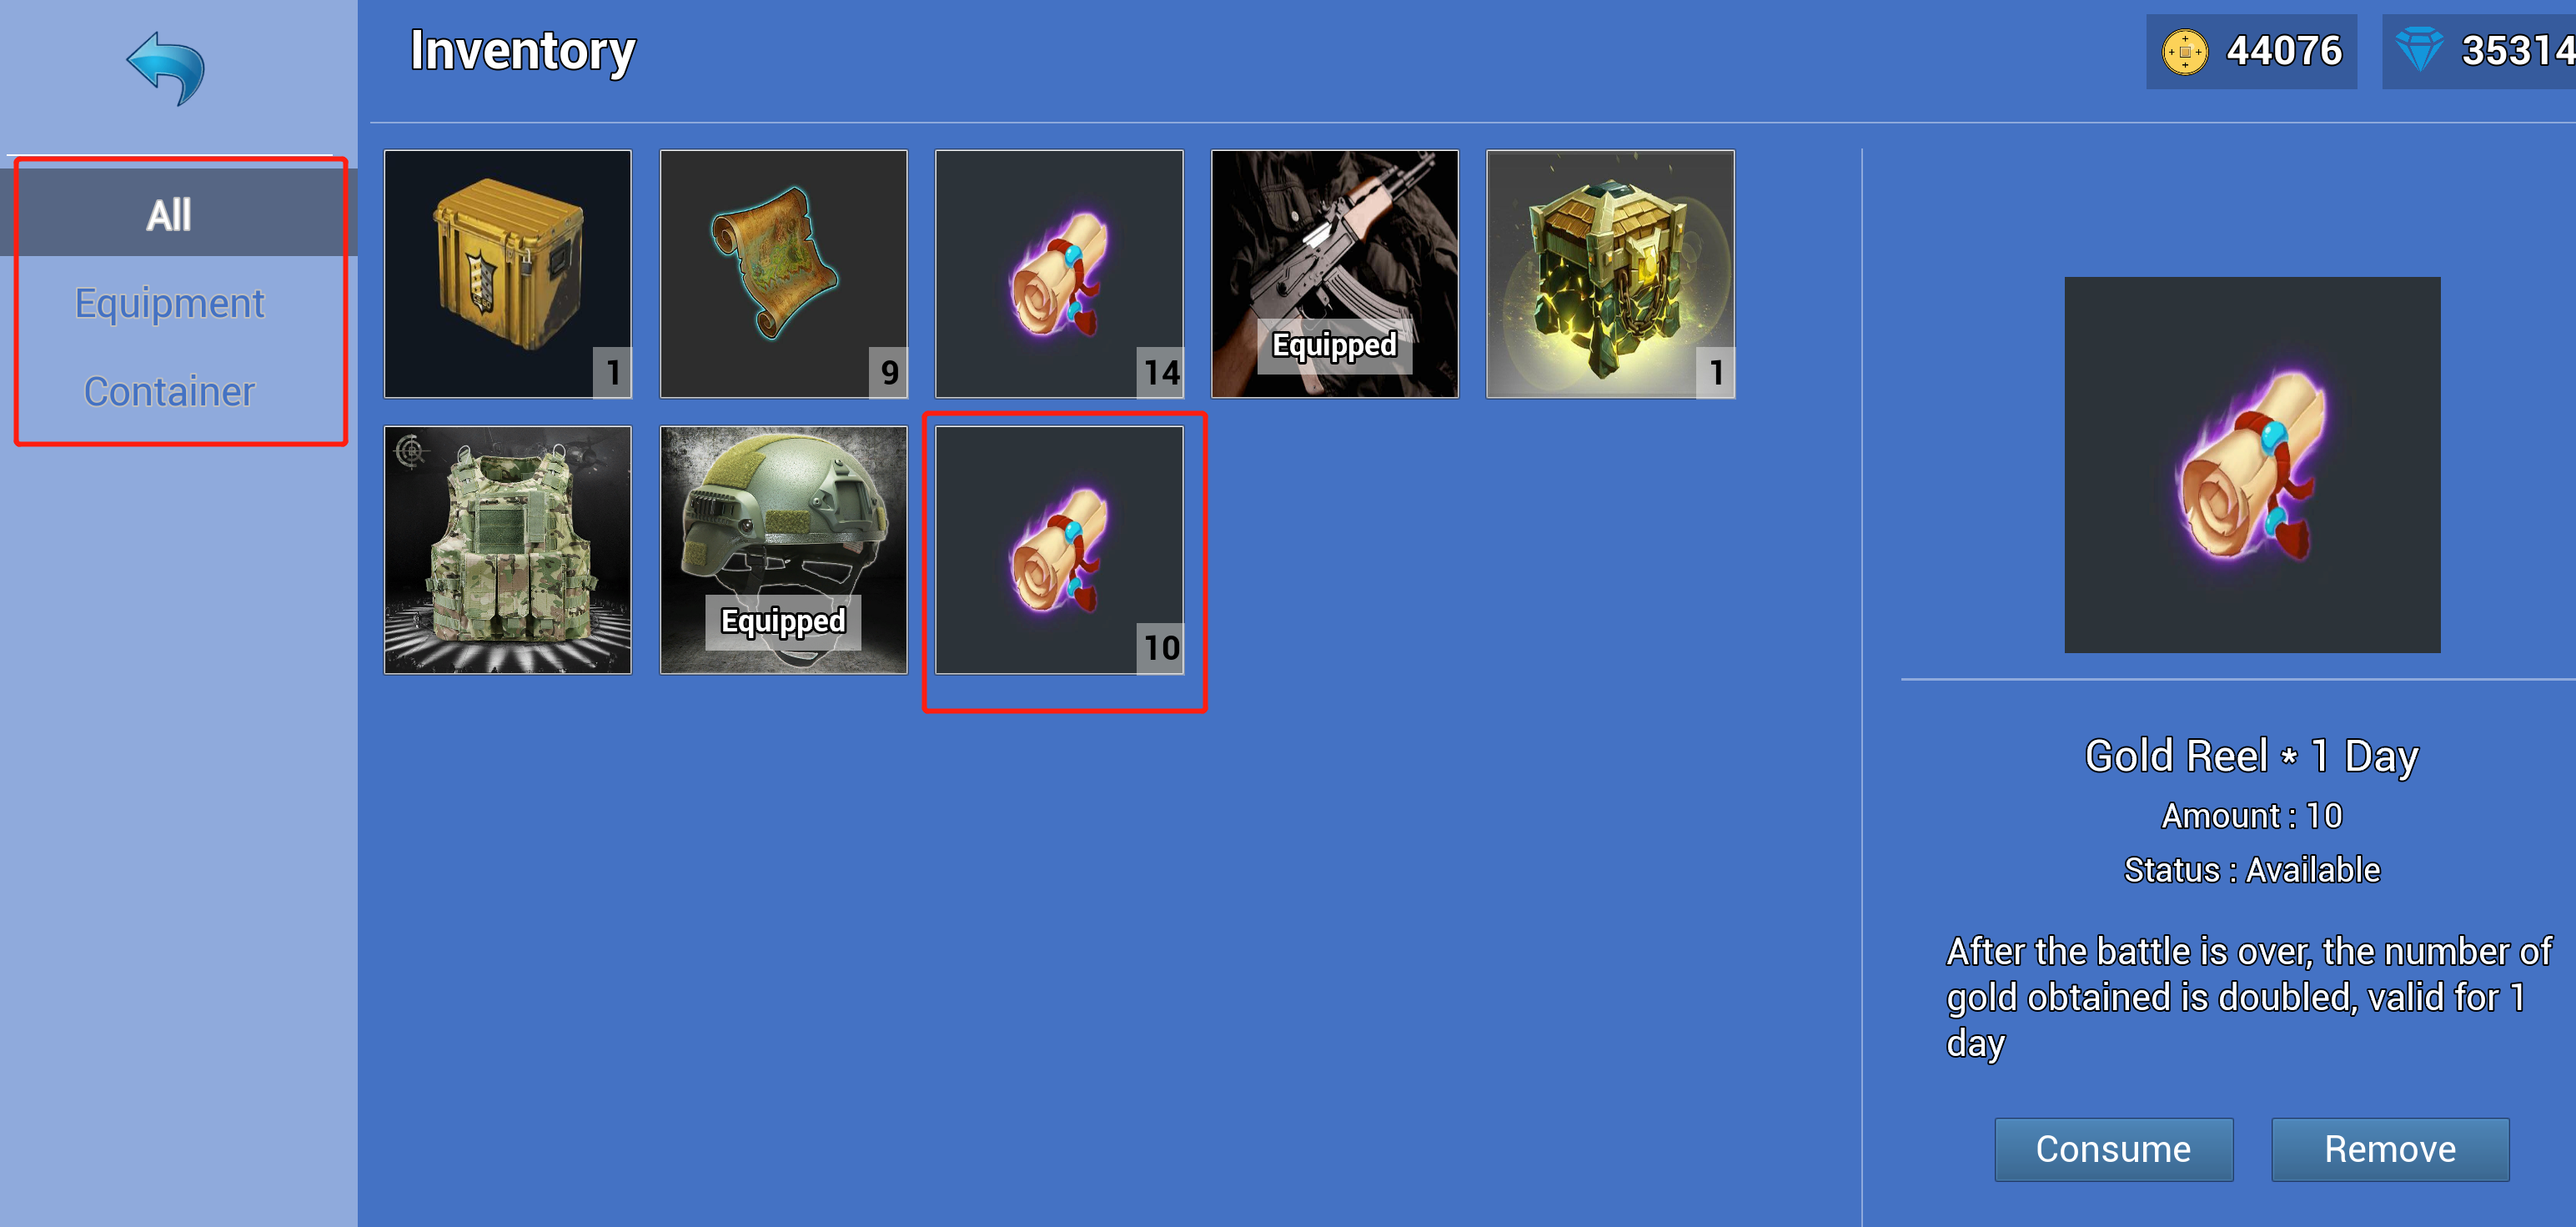
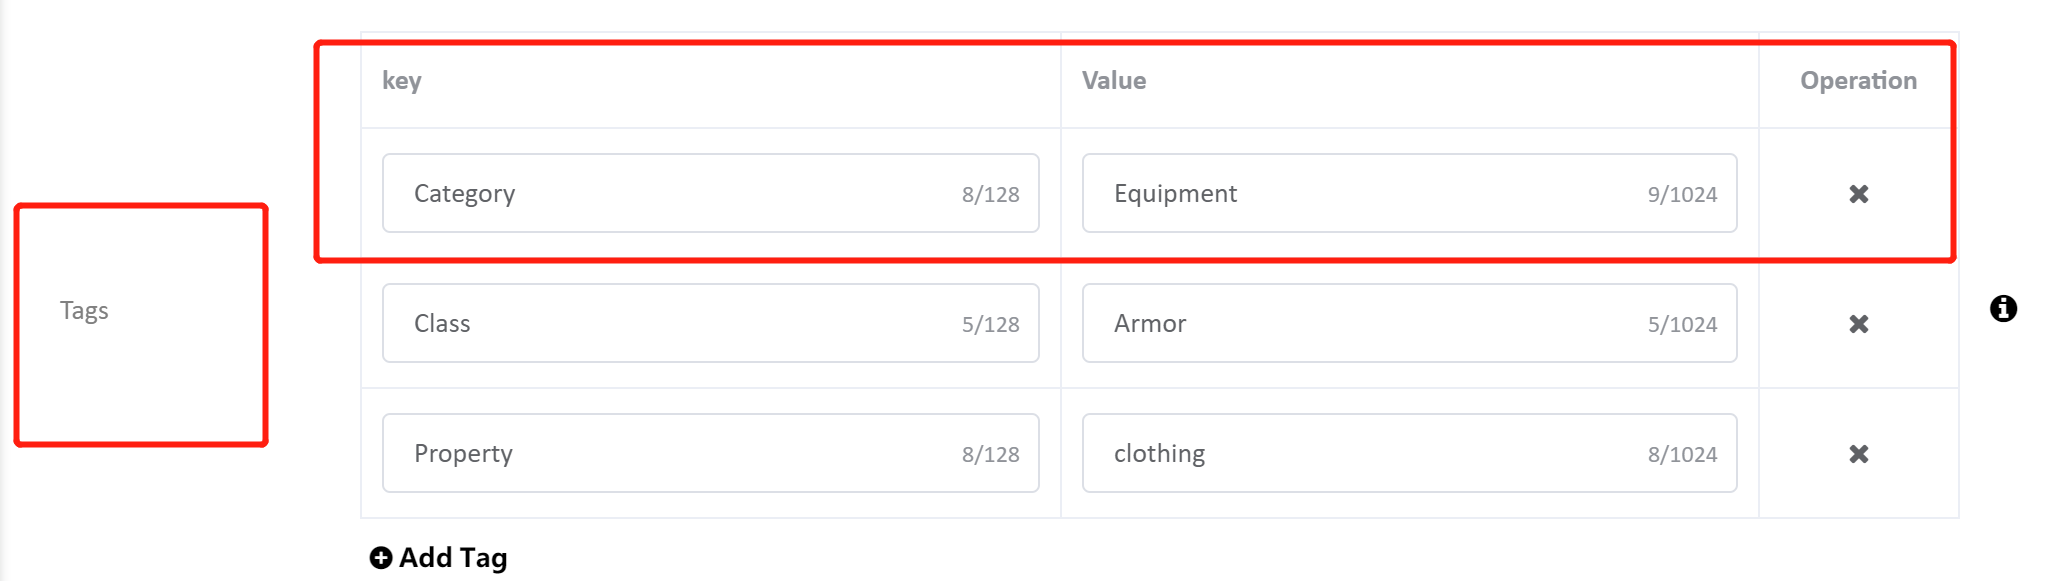
Currently, inventory categories are displayed by filtering specific kv values of InGameItem tags.
6.3.3 Use Item Instance
The sample currently provides two types of item instances: gear and buff. These item instances are used by calling virtual servers and adding the relevant Instance ID to PlayerData.

Then, when the player enters a battle, the SDK will acquire the corresponding field values from PlayerData and use the DS Server API to obtain specific property information.
// PGOSSample/DataTasks/BattlePlayerDataTask.cpp
IPgosSDKCpp::Get().GetServerEconomyAPI()->GetPlayerInventory(
            player.Key, Ids,
            [this, &res, SuspendedEvent](const FPgosResult& Error, const FServerGetPlayerInventoryResult* Result)
        {
            res = res && OnFetchPlayerEquipmentIntanceCallback(Error, Result);
            SuspendedEvent->Trigger();
        });
The item instance information is displayed on the UI and used to calculate damage inflicted and received during the battle.
