Virtual Server Storage
1. Overview
PGOS enables the creation of one or more data storage services within a title region, referred to as Virtual Server Storage (VS Storage). These services are accessible exclusively through the PGOS intranet, ensuring secure usage without additional security concerns.
PGOS provides multiple storage services for different use cases, including:
- Redis
- MongoDB
- Disk
By reading this chapter, you can learn:
- How to apply for a VS Storage;
- How to use the Web Console;
- How to write Virtual Server code to use storage;
- How to operate and maintain the database.
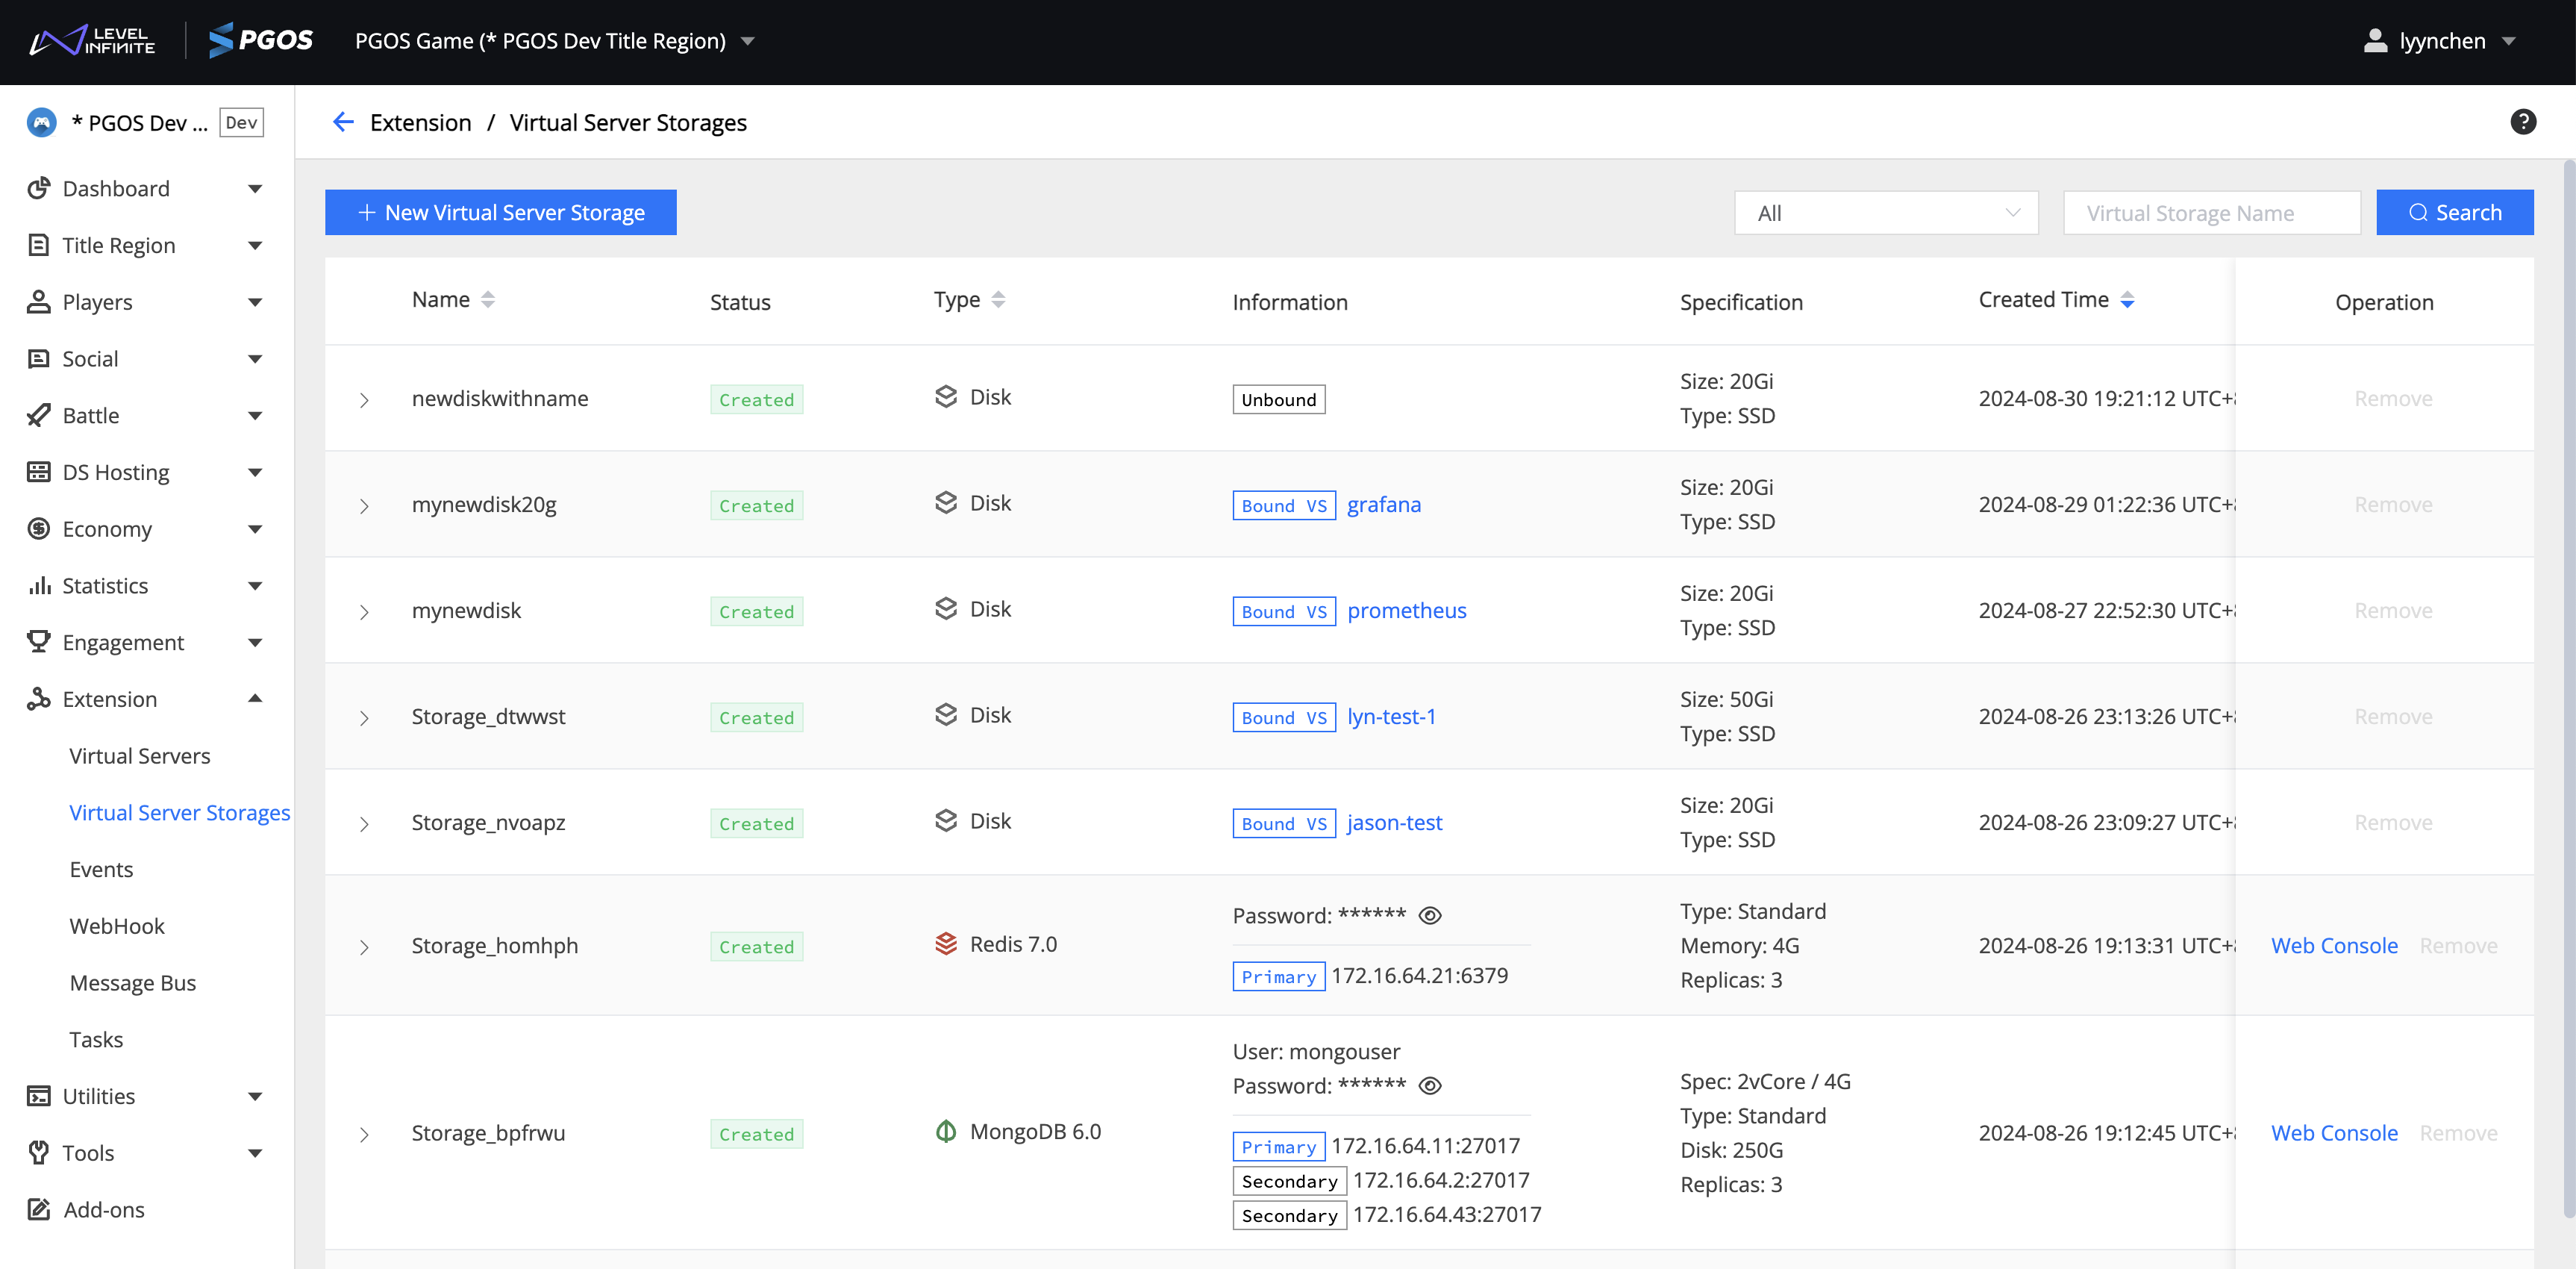
The VS Storage page is located at the Extension > Virtual Server Storage. All VS Stroages that had been created would be listed in the page, as shown below:
NOTE:
- PGOS doesn't support importing and synchronizing in the DevOps tool for VS Stroages due to they are hardware resources.
- If a virtual server mounted a disk, the mounted disk will not be transfered when importing or synchronizing in DevOps Tool
2. Apply For VS Storage
The VS Storage could be deployed automatically upon apply. To apply for a VS Storage, click the New Virtual Server Storage button located at the top left of the page. This will open the application form where you can fill in the necessary details to create a new vs storage.
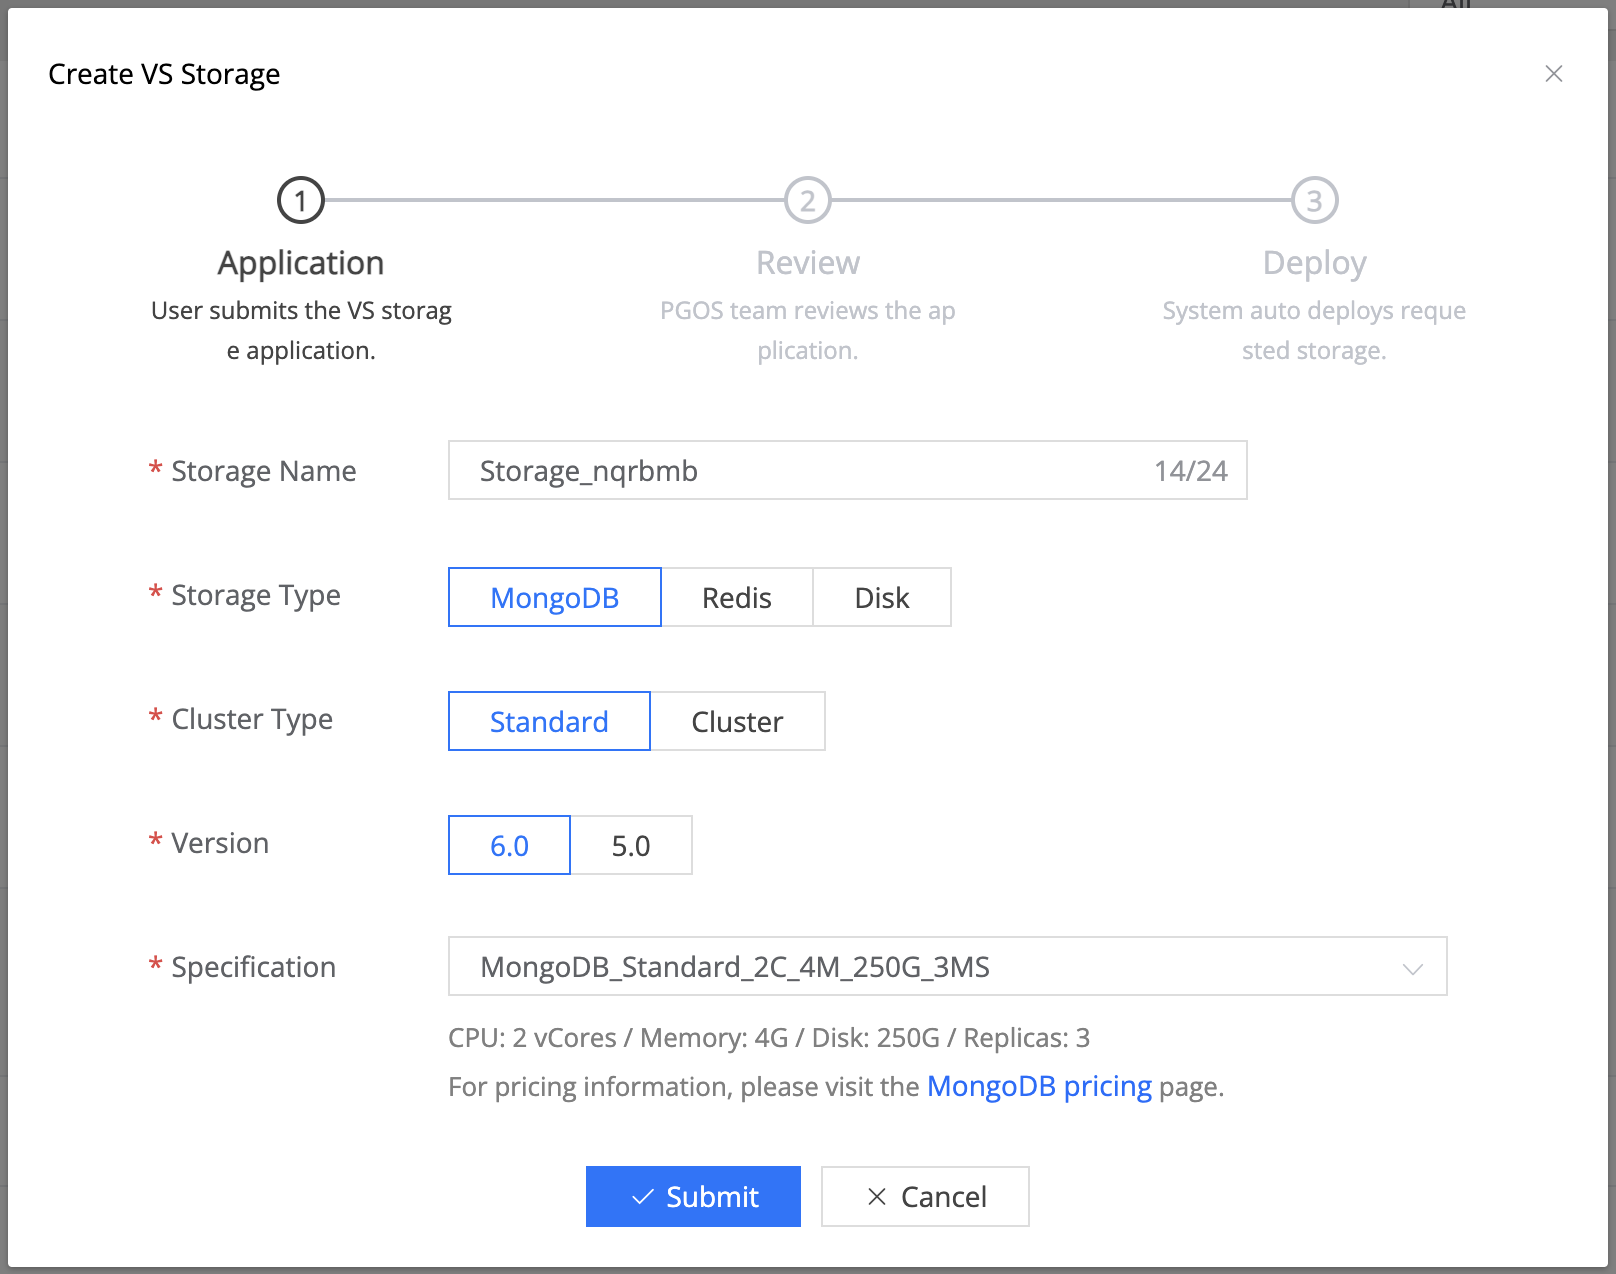
Application Form Fields:
- Storage Name: Enter a unique name for your storage.
- Storage Type: Select the type of storage (MongoDB, Redis, Disk).
- Cluster Type(Database Only): Choose between Standard or Cluster.
- Version(Database Only): Select the version of the storage type.
- Specification: Choose the specification based on CPU, Memory, Disk, and Replicas.
After filling in the form, click Submit to send your application for review. The PGOS team will review the application, and the system will automatically deploy the requested storage upon approval.
3. Use VS Storage
The connection and authentication information of the storage service instance is displayed in the Information list. However, the infomation is for debug purposes only, and should not be used in production code. Use the environment variables to get the storage information instead.
3.1 Database information
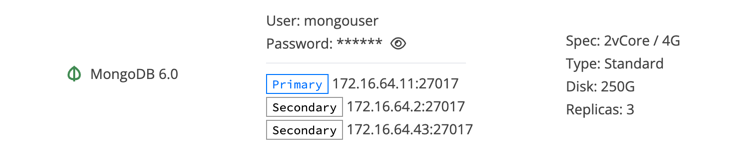
- Connection: The connection information of the current storage service;
- Spec: The CPU, memory specifications of the current storage service;
- Type: The cluster type of the current storage service;
- Disk: The available disk size of the current storage service(total disk size is shown for
Clustertype); - Replicas: The number of replicas of the current storage service.
3.2 Disk information
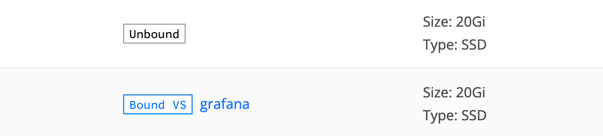
- Status: The status of the disk(Bound or Unbound).
- Size: The available disk size of the disk.
- Type: The type of the disk(Only
SSDis currently available;HSSDcan be provided upon request.).
4. Web Console
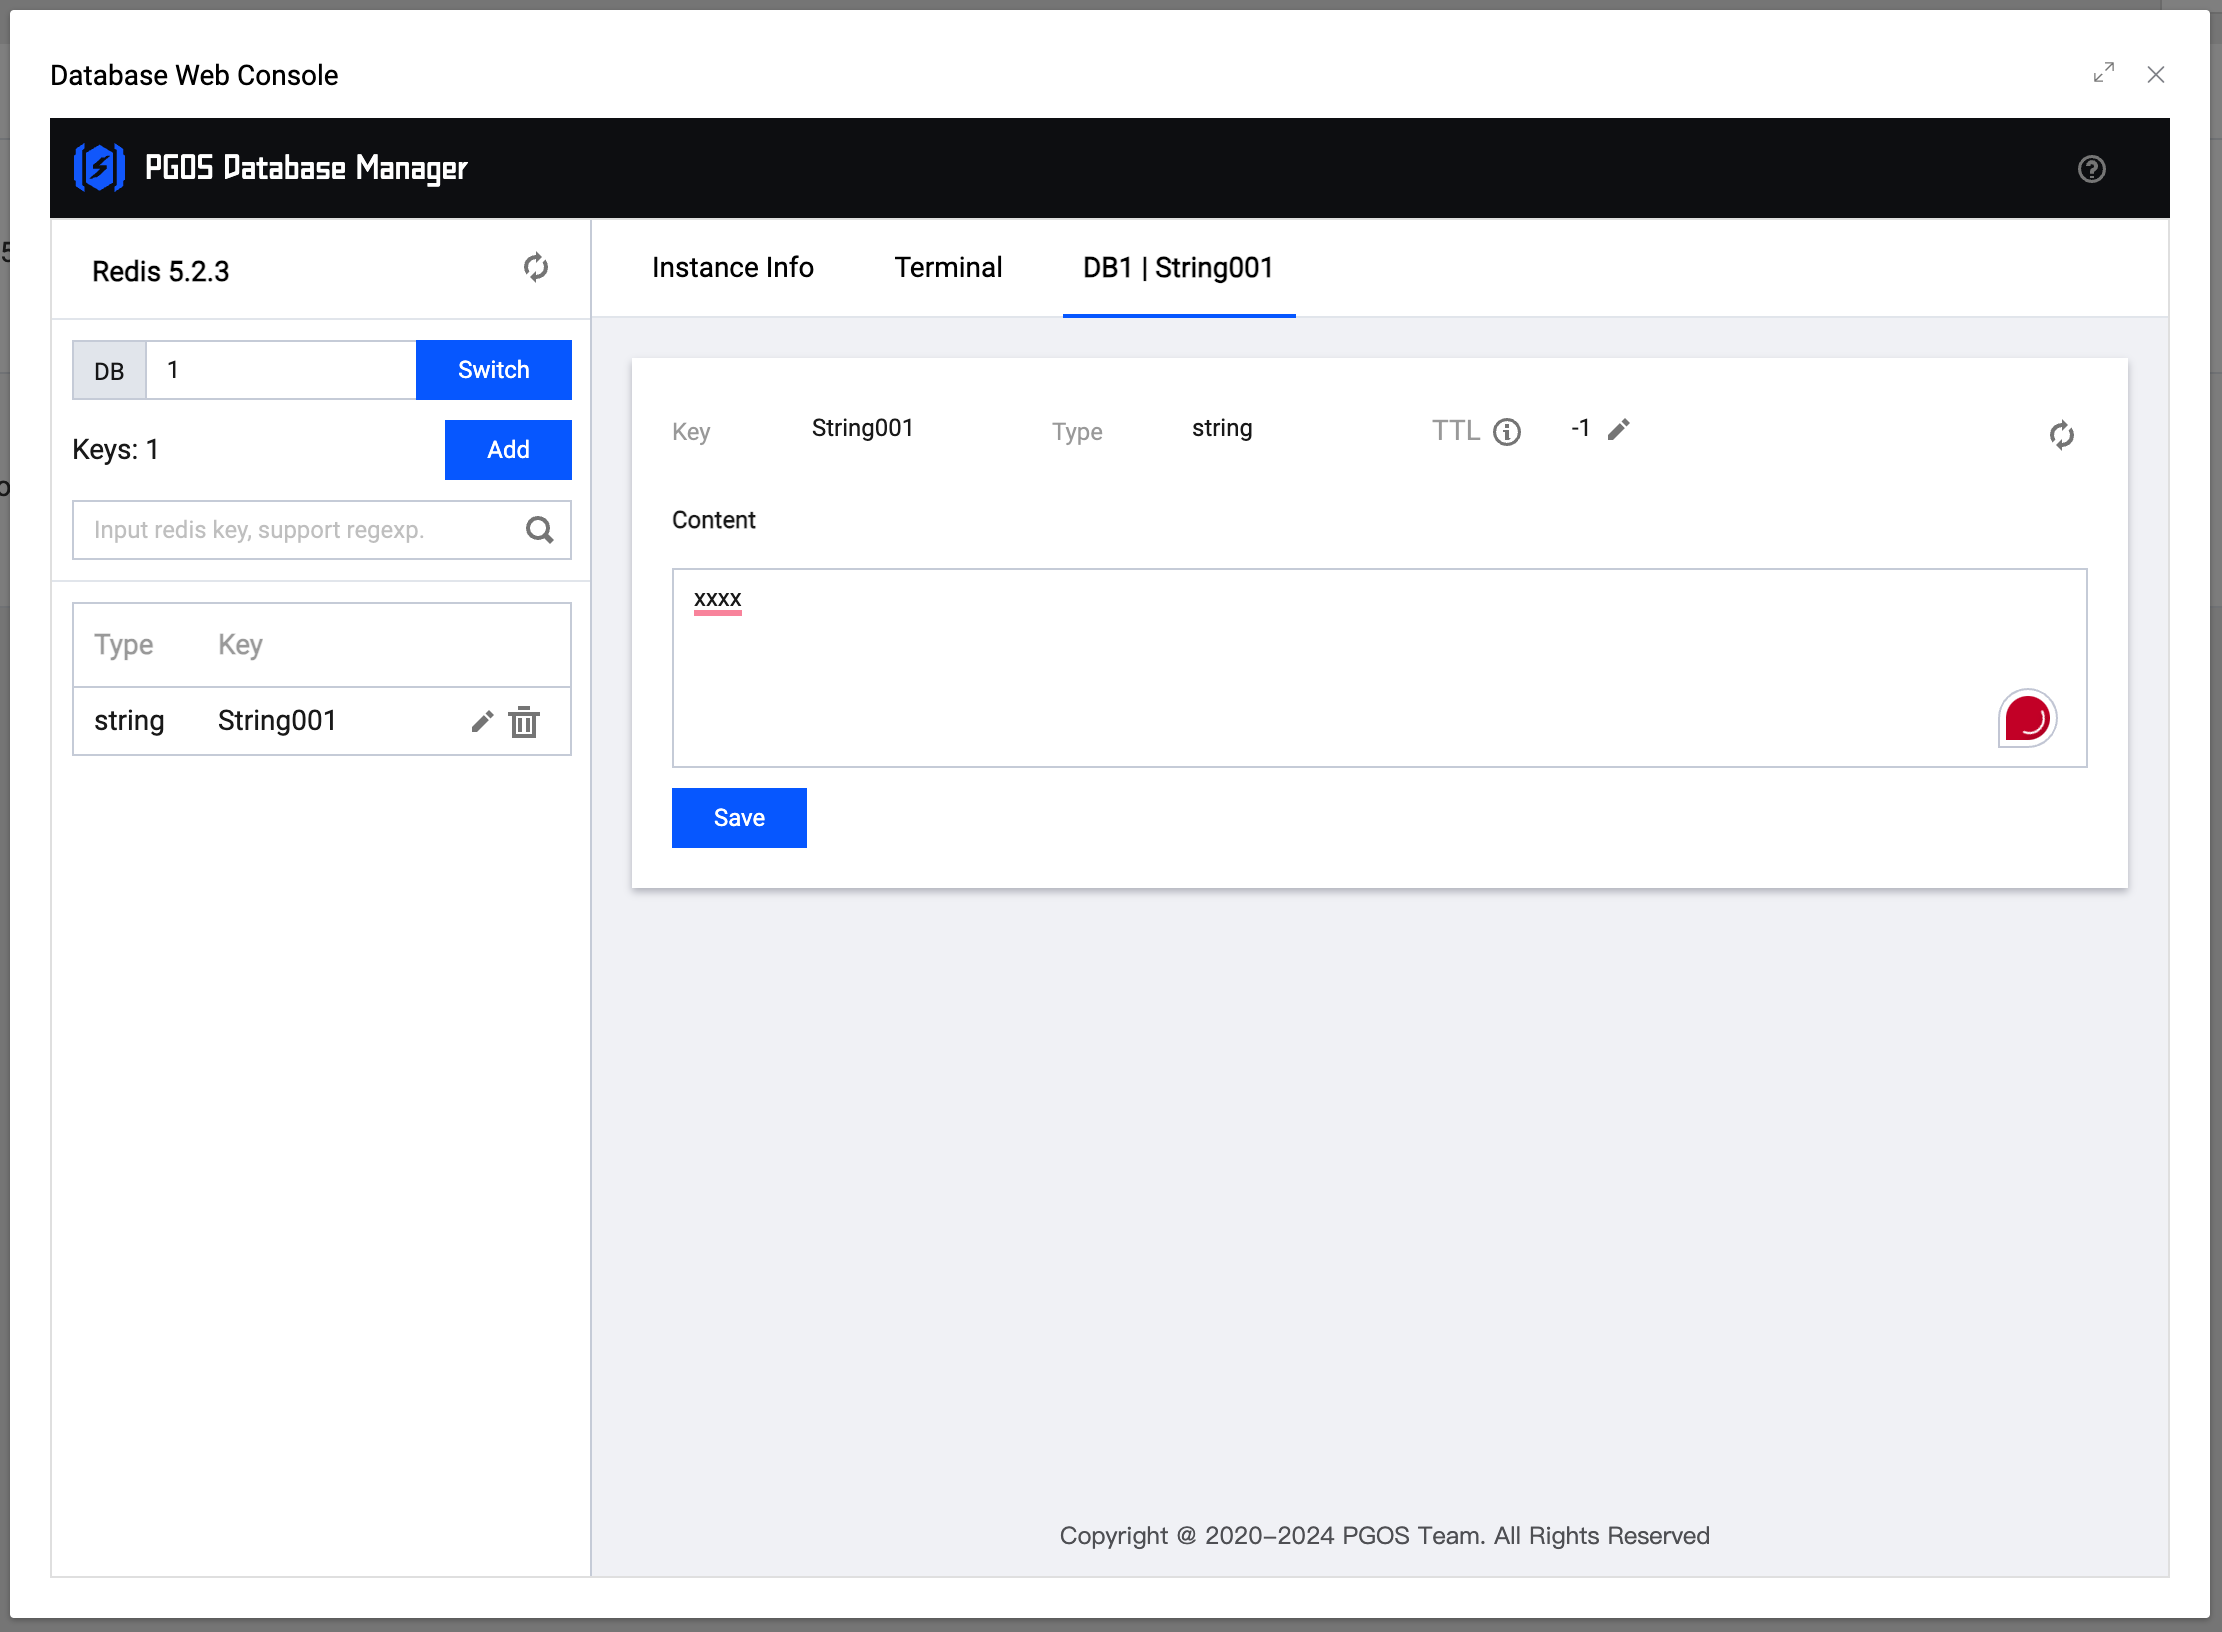
Click the Web Console button to display the management interface of the current instance in a pop-up window, as shown below:
Redis Web Console
MongoDB Web Console
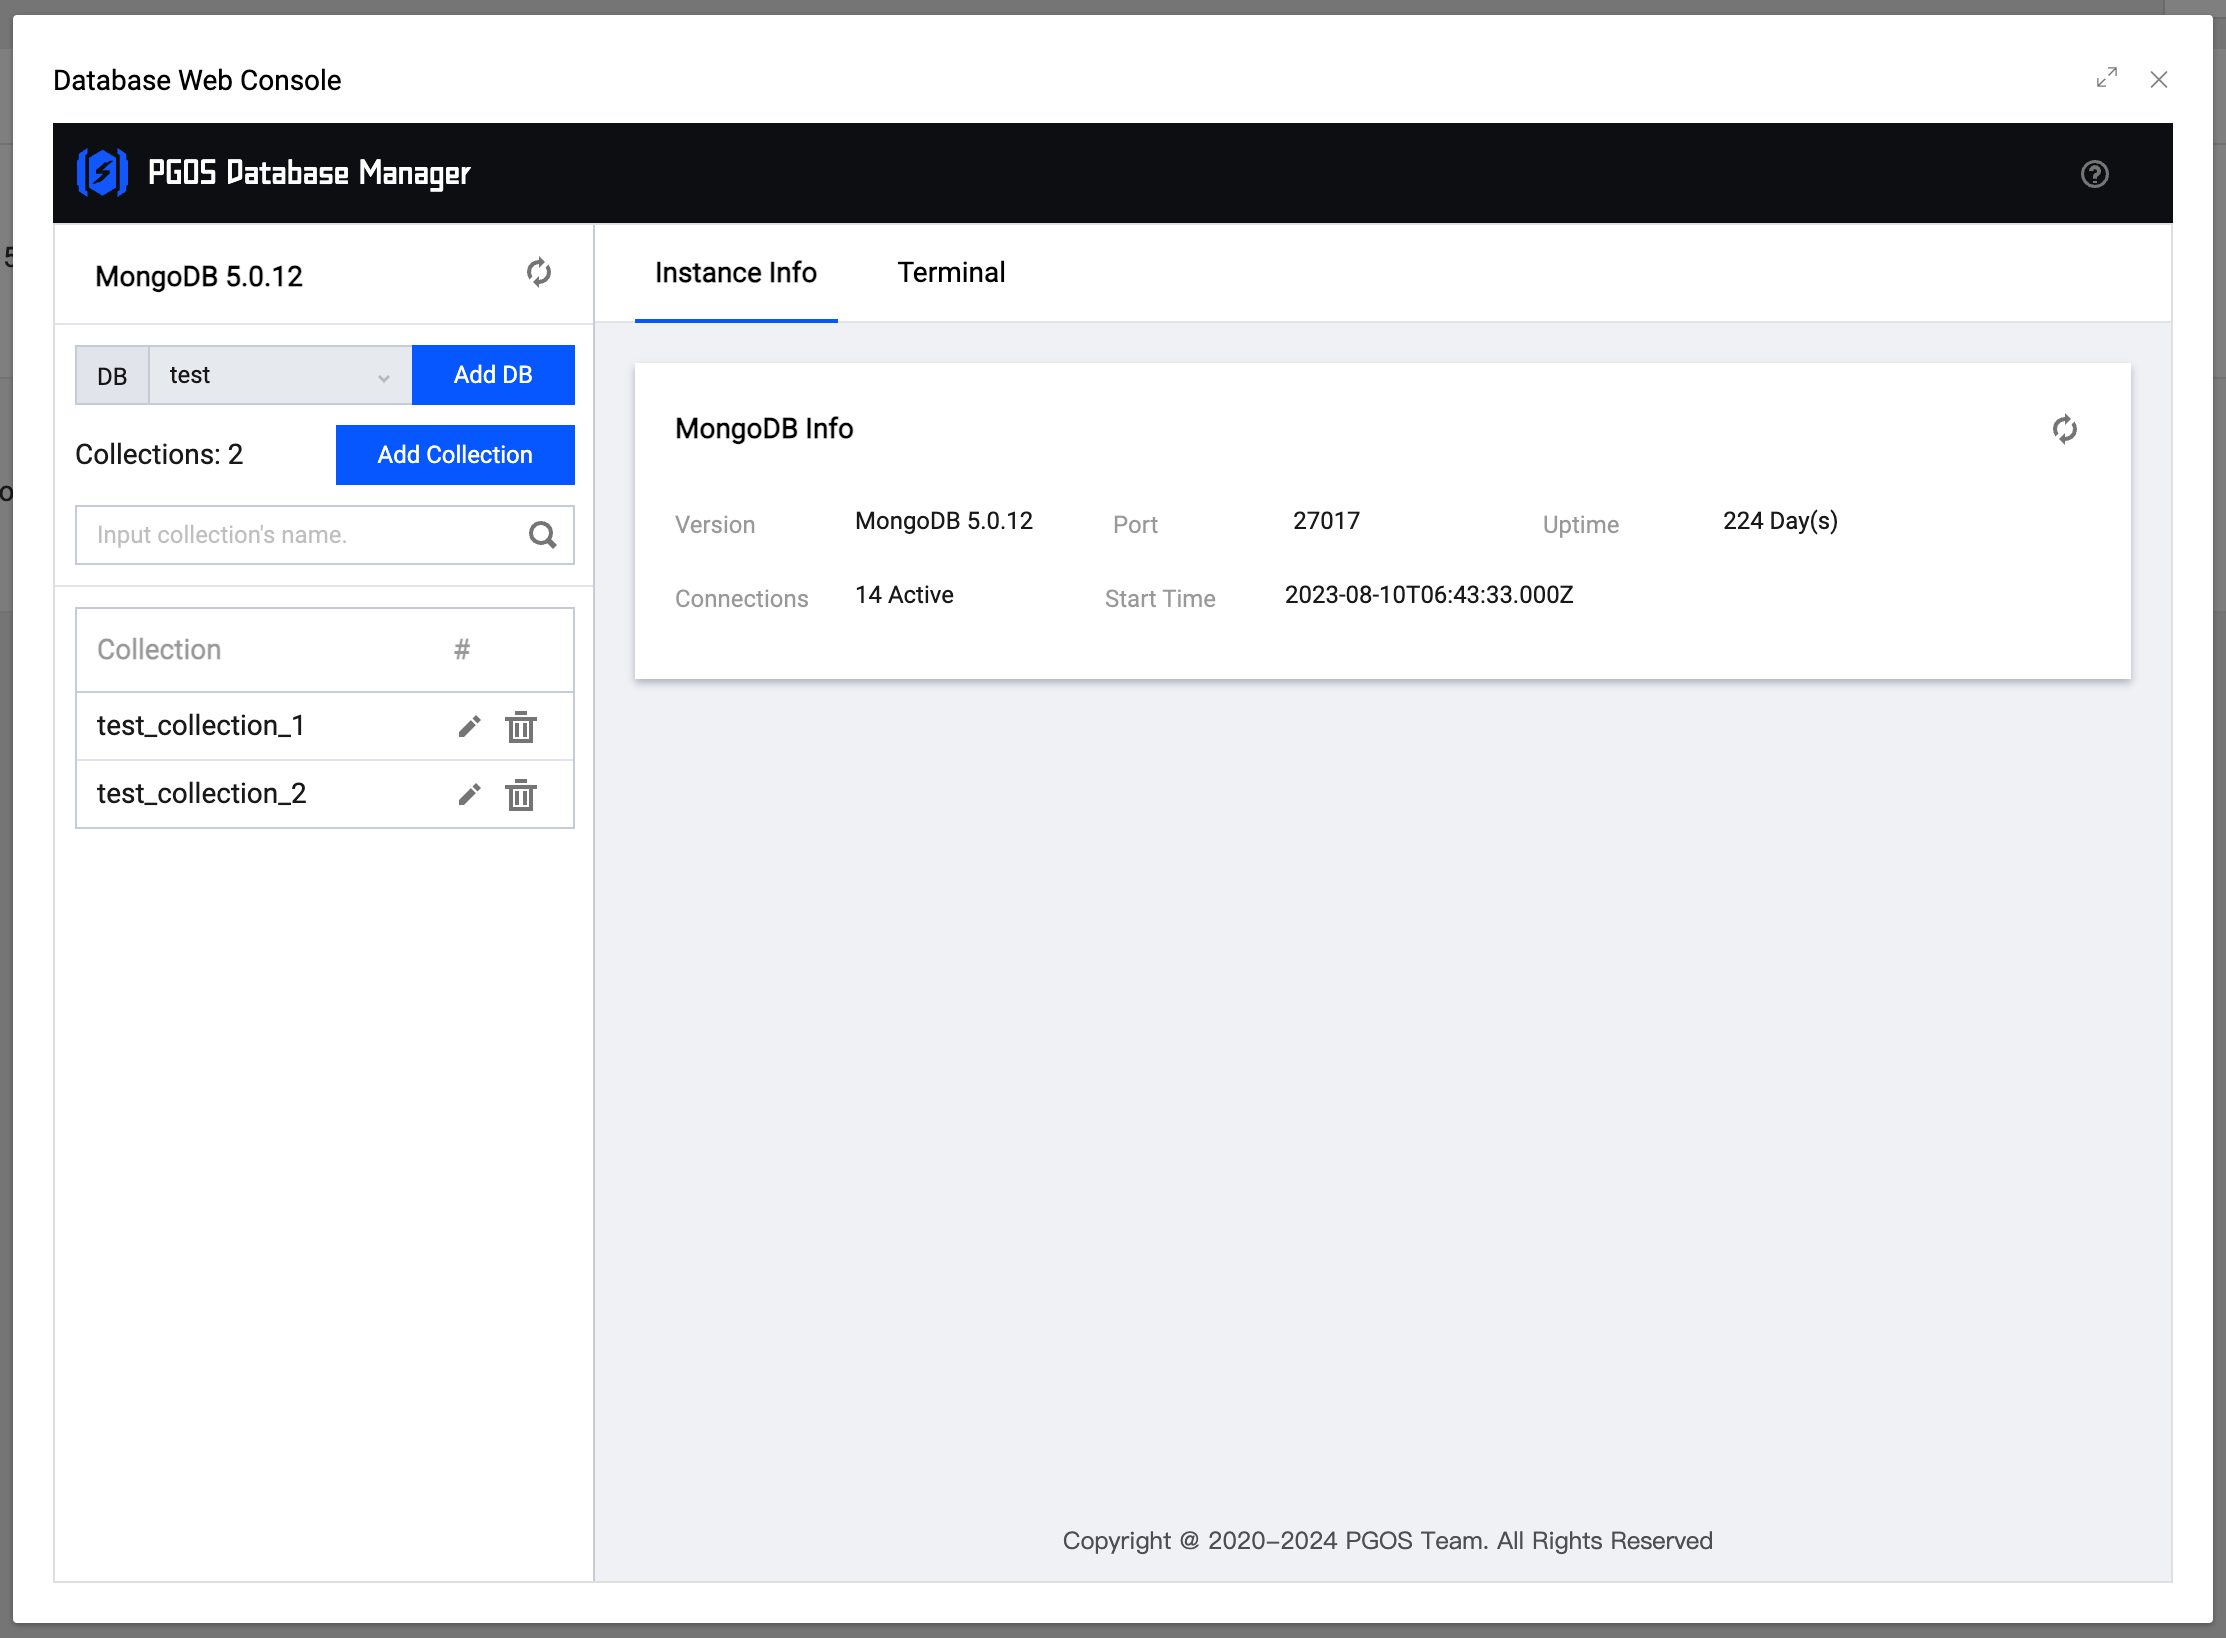
In the management dialog, you can perform operations on the current storage instance:
- View the status information of the storage service instance;
- Operate the storage service instance, add, delete, modify and check the data;
- It is more convenient to operate the storage service instance console, and the flexibility is higher;
Currently no web console for cloud disk. If you want to browse the files of your cloud disk, mounting it to a Virtual Server(by using open source docker image such as filebrowser/filebrowser) to browse files in the web page is a suggested option.
5. Write Virtual Server Code To Use Storage
Firstly, save the information about the storage service instance you want to use in Virtual Server. Sencondly, install the corresponding third-party dependencies in Virtual Server (pay attention to whether the version of the dependencies is compatible with the current runtime), and operate according to the documentation of third-party dependencies.
- We recommend using environment variables to obtain information about Virtual Server Storage, which can avoid hard coding and improve the maintainability of the code.
- In future versions, we will hide the Virtual Server Storage information of the Portal, and only allow access through environment variables.
- If you don't know how to use environment variables, please refer to Virtual Server Environment Variables.
5.1 How To Use Redis With Virtual Server
The following content is based on NodeJS, and the operation method of other languages is similar.
5.1.1. Install Redis dependencies
Modify the package.json file of Virtual Server and add "redis": "4.0.0" in dependencies. The complete file content is:
{
  "name": "helloworld",
  "version": "1.0.0",
  "description": "",
  "main": "index.js",
  "scripts": {
    "test": "echo \"Error: no test specified\" && exit 1"
  },
  "keywords": [],
  "author": "",
  "license": "ISC",
  "dependencies": {
    "redis": "4.0.0"
  }
}
5.1.2. Write code to opreate Redis
Follow the documentation of third-party dependencies to operate redis. The document address is: https://www.npmjs.com/package/redis/v/4.0.0. We write a simple Demo to perform Redis connection, basic storage and query operations.
Firstly, encapsulates tool functions and connection pool information for creating Redis instances
Tool function file directory address:"./redis/redis.ts"
import * as redis from 'redis';

// Redis connection pool, which caches established connections.
const RedisConnectPool = new Map();

interface RedisConfig {
  host: string;
  port: number;
  account?: string;
  password?: string;
  database?: number;
}

/**
 * @author PGOS Team
 * @time 2022.10.27 11:30:40
 * @description PGOS get Redis client.
 * @param {Object} redisConfig
 * @param {String} redisConfig.host - default: 127.0.0.1.
 * @param {Number} redisConfig.port - default: 6379.
 * @param {String} redisConfig.account - Redis account, optional.
 * @param {String} redisConfig.password - Redis password, optional.
 * @param {Number} redisConfig.database - default: 0
 */
export const getRedisConnectedClient = async (options: RedisConfig) => {
  const { host, port, account, password, database } = options;
  const key = `${host}:${port}:${account}:${password}:${database}`;

  if (RedisConnectPool.has(key)) {
    console.log('getRedisConnectedClient --> RedisConnectPool has key');
    return RedisConnectPool.get(key);
  }

  const [err, client] = await createRedisConnectClient(options);
  if (err) {
    throw err;
  }

  RedisConnectPool.set(key, client);
  return client;
};

/**
 * @description PGOS create Redis client.
 * @author PGOS Team
 * @time 2022.10.27 11:13:28
 */
const createRedisConnectClient = (redisConfig: RedisConfig) => {
  const { host, port, account, password, database } = redisConfig;
  console.log('createRedisConnectClient -->', host, port, account, password, database);

  const result = new Promise<[Error | null, any]>(resolve => {
    const client = redis.createClient({
      url: `redis://${host}:${port}`,
      username: account,
      password,
      database
    });

    client.on('ready', () => {
      console.log('RedisTool.createRedisConnectClient --> ready');
      resolve([null, client]);
    });

    client.on('error', err => {
      console.error('RedisTool.createRedisConnectClient --> error', err);
      resolve([err, null]);
    });

    client.connect();
  });

  return result;
};
Secondly, get an established connection and perform operations
import Koa from 'koa';
import Router from 'koa-router';
import koaBodyParser from 'koa-bodyparser';
import serve from 'koa-static';
import path from 'path';

import { getRedisConnectedClient } from './redis/redis';

const app = new Koa();
const router = new Router();

router.all('/redis', async ctx => {
  console.log(`[/redis] ${new Date().toLocaleString()} ${ctx.request.method} ${ctx.request.url}}`);
  console.log('[/redis]', ctx.request.body);

  // Use the environment variable to get the Redis configuration information
  const redisConfig = process.env.['PGOS_VS_Storage_<RedisName>'];
  const parsedRedisConfig = JSON.parse(redisConfig);

  // Please fill in the values from VS Storage in the options below.
  const redisClient = await getRedisConnectedClient({
    host: parsedRedisConfig.network[0].inner_ip,
    port: parsedRedisConfig.network[0].port,
    account: '',
    password: parsedRedisConfig.password,
    database: 0
  });

  redisClient.set('key', 'value');
  const value = await redisClient.get('key');

  console.log('[/redis] value -->', value);

  // Return the data to the client
  ctx.body = {
    code: 200,
    message: 'success',
    time: new Date().toISOString(),
    request: {
      method: ctx.request.method,
      url: ctx.request.url,
      body: ctx.request.body,
      query: ctx.request.query
    },
    data: value
  };
});

app.use(koaBodyParser());
app.use(router.routes()).use(router.allowedMethods());
app.listen(8080);
console.log('Server is running at http://localhost:8080');
5.2 How To Use MongoDB With Virtual Server
The following content is based on NodeJS, and the operation method of other languages is similar.
5.2.1. Install MongoDB dependencies
Modify the package.json file of Virtual Server and add "mongoose": "5.10.7" in dependencies. The complete file content is:
{
  "name": "helloworld",
  "version": "1.0.0",
  "description": "",
  "main": "index.js",
  "scripts": {
    "test": "echo \"Error: no test specified\" && exit 1"
  },
  "keywords": [],
  "author": "",
  "license": "ISC",
  "dependencies": {
    "mongoose": "5.10.7"
  }
}
5.2.2. Write code to opreate MongoDB
Follow the documentation of third-party dependencies to operate MongoDB. The document address is: https://mongoosejs.com/docs/. We write a simple Demo to perform MongoDB connection, basic storage and query operations.
Firstly, encapsulates tool functions and connection pool information for creating MongoDB instances
Tool function file directory address:"./mongodb/mongodb.ts"
import mongoose from 'mongoose';

// MongoDB connection pool, which caches established connections.
const MongoDBConnectPool = new Map();

interface MongoDBConfig {
  host: string;
  port: number;
  account?: string;
  password?: string;
  database?: string;
}

/**
 * @description PGOS get MongoDB client.
 * @author PGOS Team
 * @time 2023.08.11 11:30:40
 * @param {Object} mongoDBConfig
 * @param {String} mongoDBConfig.host - default: 127.0.0.1.
 * @param {Number} mongoDBConfig.port - default: 6379.
 * @param {String} mongoDBConfig.account - MongoDB account, optional.
 * @param {String} mongoDBConfig.password - MongoDB password, optional.
 * @param {Number} mongoDBConfig.database - default: test.
 */
export const getMongoDBConnectedClient = async (options: MongoDBConfig) => {
  const { host, port, account, password, database } = options;
  const key = `${host}:${port}:${account}:${password}:${database}`;

  if (MongoDBConnectPool.has(key)) {
    console.log('getMongoDBConnectedClient --> MongoDBConnectPool has key');
    return MongoDBConnectPool.get(key);
  }

  const [err, client] = await createMongoDBConnectClient(options);
  if (err) {
    throw err;
  }

  MongoDBConnectPool.set(key, client);
  return client;
};

/**
 * @author PGOS Team
 * @time 2022.10.27 11:13:28
 * @description PGOS create MongoDB client.
 */
const createMongoDBConnectClient = (mongoDBConfig: MongoDBConfig) => {
  const { host, port, account, password, database } = mongoDBConfig;
  console.log('createMongoDBConnectClient -->', host, port, account, password, database);

  const result = new Promise<[Error | null, any]>(resolve => {
    const url = `mongodb://${account}:${password}@${host}:${port}/${database}?authSource=admin&retryWrites=false`;
    console.log('mongodb url', url);

    const client = mongoose.createConnection(url, {
      useUnifiedTopology: true,
      useNewUrlParser: true,
      useFindAndModify: false,
      keepAlive: true,
      keepAliveInitialDelay: 30000
    });

    client.on('connected', err => {
      console.log('MongoDBTool.createMongoDBConnectClient --> connected', err);
      resolve([err, client]);
    });

    client.on('disconnected', () => {
      const deleteConnections: Array<any> = [];
      MongoDBConnectPool.forEach((item, key) => {
        if (item === this) deleteConnections.push(key);
      });
      deleteConnections.forEach(item => MongoDBConnectPool.delete(item));
      console.log('MongoDBTool.createMongoDBConnectClient --> disconnected', deleteConnections, MongoDBConnectPool.size);
    });
  });

  return result;
};
Secondly, get an established connection and perform operations
import Koa from 'koa';
import Router from 'koa-router';
import koaBodyParser from 'koa-bodyparser';
import serve from 'koa-static';
import path from 'path';

import { Schema } from 'mongoose';

import { getMongoDBConnectedClient } from './mongodb/mongodb';

const app = new Koa();
const router = new Router();

router.all('/mongodb', async ctx => {
  console.log(`[/mongodb] ${new Date().toLocaleString()} ${ctx.request.method} ${ctx.request.url}}`);
  console.log('[/mongodb]', ctx.request.body);

  // Use the environment variable to get the MongoDB configuration information
  const mongoDBConfig = process.env.['PGOS_VS_Storage_<MongoDBName>'];
  const parsedMongoDBConfig = JSON.parse(mongoDBConfig);

  // Please fill in the values from VS Storage in the options below.
  const mongodbClient = await getMongoDBConnectedClient({
    host: parsedMongoDBConfig.network[0].inner_ip,
    port: parsedMongoDBConfig.network[0].port,
    account: parsedMongoDBConfig.account,
    password: parsedMongoDBConfig.password,
    database: 'test'
  });

  const TestSchema = new Schema({
    id: { type: Number, default: null },
    name: { type: String, default: null },
    age: { type: String, default: null }
  });

  const model = mongodbClient.model('test_collection_1', TestSchema, 'test_collection_1');

  // 测试新增数据
  const res = await model.create({ id: 1000, name: 'PGOS', age: 3 });
  console.log('[/mongodb] mongodb create -->', JSON.stringify(res));

  const list = await model.find({}, {}, {});
  console.log('[/mongodb] mongodb find -->', JSON.stringify(list));

  // Return the data to the client
  ctx.body = {
    code: 200,
    message: 'success',
    time: new Date().toISOString(),
    request: {
      method: ctx.request.method,
      url: ctx.request.url,
      body: ctx.request.body,
      query: ctx.request.query
    },
    data: list
  };
});

app.use(koaBodyParser());
app.use(router.routes()).use(router.allowedMethods());
app.listen(8080);
console.log('Server is running at http://localhost:8080');
5.3 How to Mount the Cloud Disk for Virtual Server
Once creating a cloud disk, you can mount it to your Virtual Server. Please visit the link Create and Manage Virtual Server to learn how to mount the disk.
6. Database operation and maintenance
Currently, PGOS does not provide operation and maintenance features such as database monitoring and alarming. You can use the Terminal function in the Web Console to execute related commands to implement the operation and maintenance functions.
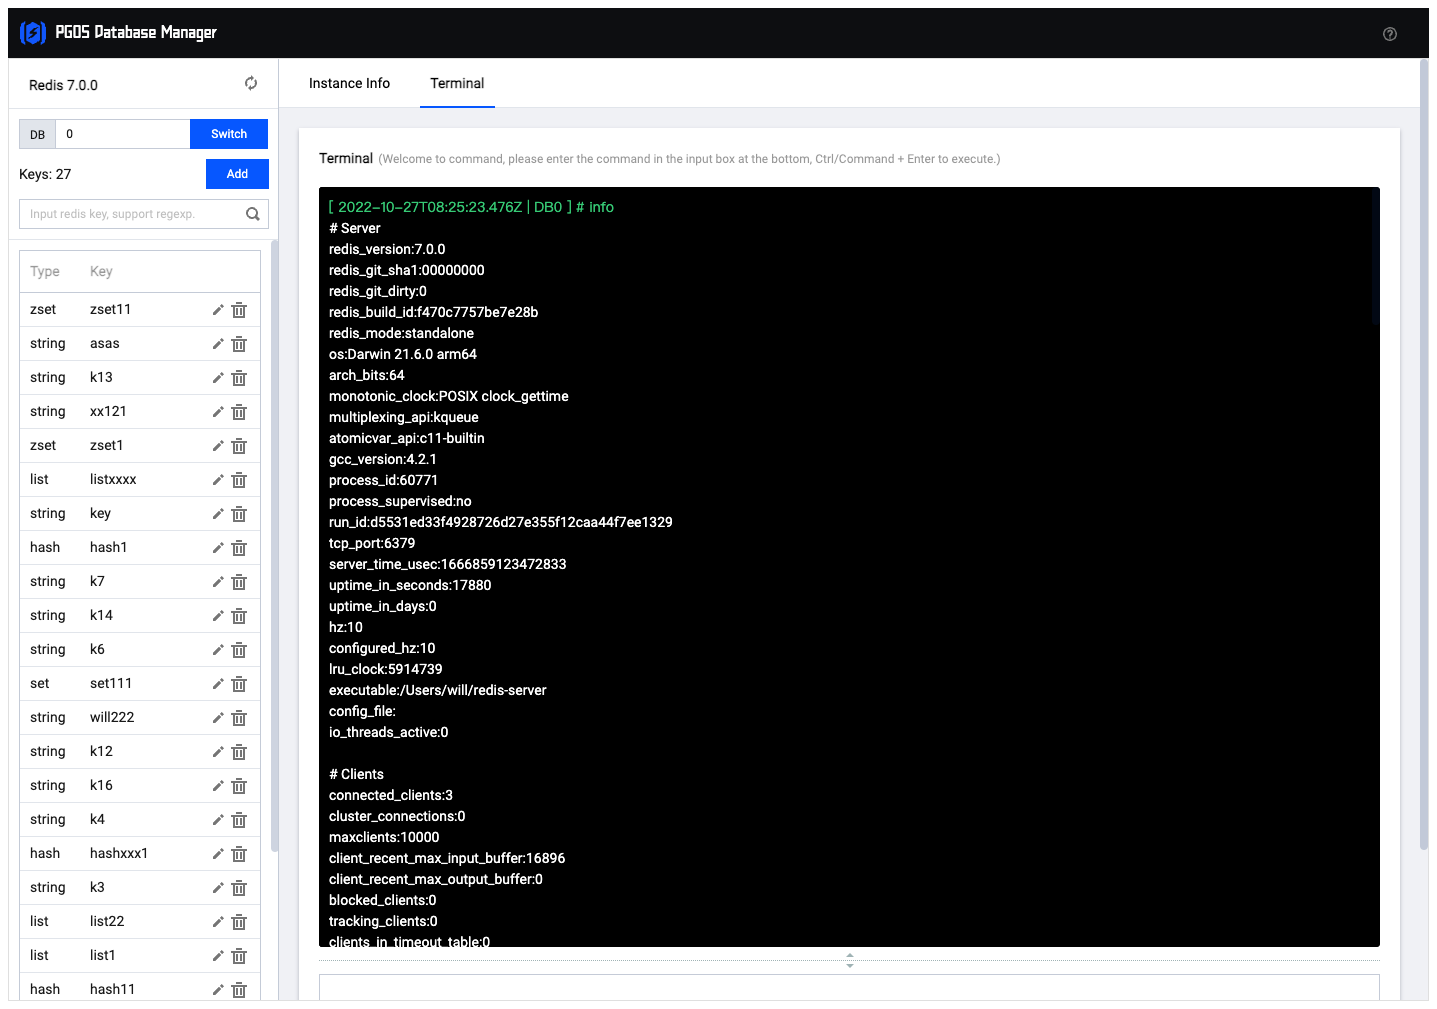
- Please refer to Redis command here:Redis Documents
- Please refer to MongoDB command here:MongoDB Documents