Fleets
Fleet represents a set of DS (dedicated server) hosting resources, and it is also the service responsible for DS deployment and lifetime management. The game can specify:
- Version of game server: Build Configuration.
- How to launch a game server process: Process Configuration.
- Where and how to deploy the game server: Deployment Configuration.
- Access security for game server: Firewall Configuration.
1. Add Fleet
1.1 Open Create Page
Choose DS Hosting > Fleets, click the Add Fleet button:

After the button is clicked, the following creation page will open:
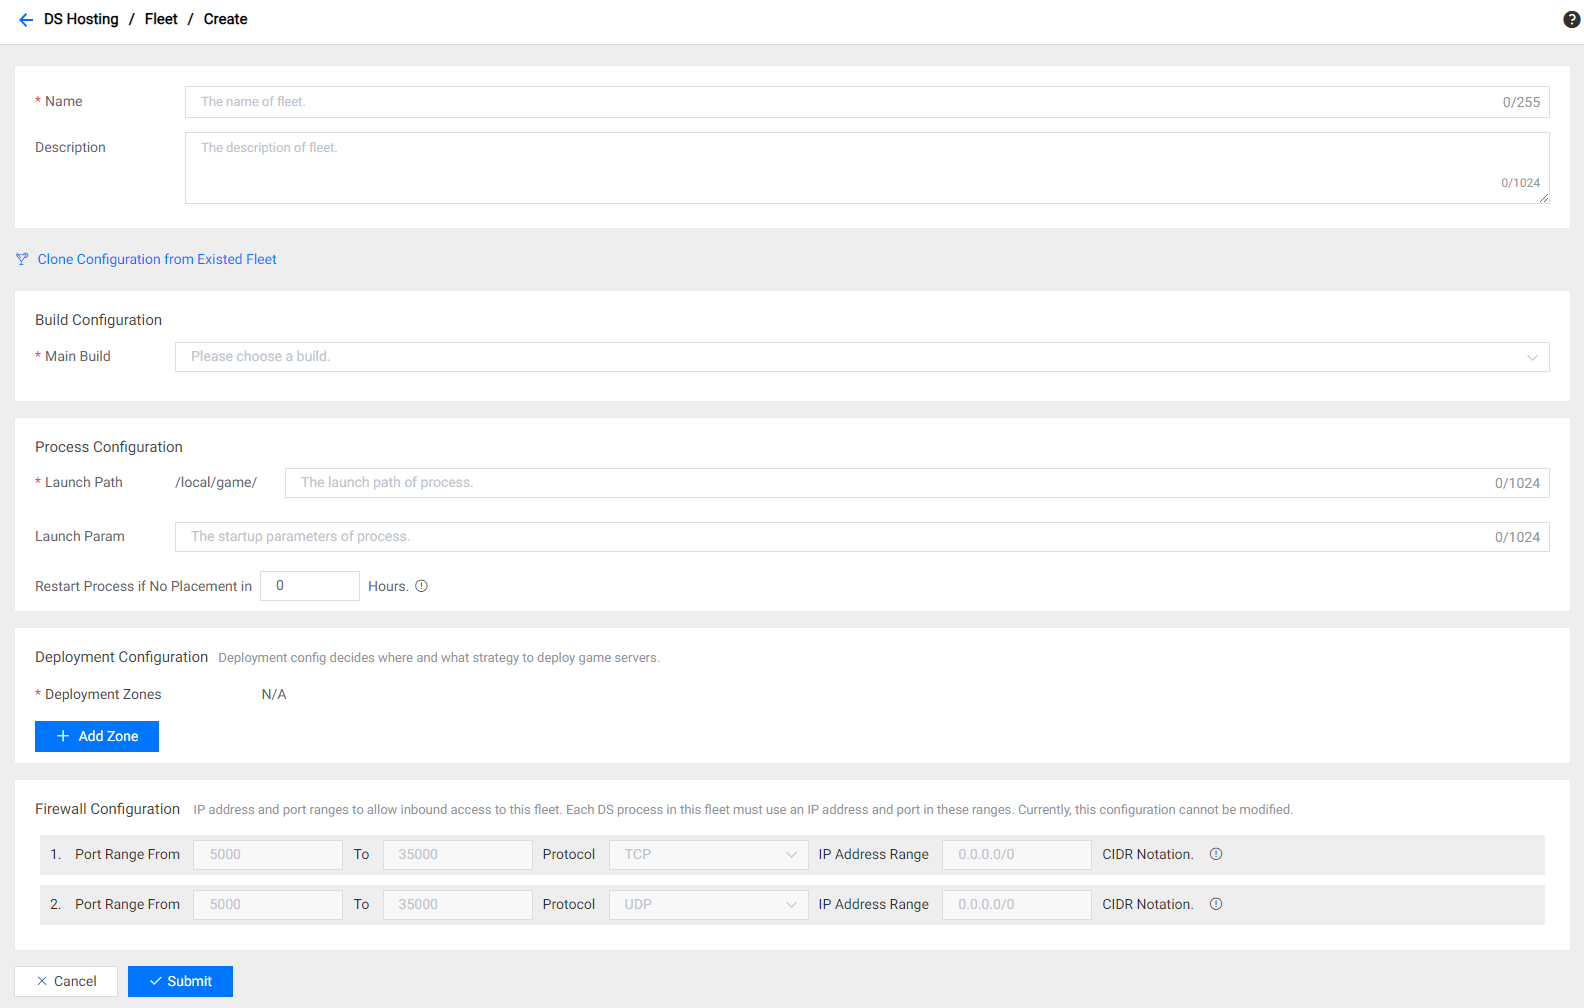
1.2 Basic Configuration

Fill in the fields below:
- Fleet Name: a descriptive name for the fleet, which is not needed to be unique, however it can't be modified after submission.
- Description: description of the fleet, which can be modified after submission.
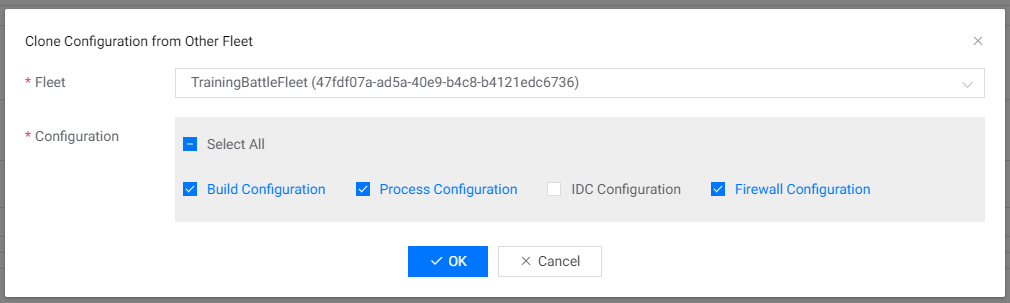
If this Fleet has the similar configuration values as another Fleet, you can click Clone Config from Other Fleet to ease the work:
1.3 Build Configuration
1.3.1 Config Main Build When Add New Fleet
Select an already created Build:

1.3.2 Modify Main Build after Fleet Creation
You can always modify Fleet's main build if needed. Select the new build from the build list:

Select an update mode:

- Force Update: Update all machines immediately, whether they are holding battle sessions or not.
- Soft Update: Update when the machine is idle (not holding any battle session). Machines deployed with the old main build will be marked as
WATING_UPDATEstatus, and new battle sessions cannot be placed on machines inWATING_UPDATEstatus.
Click submit button to submit the modification, then refresh the page, and wait for the update to complete (may need to refresh the page to check):

1.4 Process Configuration

Fill in the fields below:
- Launch Path: the dedicated server executable file path in the build package, which cannot be a script file path (*.sh, *.ps1, *.bat, etc.).
- Launch Param: parameter string can be passed to the dedicated server process at startup. (optional)
- Process Restart Attempt Time: After the server process has been running for the specified duration, it will be restricted from hosting new battle sessions. Once all existing battle sessions it is hosting have ended, the server process will attempt to restart. This helps DS avoid certain data anomalies caused by prolonged operation (such as the time dilation issue in UE4). The setting value must not be greater than 168 hours (7 days). If it is set to 0, this setting will be ignored.
1.5 Deployment Configuration
The deployment configuration specifies where and how to deploy the game servers.
1.5.1 Overall Concept
PGOS manages game server deployment using two levels, Data Center and Zone:
- Data Center: it is a physical data center of cloud provider in a certain city, which can provide the machine resources to deploy game servers.
- Zone: it is a cluster composed of multiple data centers within a geographic region, where these data centers share a scaling strategy and are scheduled on-demand within the cluster. The concept of Zone is abstracted, so that the game can effectively utilize the machine resources of different data centers within a geographic region, so as to achieve cost control and resource backup. The game will not be charged for the backup data center's resources if they are not utilized, even if it is set up.
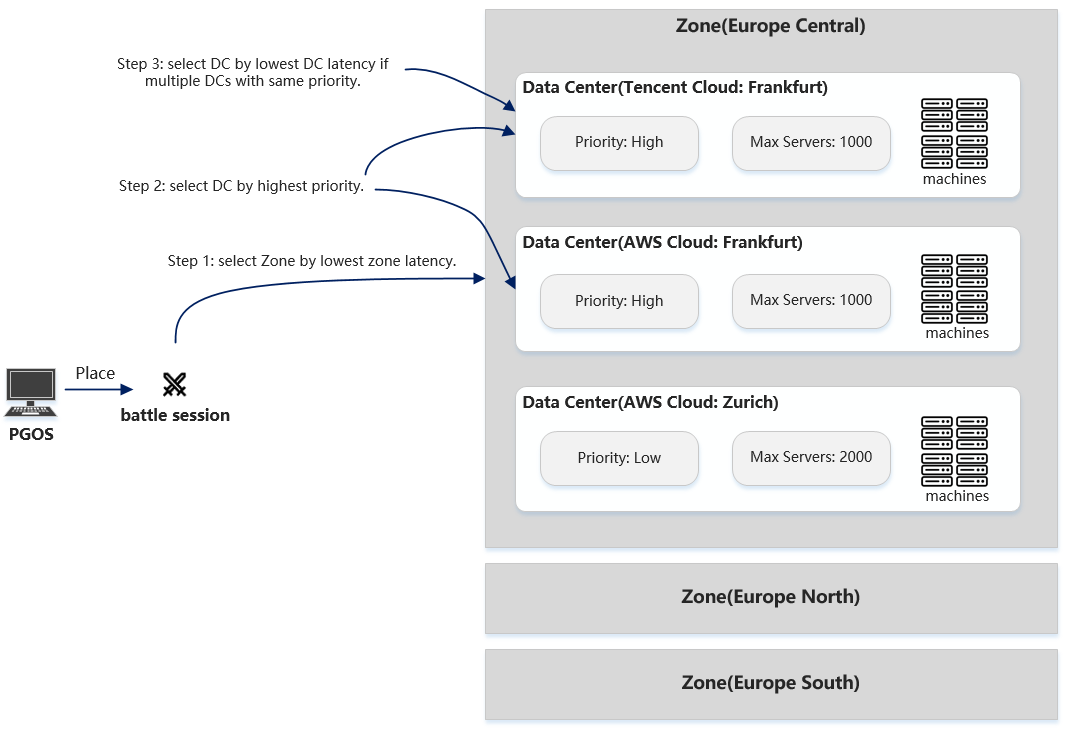
Here is a rough conceptual diagram:
1.5.2 Add Zone
Add a zone to provide game server services to a certain geographical region.


1.5.3 Add Data Center
Add a data center to utilize machine resources from a cloud provider in a specific city.


Data Center: The physical data center of cloud providers in a certain city, which can provide the machine resources to deploy game servers.
Priority: The priority of the data center when the zone needs to place a battle session, that is, when a battle session needs to be placed on a server process, the server process will be selected from the data center with the highest priority. If multiple data centers have the same priority, the data center with the lowest latency to the players will be selected first.
The Priority setting also affects which data center is prioritized for scaling up: The data center with the highest priority will be scaled up first. When multiple data centers have the same highest priority, The scaling operation will strive to distribute idle server processes across these data centers evenly.
Machine Type: PGOS offers two types of machines:
- Virtual Machine (VM) that is billed based on usage
- Bare Metal (BM) that is billed on a monthly basis.
Machine Models: The machine models allowed for deployment in the data center. The game must select at least 1 model, and a maximum of 10 models can be selected, and the models ranked first will be prioritized for purchase and deployment.
1.5.4 Scaling Strategy Setting
Scaling strategy specifies how to control the number of game server processes.

1.5.4.1 Server Capacity of Data Center
For Virtual Machine Data Center:
Specify the maximum server process count for the data center:

The data center has a maximum limit on the number of server processes that can be launched. Since the actual number of server processes is an integer multiple of the
Server Processes per Machinesetting, the final actual number of server processes may slightly exceed this maximum limit.Why the actual value may slightly exceed the setting value, here is an example: Assume the max server processes for the data center is 1000, and the data center has only 1 machine model with the setting: 6 server processes per machine, then the final actual number of max server processes is 1002 (= 6 * 167), which is slightly exceed the setting value (1000).
For Bare Metal Data Center:
Specify the number of bare metals to be assigned to this zone from the bare metal pool:

The bare metal machines will always be running unless you return them to the backend from the bare metal pool, and they will not be cooled down. Therefore, the number of server processes running on bare metal machines is fixed and does not participate in automatic scaling.
Click here to learn more about managing Bare Metal instances on the portal.
1.5.4.2 Scaling Mode of Zone
PGOS offers two scaling modes:
- Fixed Server Processes: Start a fixed number of game servers, suitable for Debug or QA scenarios.
- Auto Scaling With Buffer: Automatically scale up or down while maintaining a certain number or percentage of available game server processes.
Fixed Server Processes Mode
In this mode, the zone will maintain a fixed number of server processes equal to the sum of the maximum server processes for all data centers. This means that the machines hosting these server processes will incur ongoing costs, so this mode is more suitable for Debug or QA scenarios with a small number of server processes.

- Initial Server Processes: The number of initialization server processes for the zone. It is the number of warm-up server processes after the zone is created, and it is also the minimum number of server processes for the zone. Since the actual number of server processes is an integer multiple of the
Server Processes per Machinesetting, the final actual number of server processes may slightly exceed this setting value. In the Fixed Server Processes mode, the Initial Server Processes are equal to the Max Server Processes, and can not be modified. - Max Server Processes: The maximum number of server processes for the zone, its value is the sum of the
Max Server Processesin all data centers. Since the actual number of server processes is an integer multiple of theServer Processes per Machinesetting, the final actual number of server processes may slightly exceed this maximum limit.
Auto Scaling With Buffer Mode
In this mode, the zone will automatically adjust the number of server processes based on the current number of battle sessions. Additionally, to facilitate faster placement of battle sessions, the zone will maintain a certain number or percentage of available game server processes.
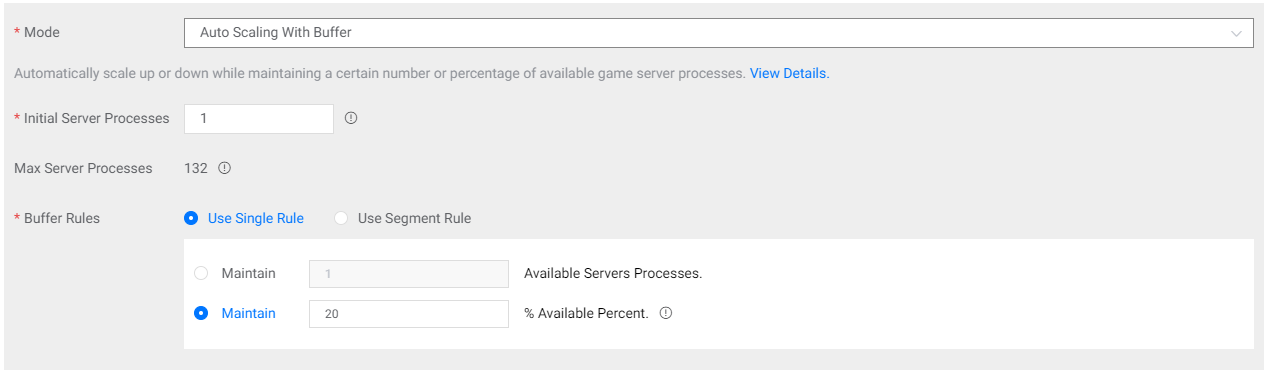
Initial Server Processes: The number of initialization server processes for the zone. It is the number of warm-up server processes after the zone is created, and it is also the minimum number of server processes for the zone. Since the actual number of server processes is an integer multiple of the
Server Processes per Machinesetting, the final actual number of server processes may slightly exceed this setting value. Its value must be an integer greater than 0.Max Server Processes: The maximum number of server processes for the zone, its value is the sum of the
Max Server Processesin all data centers. Since the actual number of server processes is an integer multiple of theServer Processes per Machinesetting, the final actual number of server processes may slightly exceed this maximum limit.Buffer Rules: The Zone maintains available server processes to support quick battle session placement until the total number of running server processes exceeds the maximum limit of server processes. There are two ways to specify how to maintain available game server processes:
Maintain Available Servers: maintain a fixed number of available/idle game server processes.

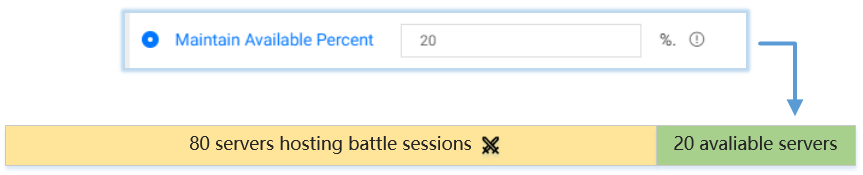
Maintain Available Percent: maintain a percentage of available server processes based on the total number of current server processes.
Some games may have different growth rates for battle session placement requests at different activated battle session scales. Therefore, in addition to supporting
Single Rule, PGOS also providesSegment Rule, which allows the game to set different buffers based on the current number of activated battle sessions (placed servers).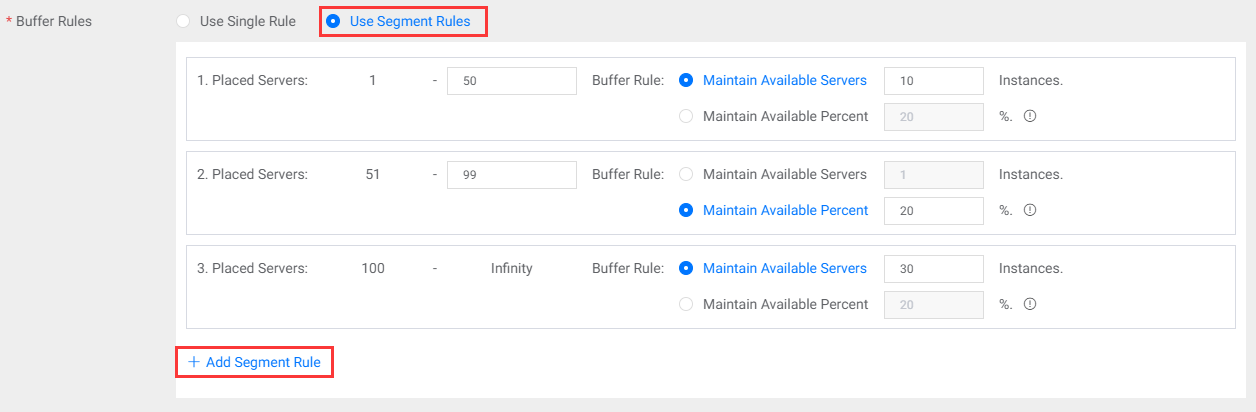
1.5.4.3 Save Cost for Dev/Test Title Region
If all the battle sessions held by the zone have been terminated, then after the specified time (cooldown time), PGOS backend will attempt to scale down all usage-based billing machines to 0. The purpose of this setting is to save hosting costs, especially for those fleets used for Debug/QA.

If the zone or data center is in cooldown status and a battle session placement request is received, the PGOS backend will automatically restore a number of server processes equal to the Initial Server Processes to fulfill the placement request without requiring any additional intervention.
1.5.5 Server Processes per Machine
After selecting which machine models to deploy in the data center, we also need to specify the maximum number of server processes allowed to run simultaneously for each machine model.

1.5.6 Server Process Hosting Battle Session Mode
This configuration specifies how the DS process hosts battle sessions.

There are two modes available:
- Simple Mode: A server process can host only 1 battle session and will restart the process when the battle session ends.
- Parallel Mode: A server process can host multiple battle sessions concurrently, and when a battle session ends, its slot can be used by a new battle session. With this mode, game developers are required to implement the necessary logic for the DS to manage multiple battle sessions simultaneously. And it is highly recommended to set a valid value for the "Process Configuration - Process Restart Attempt Time" to prevent unexpected issues caused by prolonged server process uptime.
This configuration can only be specified when creating a Fleet and cannot be changed afterwards.
1.6 Storage Configuration

The default storage size configured by PGOS for the machine is 50GB. However, games can configure a more suitable space size as needed. For example, if a game requires performance analysis for DS and wishes to output a large amount of performance logs locally, 50GB of space may not be sufficient. In this case, the game can choose the Custom Capacity mode and set a larger space size.
1.7 Submit to Create

When all these configuration fields are filled, click the Submit button then a new fleet is created.
2. Fleet List
Choose DS Hosting > Fleets, you will see a list of all created fleets, and the list displays some key information about these sleets:
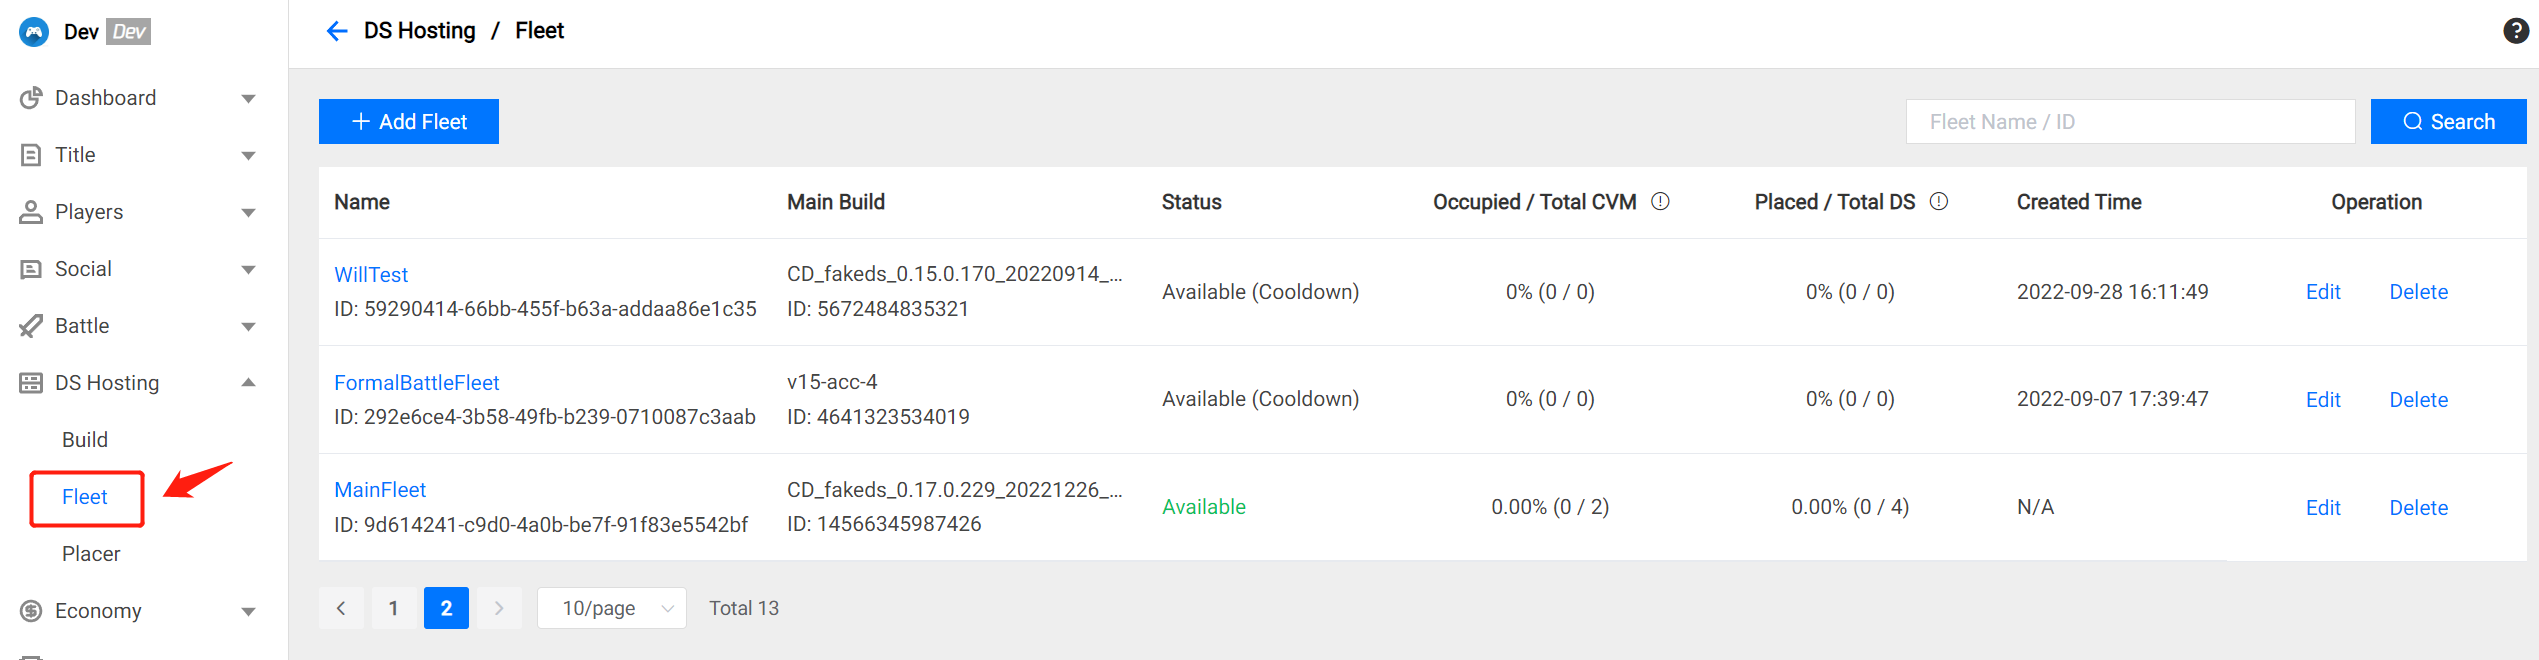
The Operation column on the right shows the operations that can be performed on the fleet.
2.1 Fleet Status
A Fleet may be in one of the following status:
2.1.1 Status: New
Fleet is being newly created, it does not yet have any resources.
2.1.2 Status: Launching
Fleet is acquiring resources. It may be purchasing machines, or downloading/installing server Build on machine, or launching server instances.
2.1.3 Status: Available
Fleet's game server instances (maybe not all instances) are working properly and can accept battle session placement.
2.1.4 Status: Available(Cooldown)
If all battlesessions are terminated and no new battlesession placement for a period of time, the backend will try to scale down all machines to 0, and then the fleet status will become Available(Cooldown). The purpose of this mechanism is to save cost, especially for those Fleet used for Debug/QA.
A fleet in Available(Cooldown) status is still available for battle session placement, when a battle session placement request suddenly comes, the backend will automatically restore the initial server processes specified by the scaling strategy to meet the request, and then the fleet status will become Available.
2.1.5 Status: Unavailable
Fleet has an exception that cannot be automatically repaired, and cannot provide battlesession placement services. At this time, you can view the Fleet Event for details.
2.1.5 Status: Deleting
Fleet is being deleted, which is usually triggered by a manual delete operation.
2.2 Edit Fleet
Click the Edit will enter a fleet editing page. For the field editing of fleet, please refer to Add Fleet.

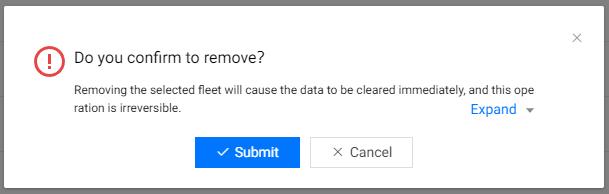
2.3 Delete Fleet
Click the Delete and there will be a confirmation pop-up window asking if you really want to delete the fleet.

❗ Note:
Deleteoperation may not succeed when the fleet is associated with some placers.- Please confirm the
Deleteoperation because it cannot be recovered.
2.4 View Detail
Click the Name in blue font will open the fleet details page:
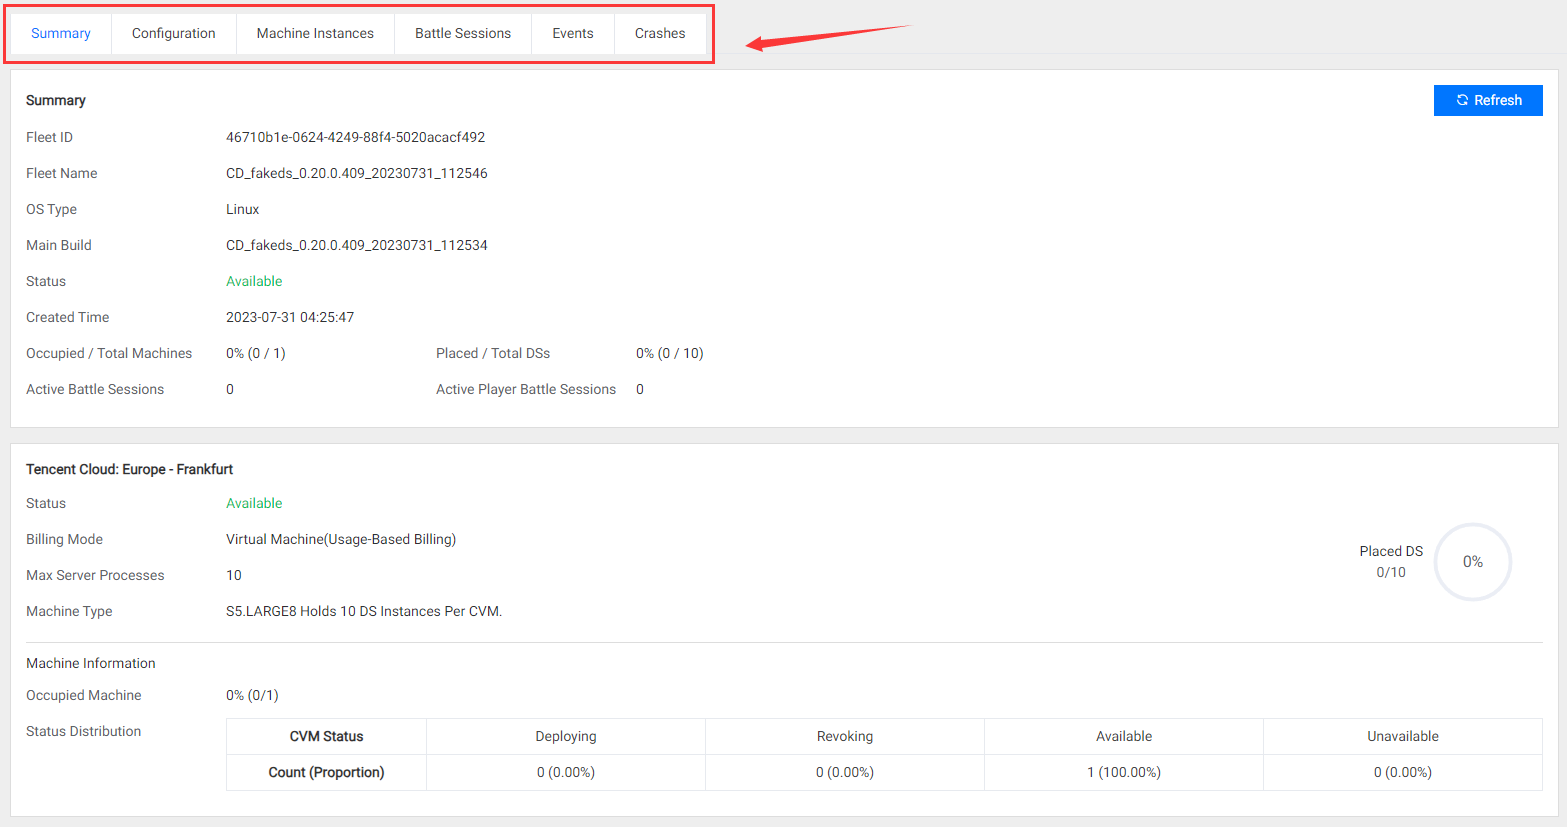
The page shows several sub-tabs:
- Summary: General details of the fleet.
- Configuration: View or edit the fleet configuration.
- Machine Instances: A list of all machine instances belonging to the fleet, you can view key machine information (such as status, ip, crash core dump, etc.) here.
- Battle Sessions: A list of battle sessions that have been placed on the fleet.
- Events: A list of key events that occurred on the fleet.
- Crashes: A list of DS crashes that occurred on the fleet.
2.4.1 Summary
Displays general information about current fleet.
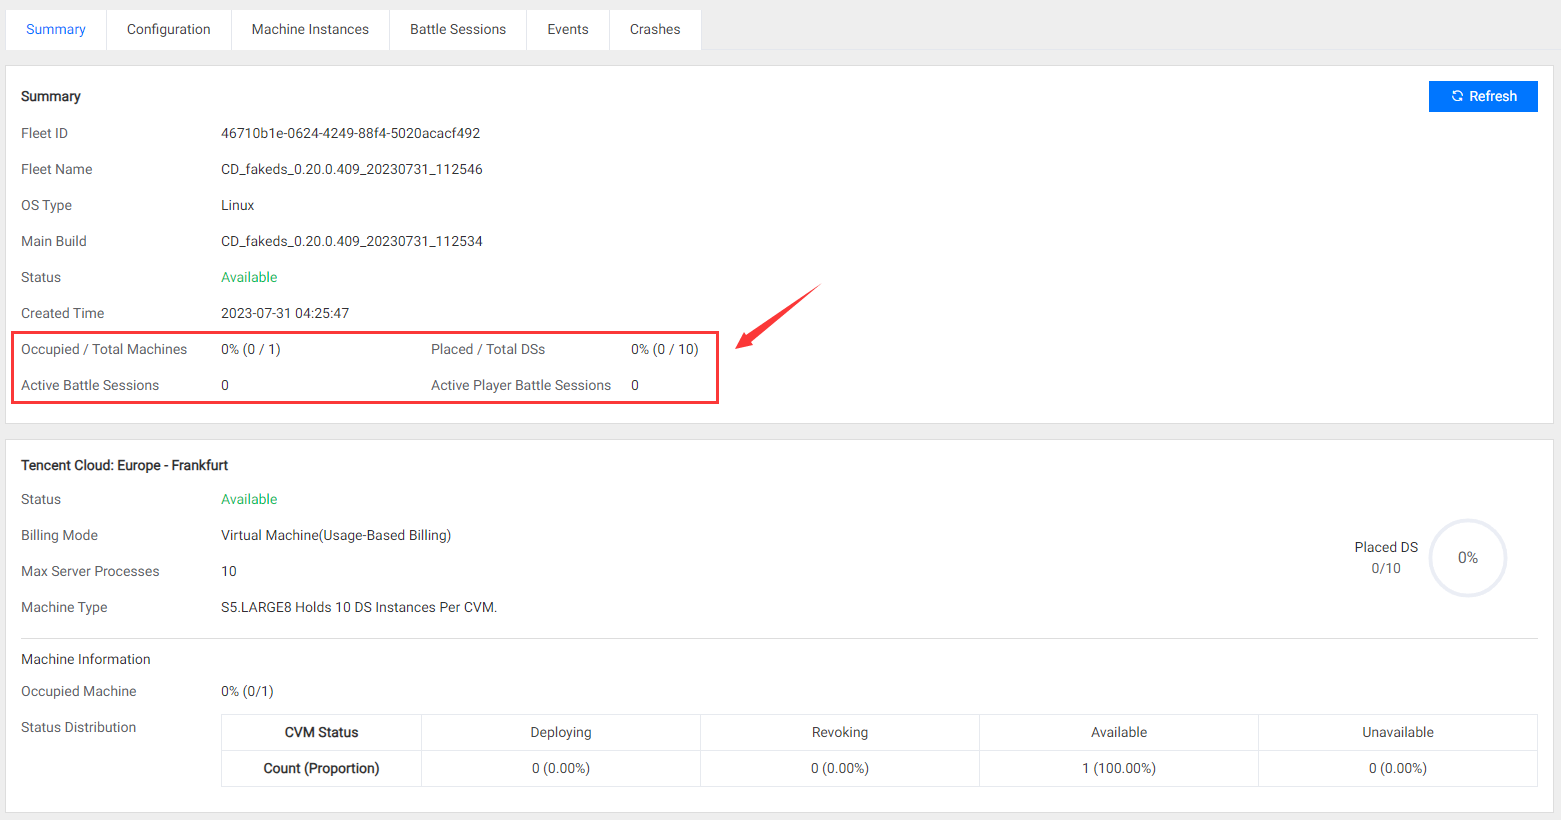
Meaning of key fields:
- Occupied / Total machines: A occupied machine means that at least one battle session is running on this machine.
- Placed / Total DSs: A placed DS means that a battle session has been placed to the DS instance, it is no longer an idle DS instance.
- Active Battle Sessions: The number of battle sessions currently being played.
- Active Player Battle Sessions: The number of players currently playing in the battle sessions.
2.4.2 Configuration
You can view the current fleet configuration here, if you want to edit it, please refer to Add Fleet.
2.4.3 Machine Instances
A list of all machine instances belonging to the fleet:

You can filter the list of machine instances by ID, IP, Status, Build, IDC.
Key column descriptions for the machine list:
Last core dump Time
If a DS crash has occurred on the machine, the time of the last crash will be displayed here.
❗ Note: If the DS program doesn't have the function of generating crash dumps, there will be no data in this column.
For Unreal DS programs, you can simply add "-core" to the launch parameters to enable the programs to generate crash dumps.
Click the time value to open the DS crash list for this machine:

Click
Details to view the details of the core dump, which includes the core dump stack: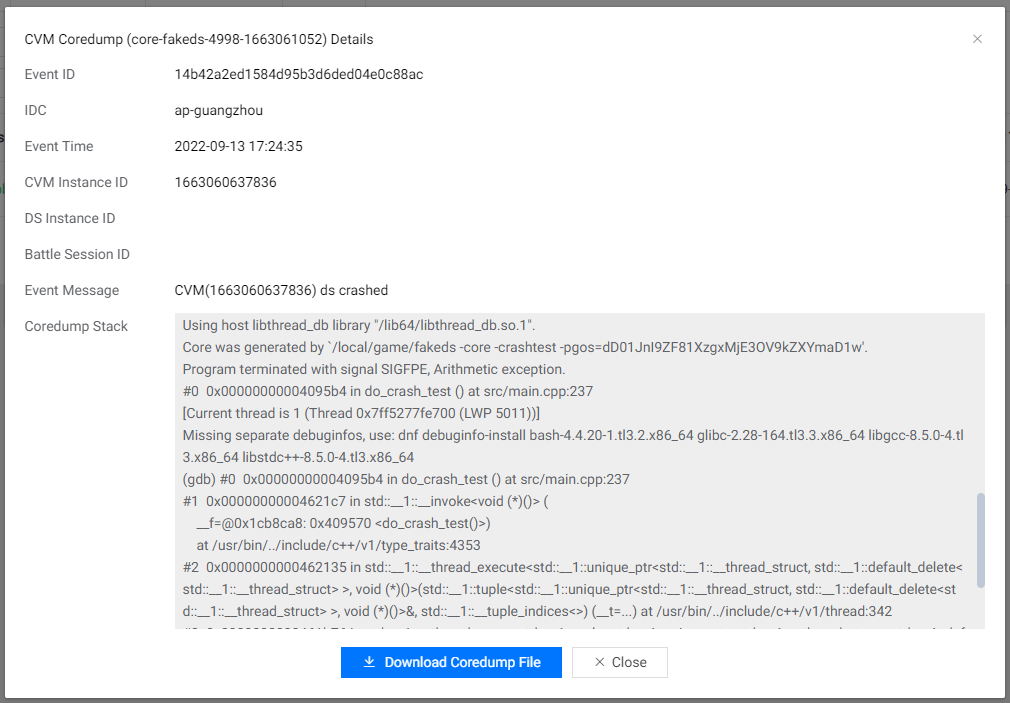
You can also click
Downloadto download the core dump file to the local for further analysis.Operation Monitoring

Click
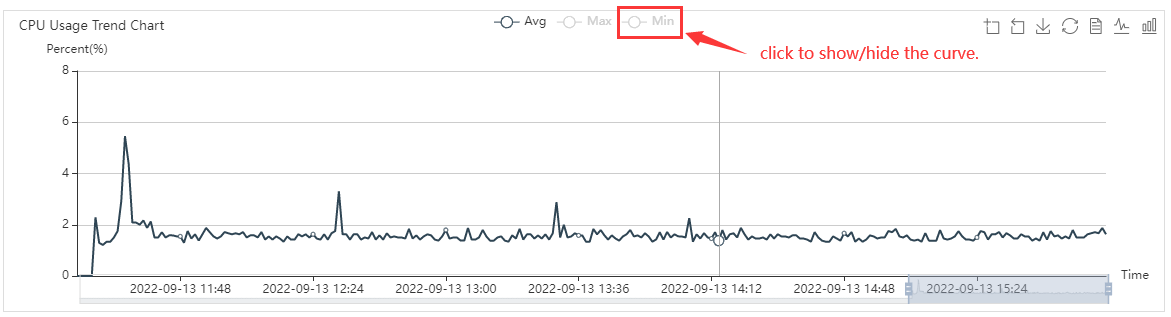
Monitoringin theOperationcolumn to open the monitoring page and view the CPU/Memory usage trend of the machine: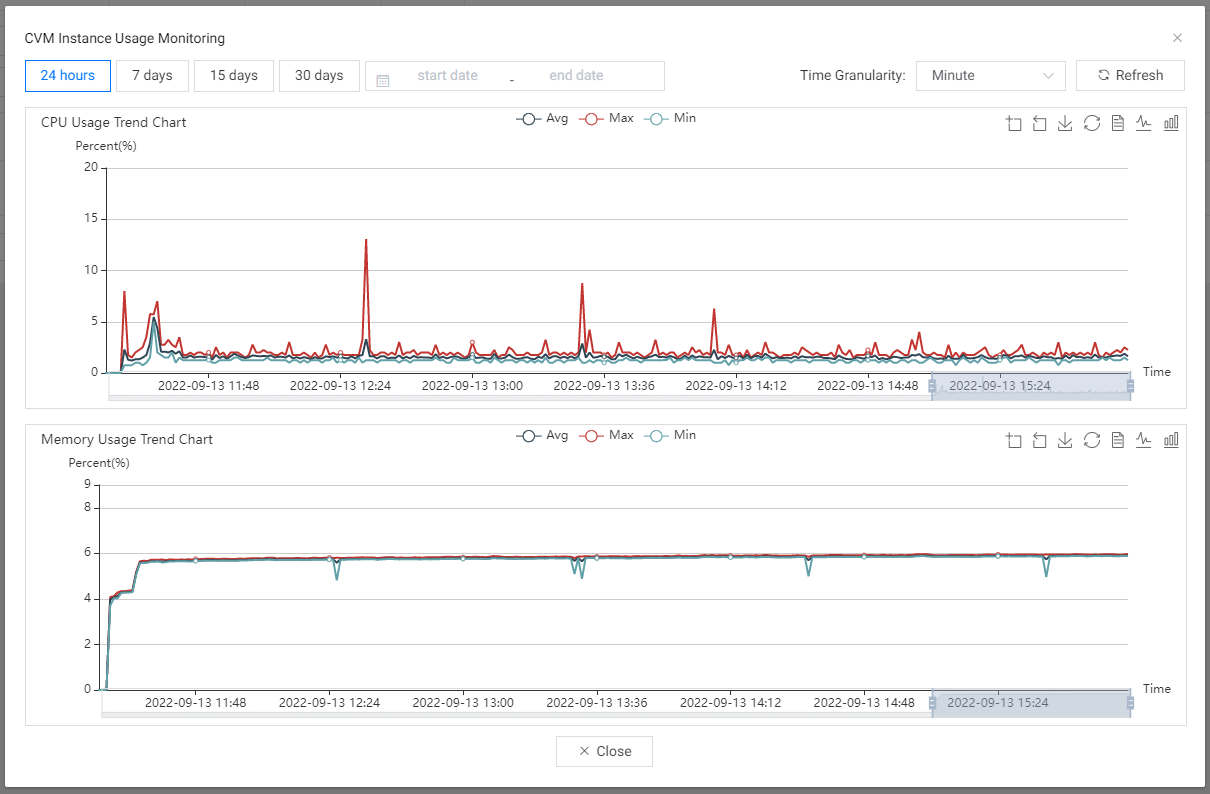
You can select a certain date range and a certain time granularity to view the average, maximum and minimum values of the collected samples, and you can click to show/hide a certain curve.
Operation Terminal
Click
Terminalin theOperationcolumn to start our proxy terminal on the machine: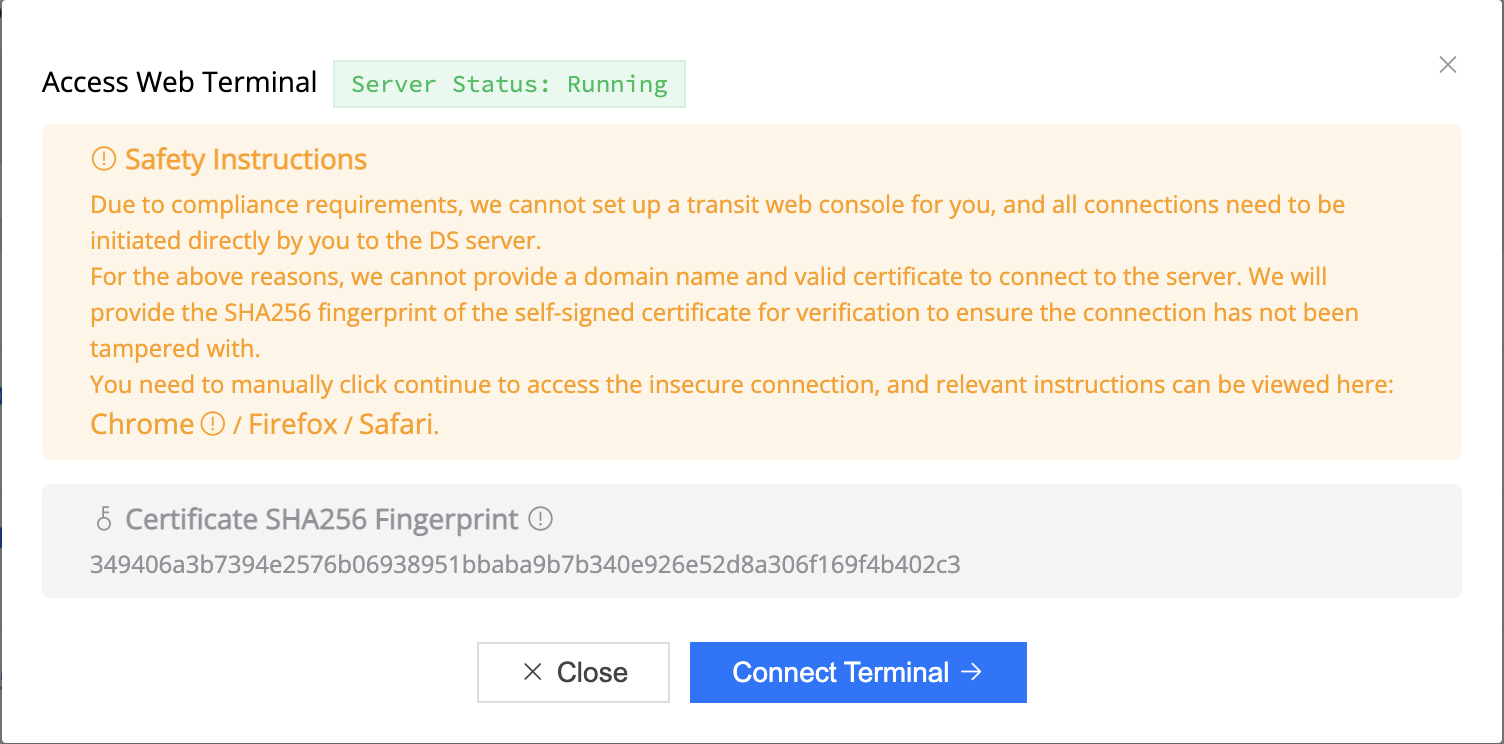
After the Terminal service starts successfully, you can click
Connect Terminalto jump to the Terminal.❗ Note: Please note that due to compliance issues, we can only provide you with a P2P direct connection and a self-signed certificate. However, we will provide the sha256 value of the certificate. Please verify whether the sha256 value of the certificate is correct according to the prompts on the page.
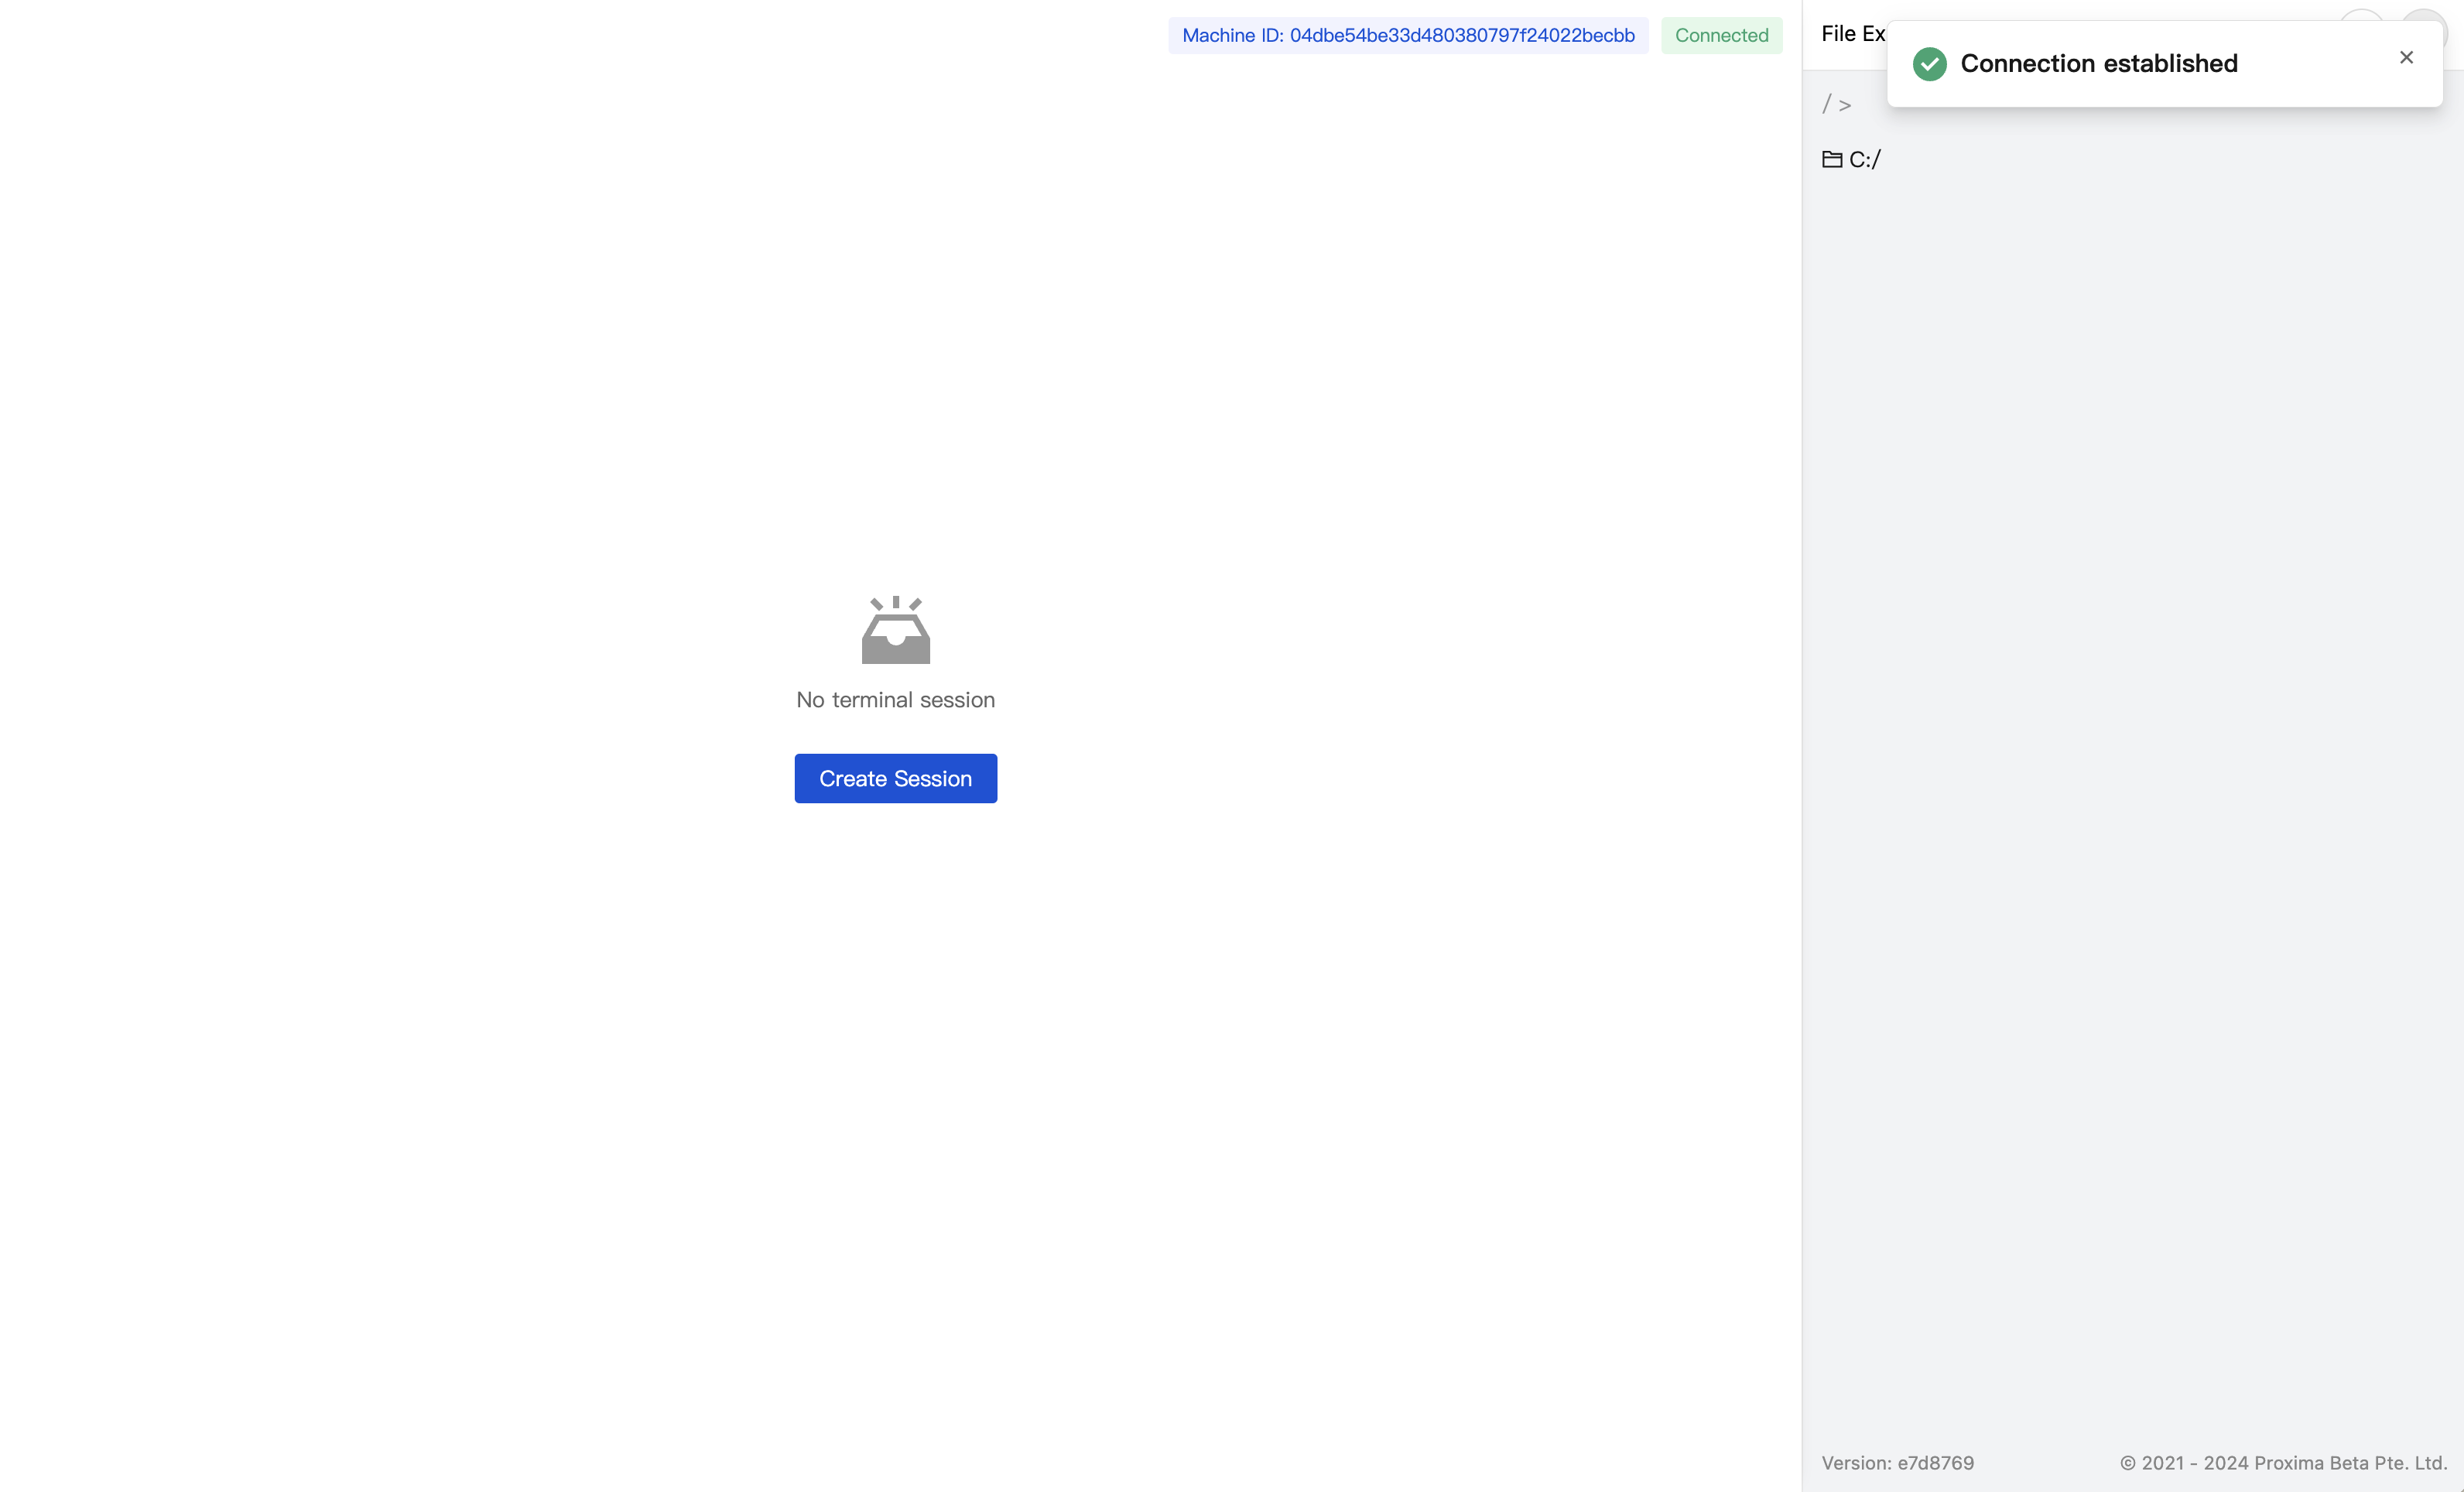
After the connection is successful, you can operate the machine through the terminal. VNC and Shell are supported in Windows machine, and Shell is supported in Linux machine. You need to create a new terminal session for each operation.
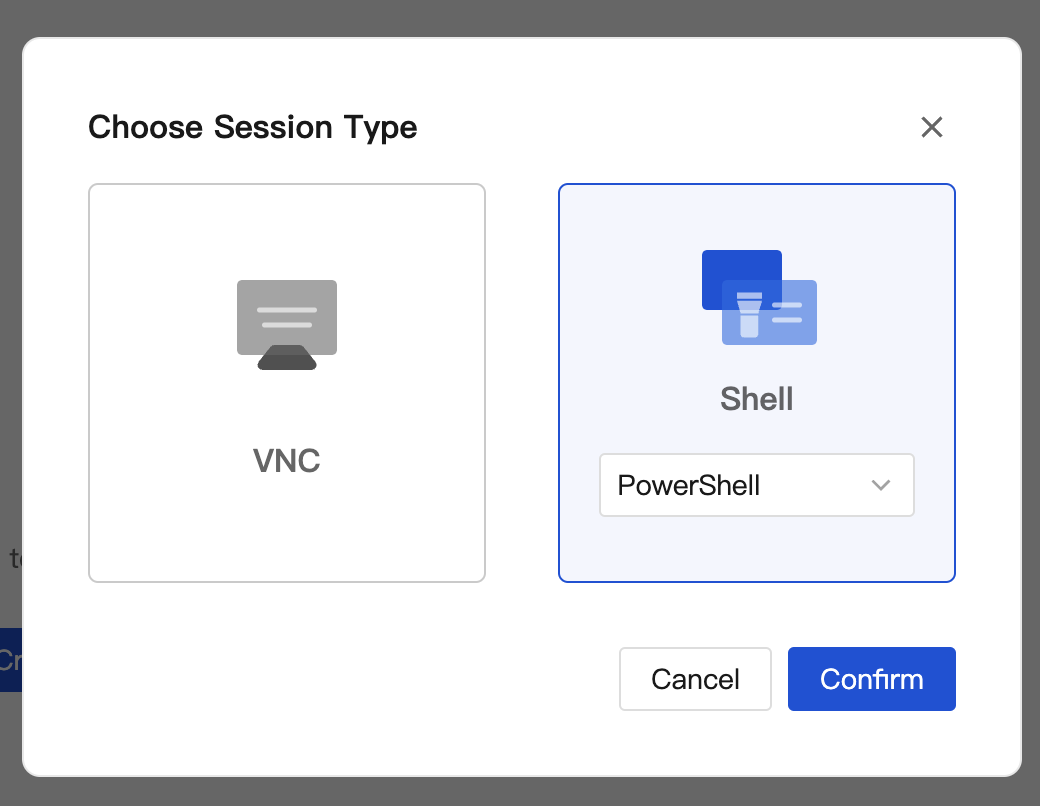
After creating a session, you will be able to operate the machine through the terminal:

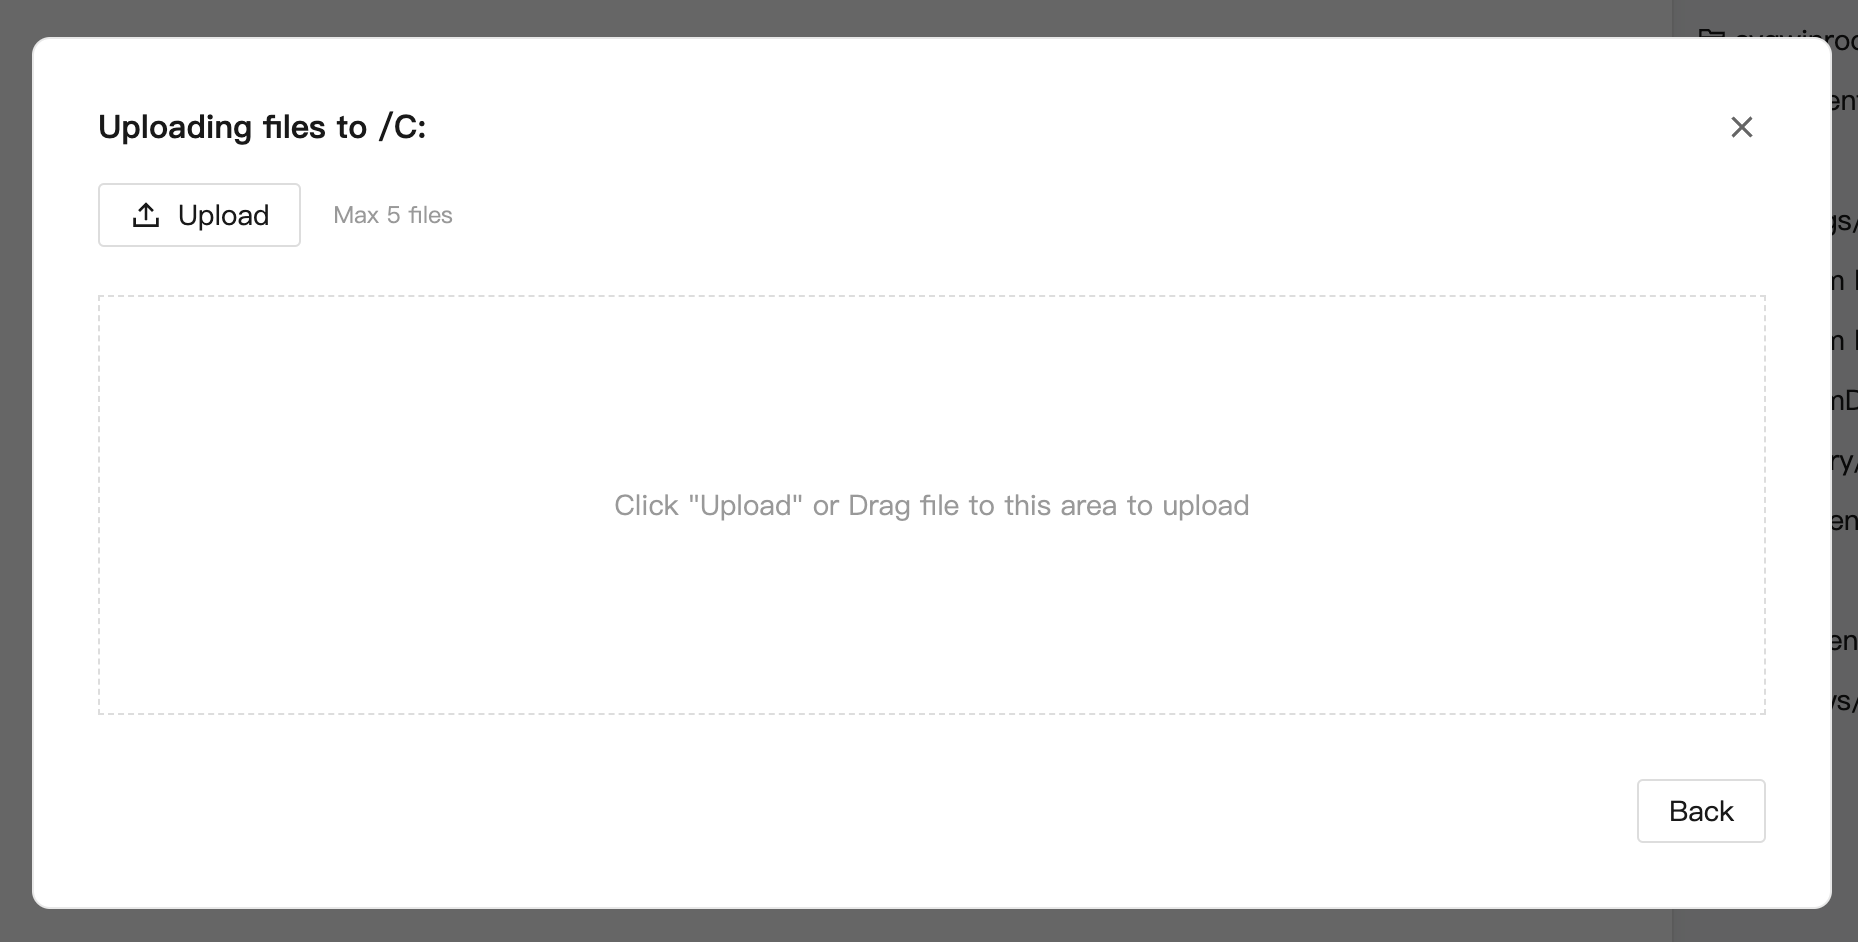
On the right, file operations are supported, you can upload files to the machine, download files from the machine, with graphical file management.
Operation Explore

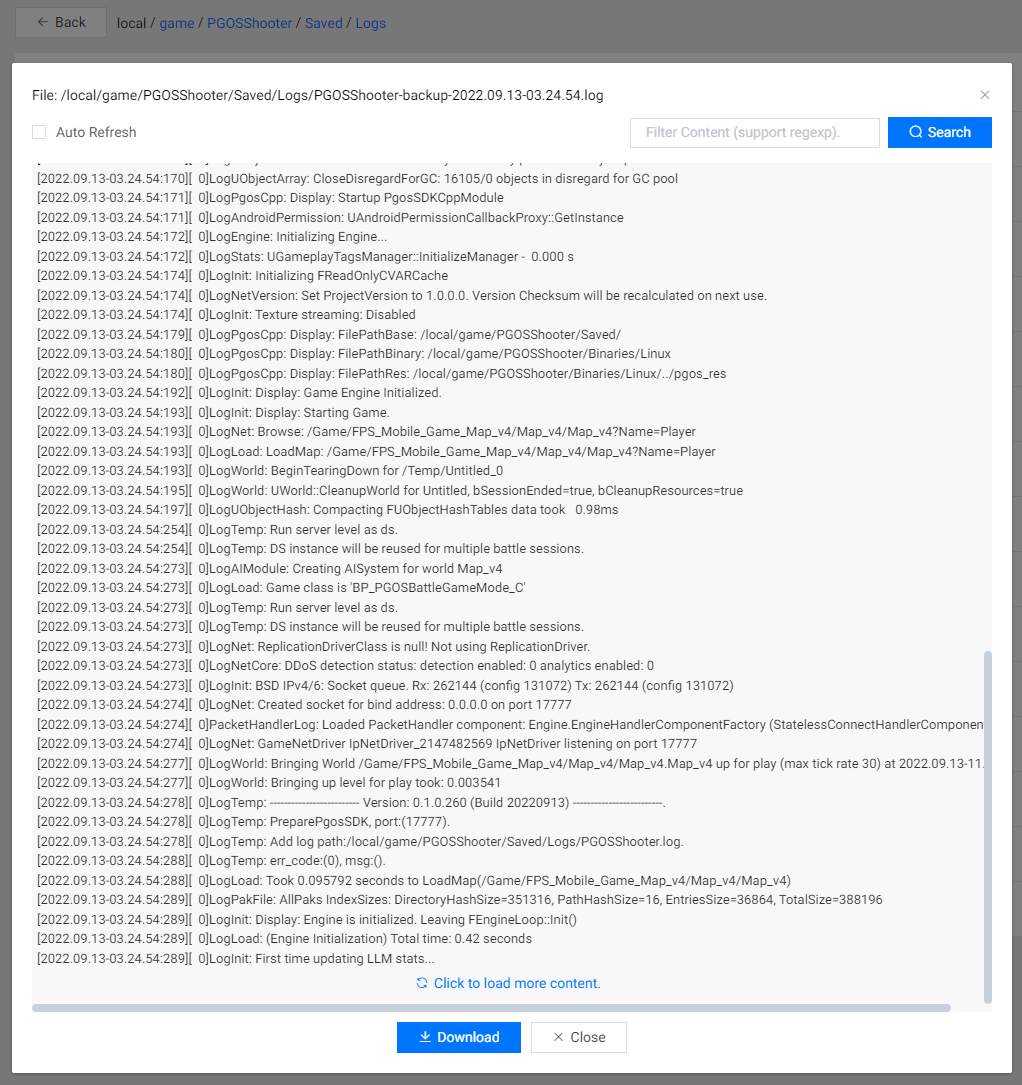
Click
Explorein theOperationcolumn to open and browse the game DS folder on this machine:
You can view any files/folders in the game directory, or download them, and even preview some text files online:
Operation Reboot

Click
Rebootin theOperationcolumn to reboot the machine instance, and there will be a confirmation pop-up window asking if you really want to reboot it.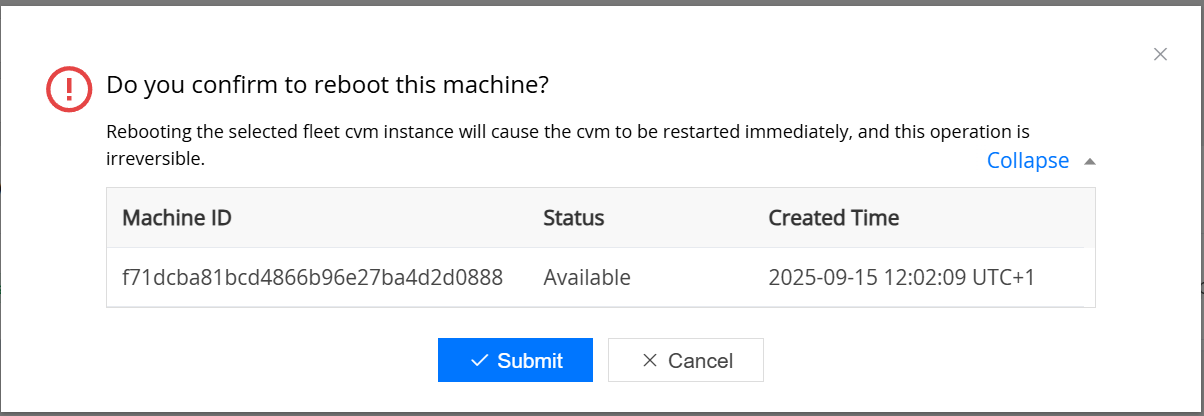
Operation Revoke

Click
Revokein theOperationcolumn to revoke the machine instance, and there will be a confirmation pop-up window asking if you really want to revoke it.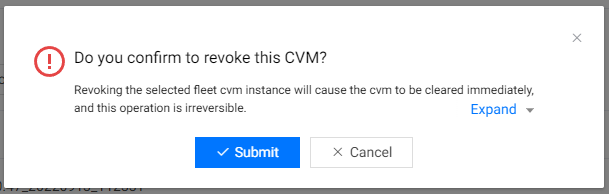
❗ Note:
The
Revokeoperation is a forceful action that immediately terminates the machine instance, regardless of whether an active battle session is running. Since this may result in players being disconnected from the DS, please exercise caution when performing this operation.
2.4.4 Battle Sessions
A list of battle sessions that have been placed on the fleet, you can filter the list by ID, Source Configuration, machine ID, IDC, and Build.

Click the ID to view the details of the battle session:
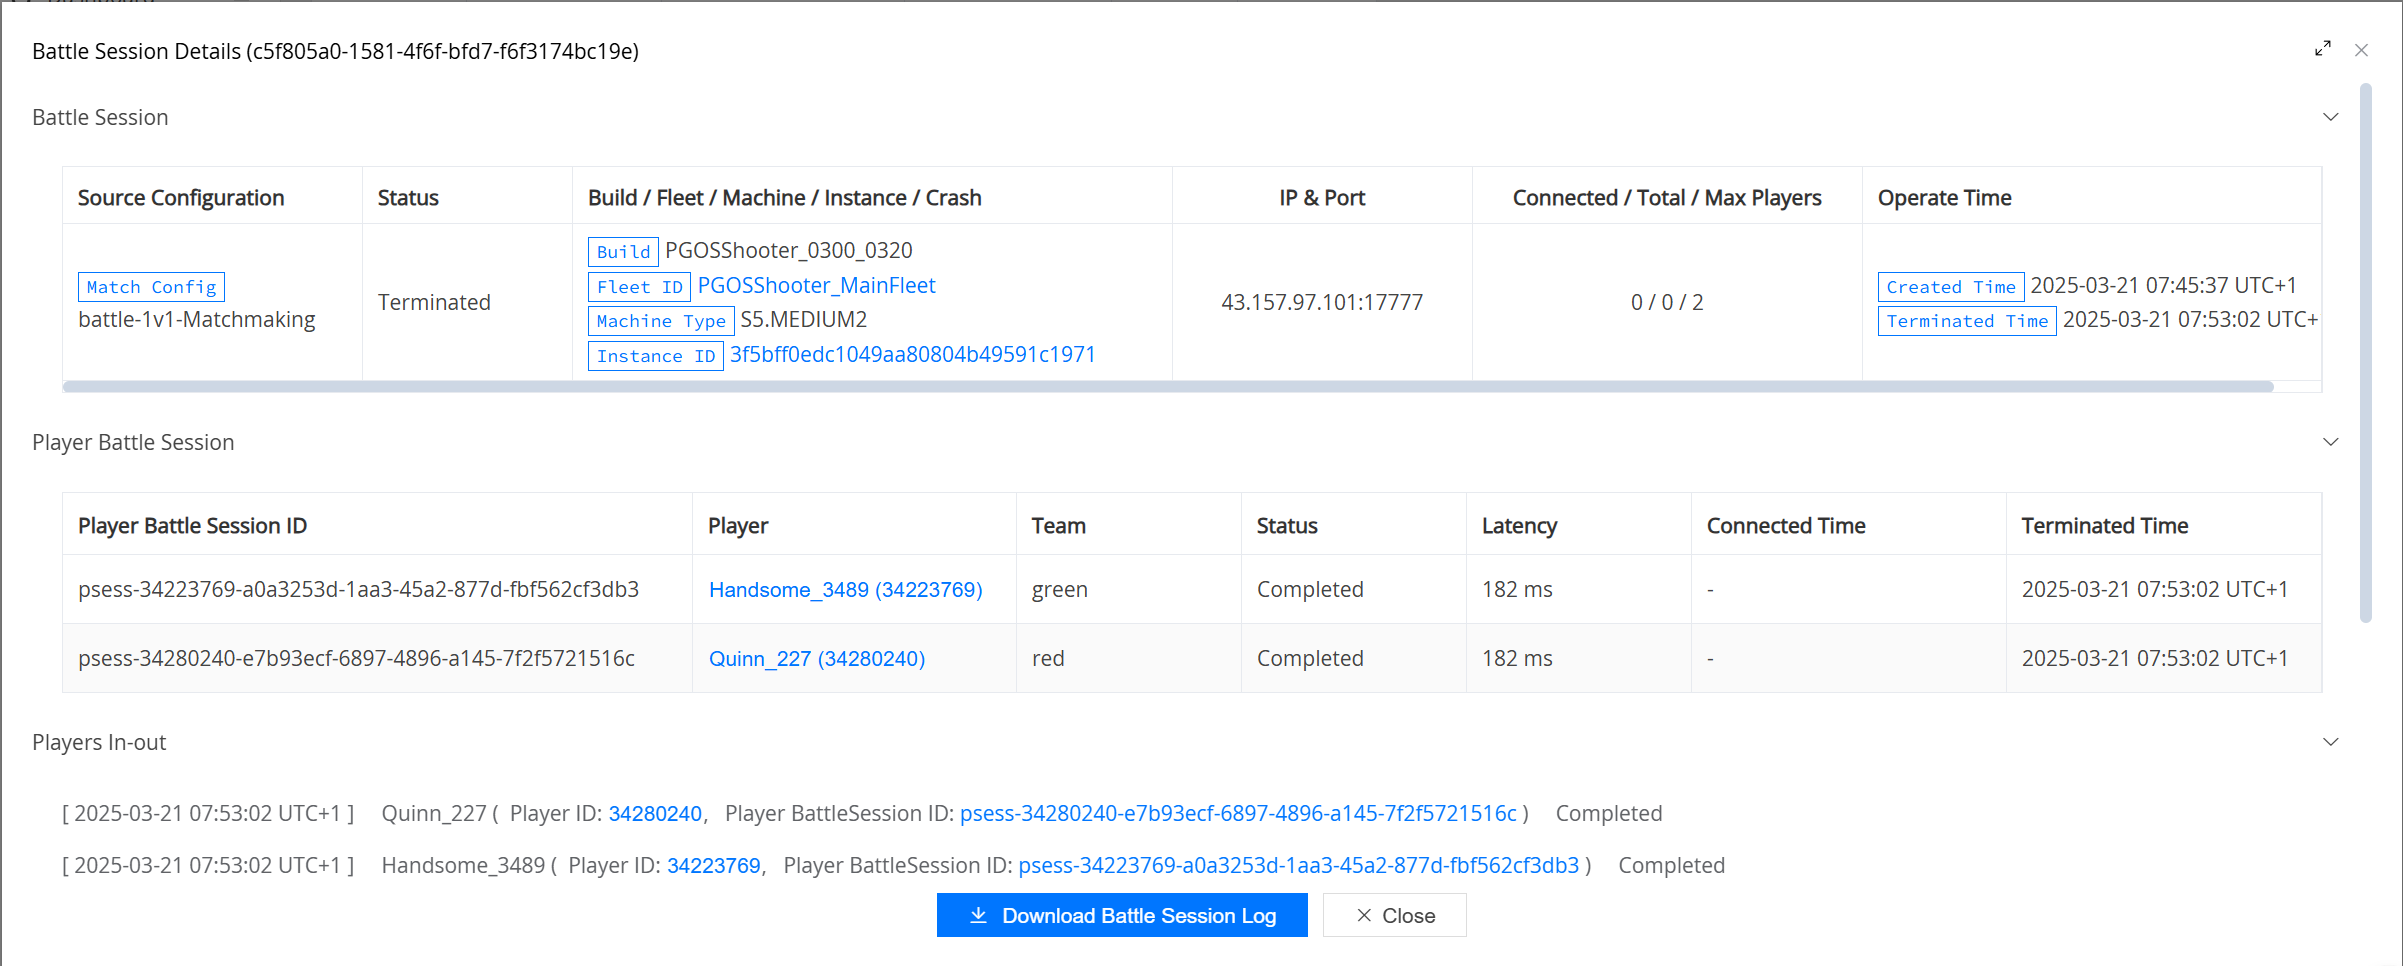
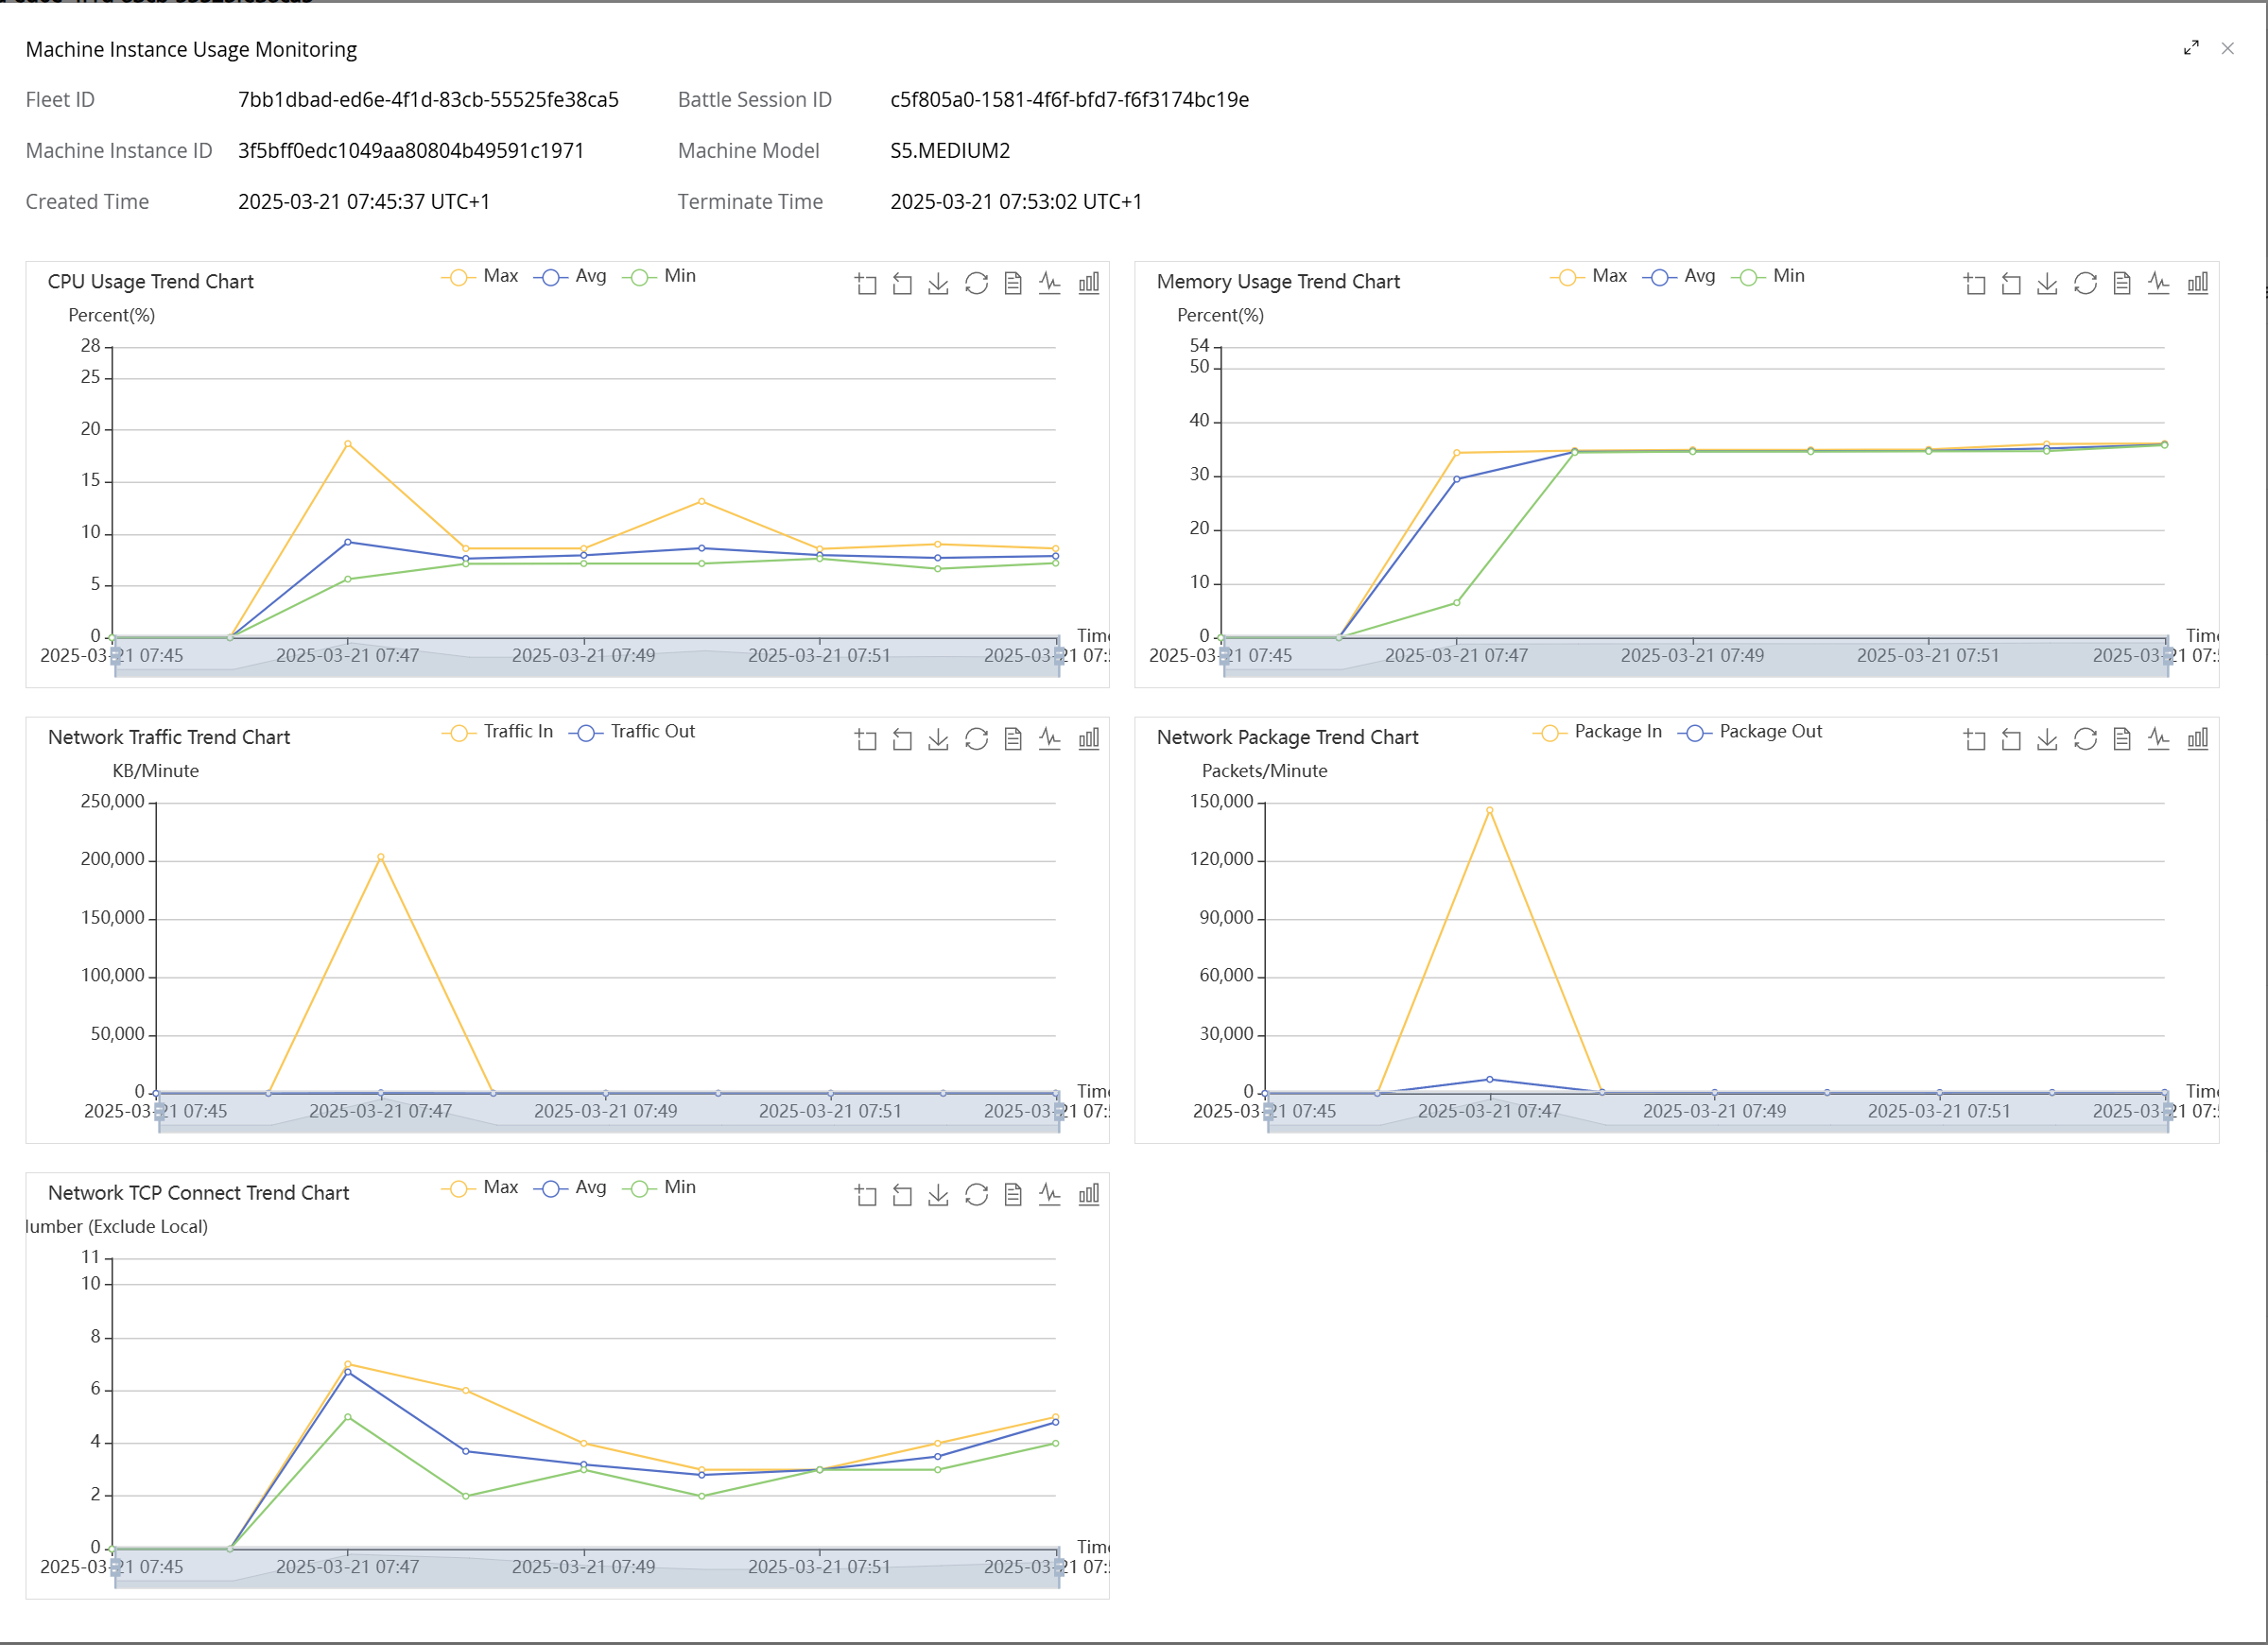
Click on the Monitoring link and you can view the performance of the machine during the battle session:
2.4.5 Events
A list of key events that occurred on the fleet:
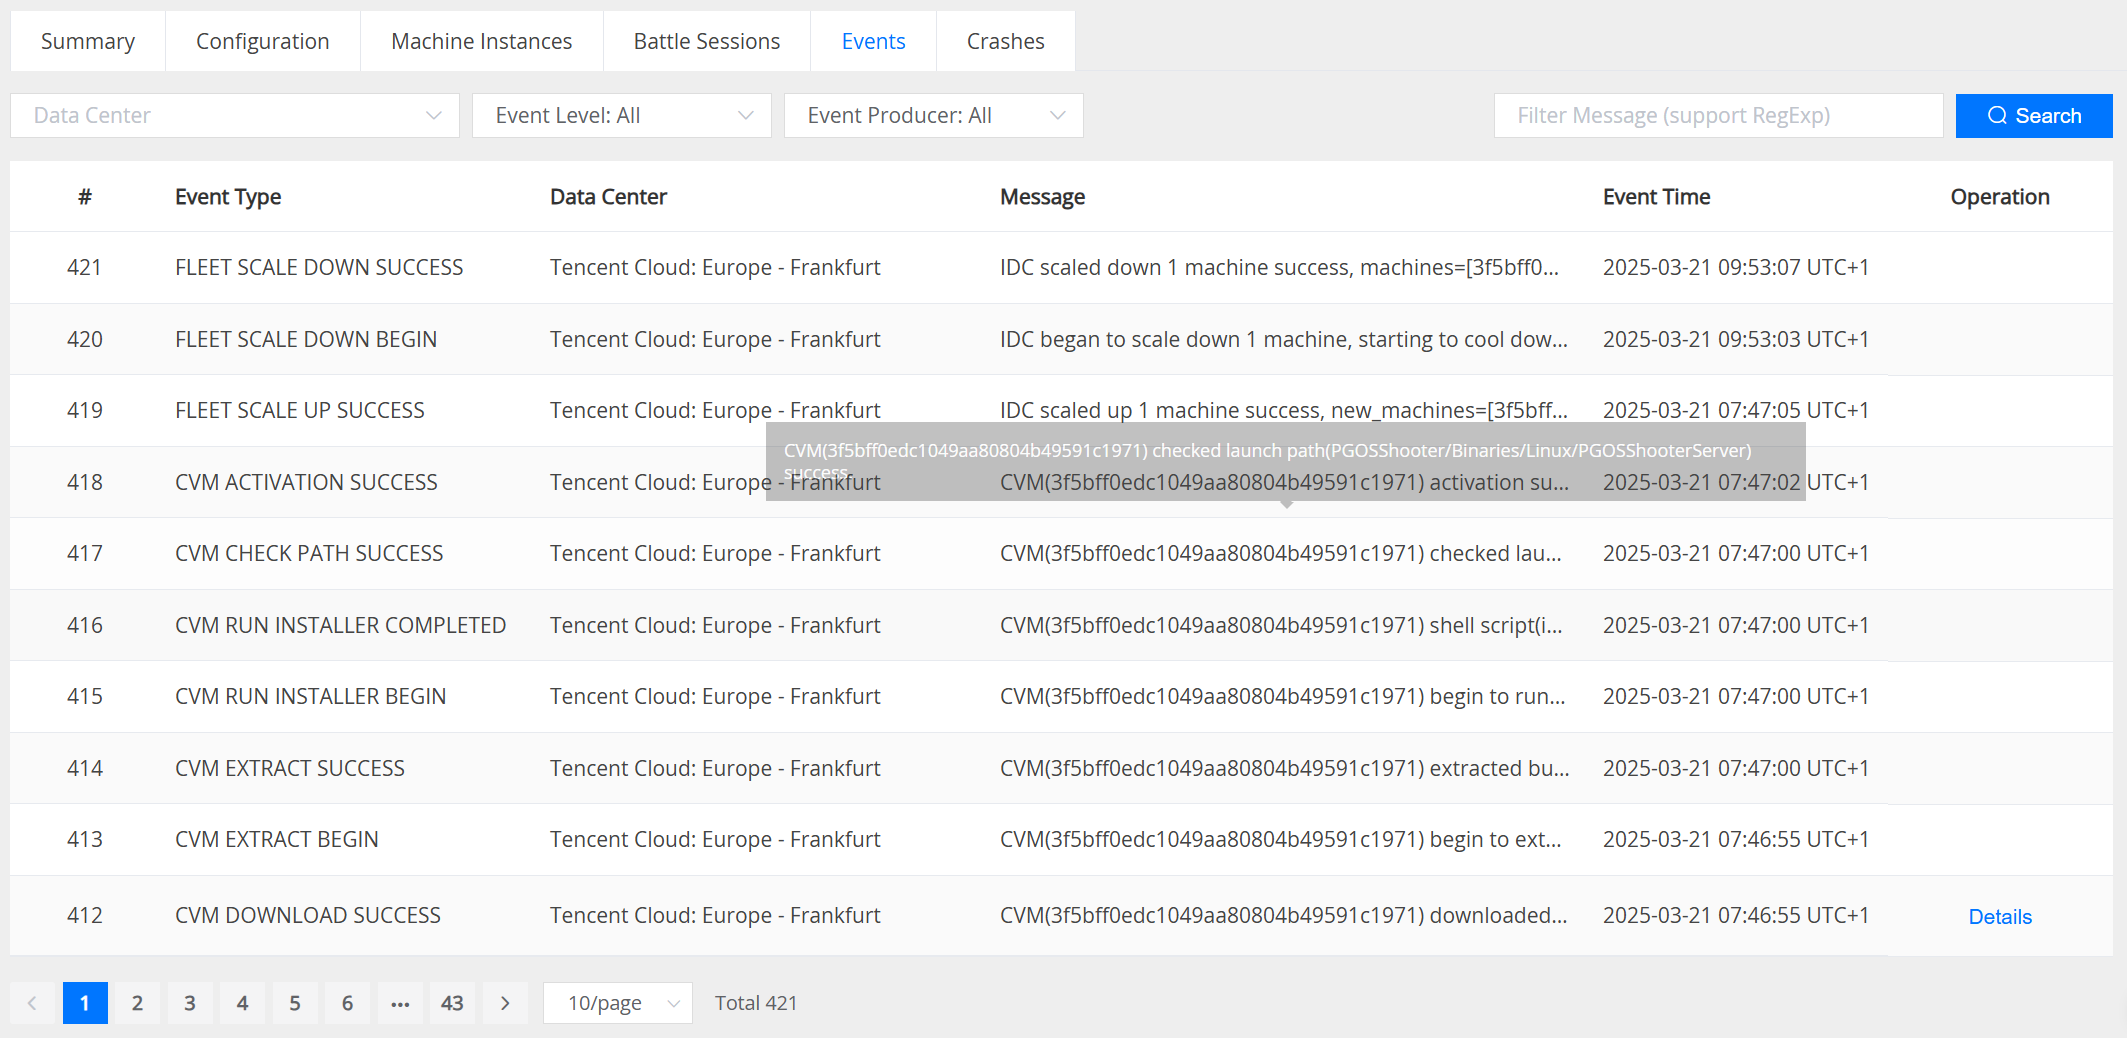
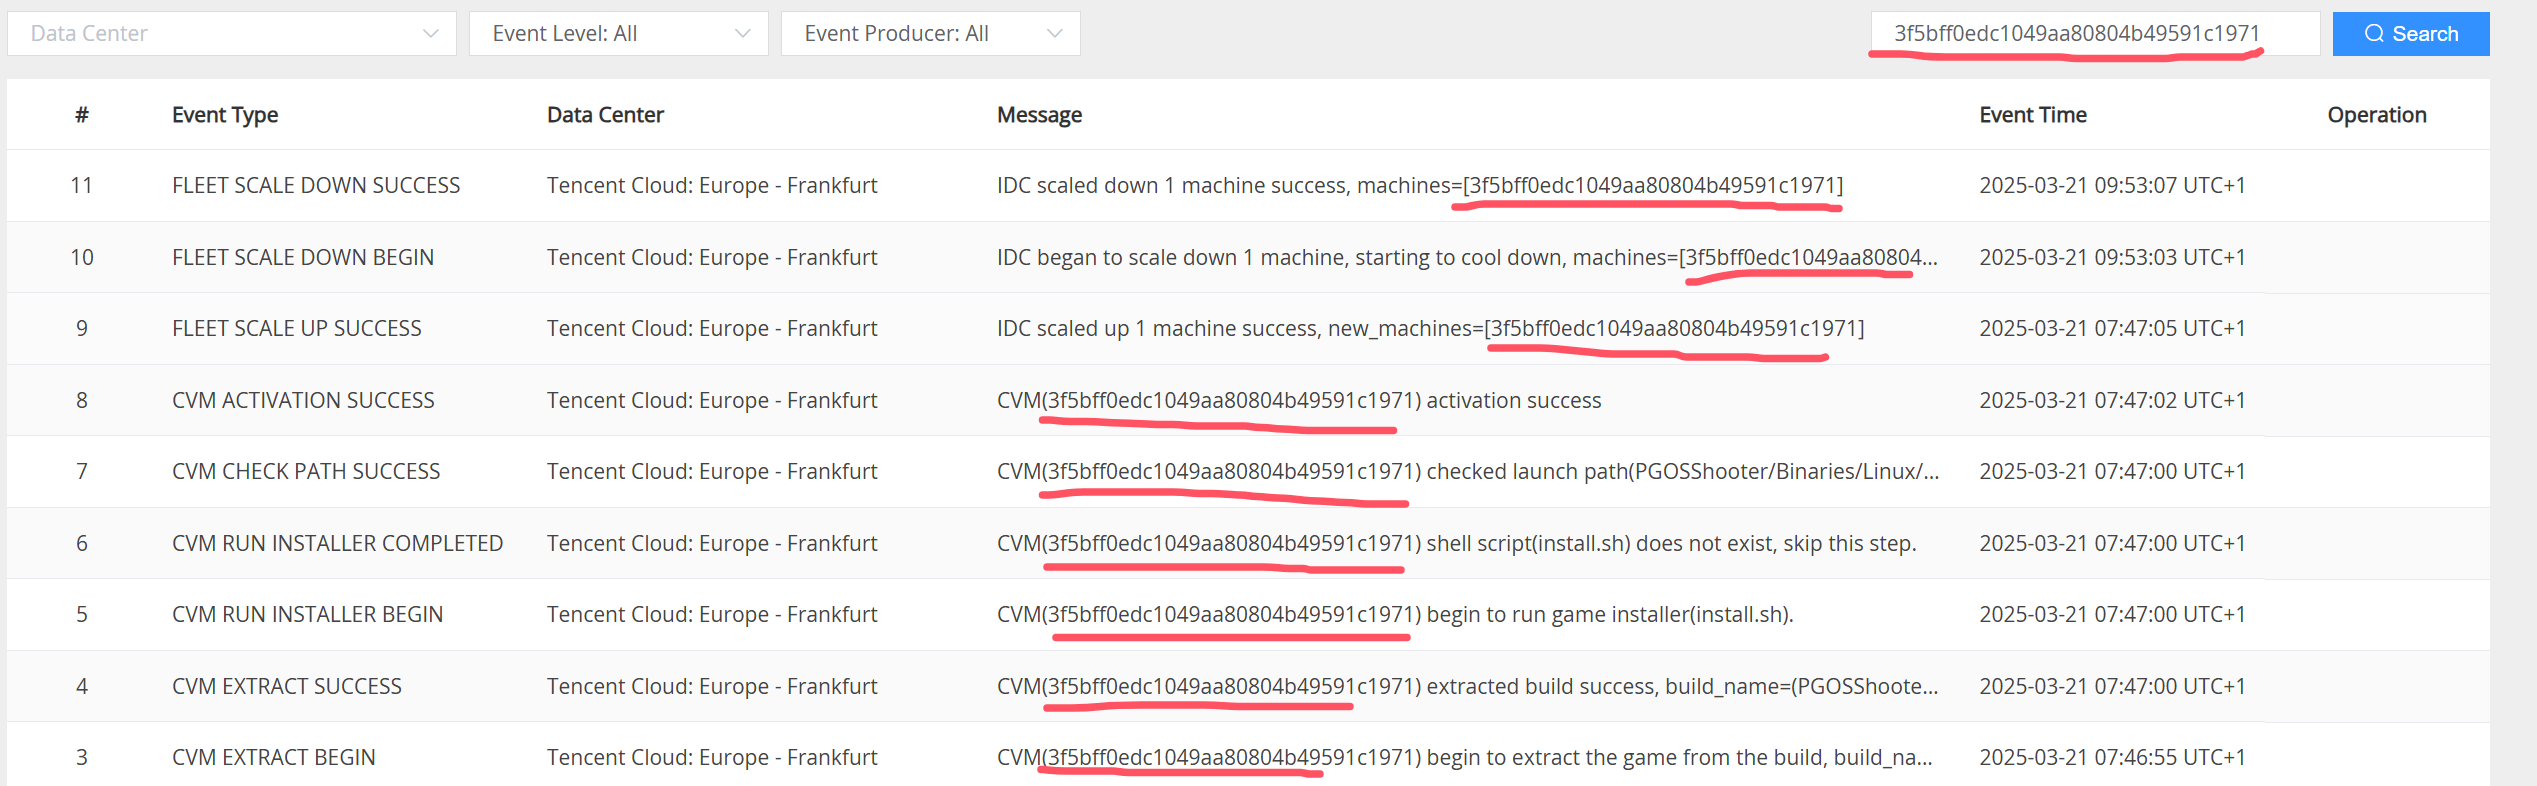
You can filter the list of events by IDC, Event Level(Info/Warning/Error), Event Producer(Fleet/machine), or filter with the keyword in the event message:
2.4.6 Crashes
A list of DS crashes that occurred on the fleet, and you can filter the list by IDC or Build.

Click the Stack ID or the Details link, you can view the details of the crash:
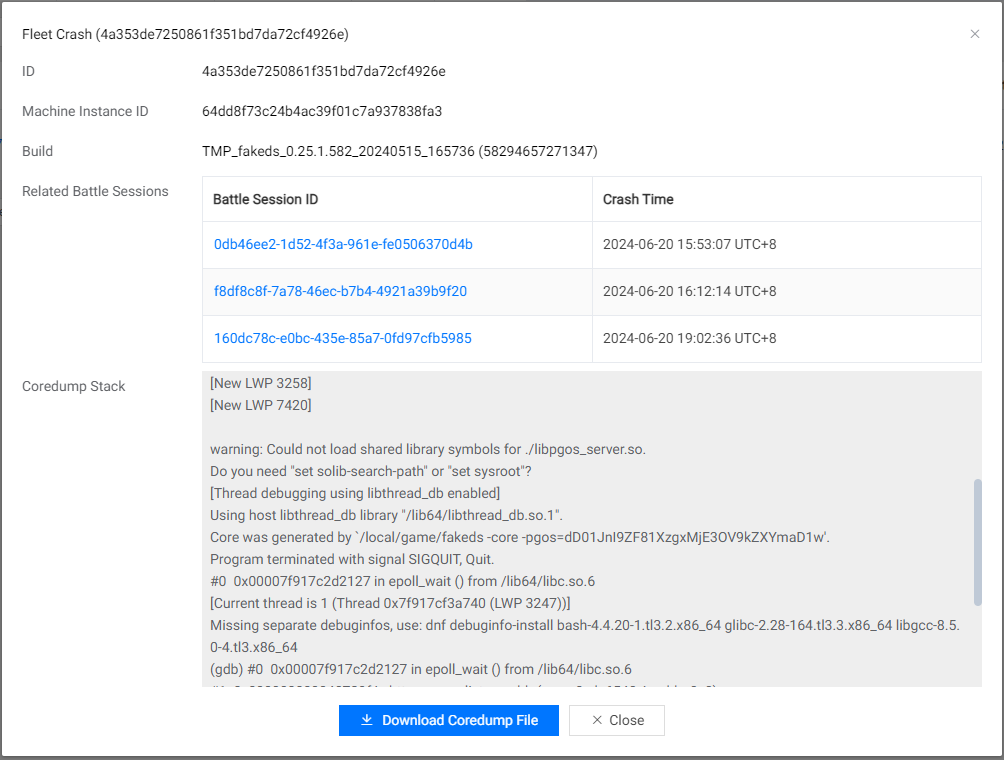
And click the Download button to download the core dump file if you want.