Stores
1. What is Store
Store is in-game economy service by whick players can purchase in-game items. You can define multiple stores in one title region and then arrange the items sold in the stores and their prices.
2. Key Concepts
Games can build a variety of in-game stores with the help of the PGOS Store service and freely define how products are sold within the store. Understanding the following concepts will help you make better use of this service.
Category
A Category is a container object created within a store that integrates publishing schedule feature. Games could create one or more categories to manage the selling of products in a store. All products must be created within a category and can only be purchased by players after being published through a category.
For games with low in-game store requirements, a single category can be used to manage all products sold in the store. However, most of the time, using multiple categories to diversify your store's presentation is a good choice. For example:
- Create one category for products that are sold long-term and rarely updated. Products in this category will be published for an extended period.
- Create one category for limited-time seasonal products. Products in this category will be published within a specified time period.
- Create one category for clusters of products that are updated daily. This category publishes different products every day.
Store Item
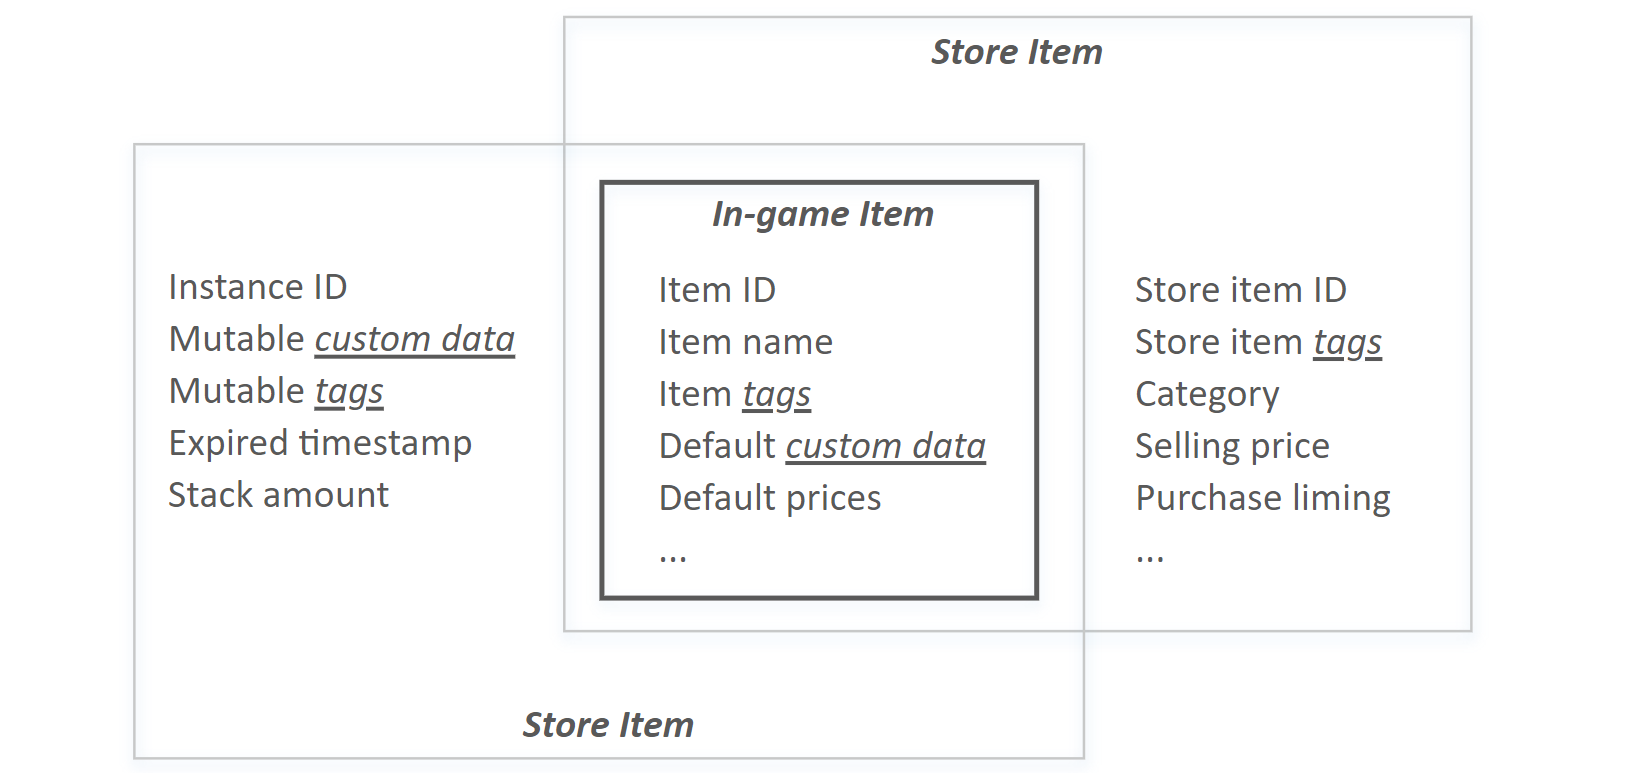
A Store Item defines a unit that can be sold in the store. Games can build stores in a more convenient and flexible way with the help of store items, such as selling a same in-game item at different prices, or with different purchase limits. There are two concepts closely related to store items in the PGOS economic system, and clarifying their relationship will help you better leverage the capabilities of the PGOS economic system:
- In-game Item: An In-game Item is the cornerstone of the PGOS economic service. All objects that players can be awarded, purchase, or possess must have a defined prototype, known as an in-game item. In-game items contain static data that describes the item's characteristics.
- Item Instance: An item instance represents a player's ownership of an in-game item. Whenever a player acquires an in-game item, regardless of the method, an instance of that item is created in their inventory. Item instance includes properties that can be dynamically altered, such as expiration dates and customizable data fields.
The diagram below shows the association and differences between in-game items, item instances, and store items. Detailed properties of store items will be introduced later in the text.
Publishing Schedule
The publishing schedule in a Category defines the plan for when store items in that category go on sale. Only store items that are in a published state are visible to players and can be purchased by them.
A publishing schedule could define multiple time periods, and then freely arrange store items into these time periods. Once any of the time periods for a store item arrives, the store item will be published. Otherwise, the store item will be retired.
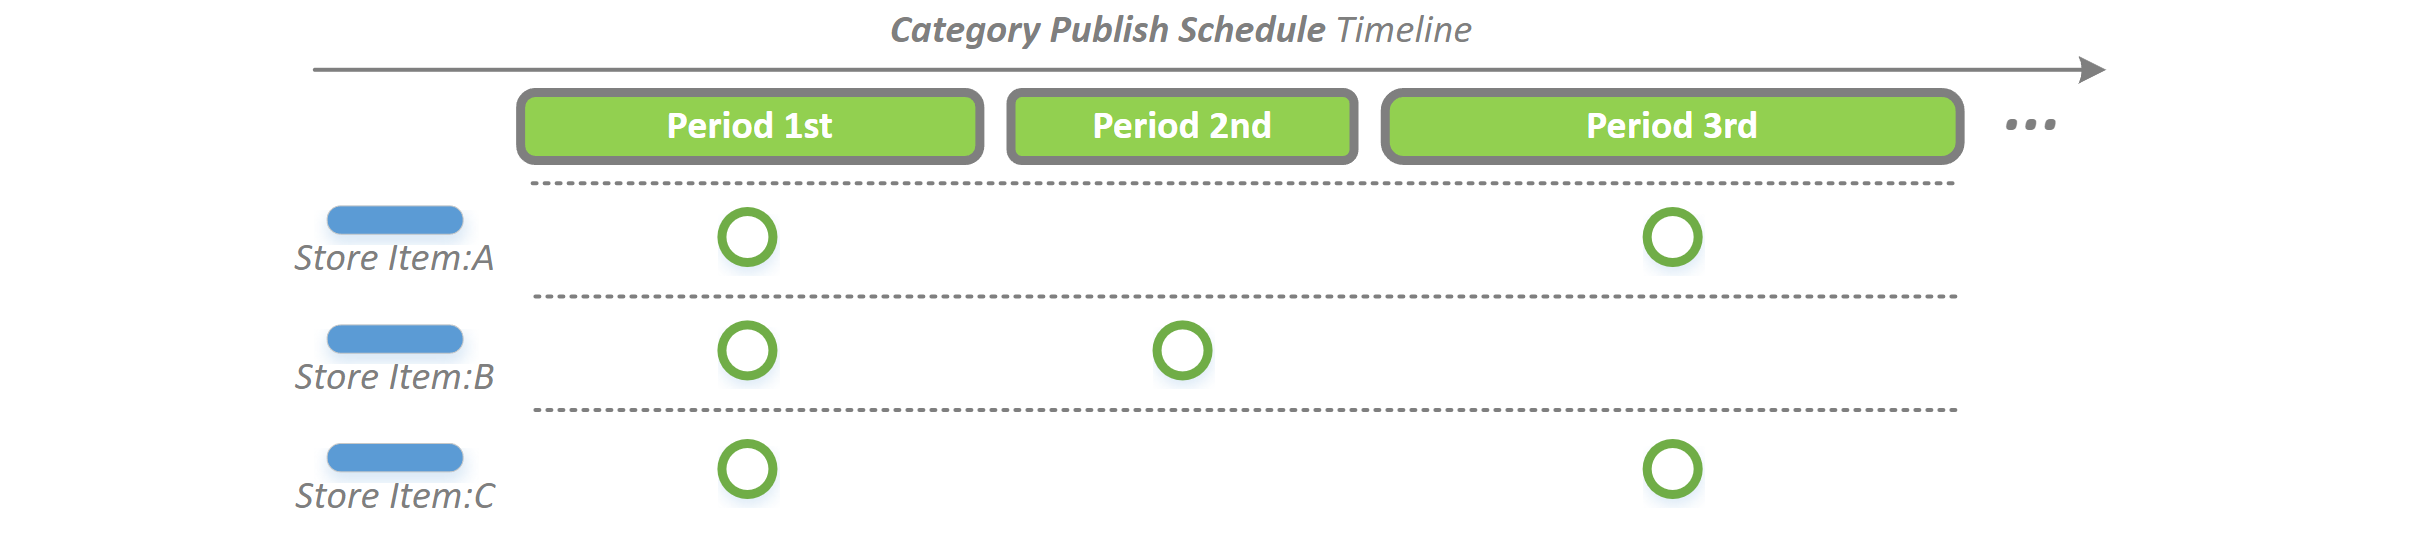
In the example above:
- During the 1st Period, players will see store items A/B/C in the category, and all are available for purchase.
- During the 2nd Period, store items A/C are taken off the shelf, and players can only see and purchase store item B.
- During the 3rd Period, store item C is taken off the shelf, and players can see and purchase store item C.
3. Configure Your Store
3.1 Setup a Store
In the PGOS Portal, go to the Economy -> Store page and click Add Store to add a new store.
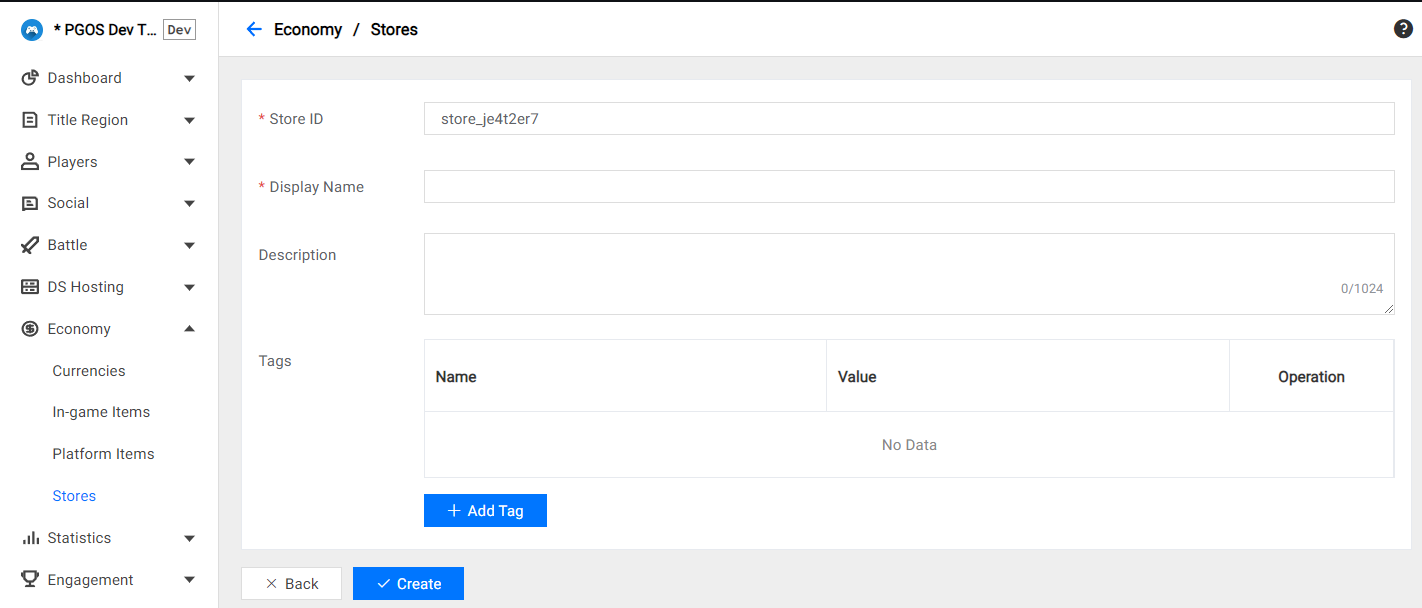
Field description for store:
Store ID: The store identifier must be unique within the title region.
Display Name: The display name of the store.
Description: A short description of the store.
Tags: You can use this field to store information used to classify stores.
Select and view the created store.
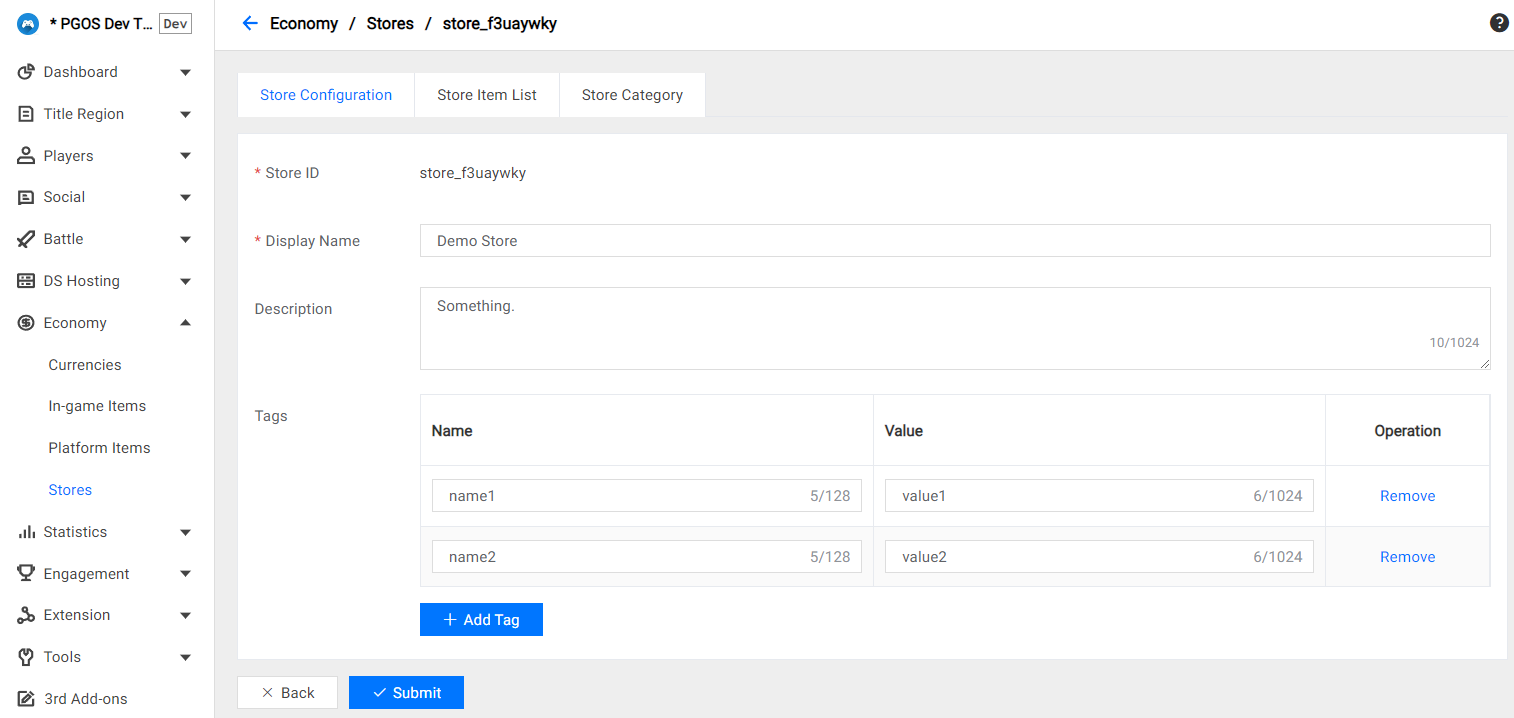
The details of the store is divided into three sections:
- Store Configuration: Here you can modify the basic properties of the store.
- Store Category: Create and manage categories within the store here.
- Store Item List: Browse all store items in the store here. Please note that store items must be created within a category.
3.2 Setup Categories in Store
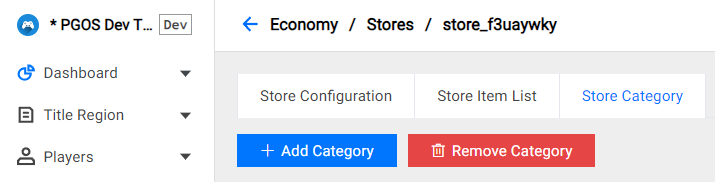
Switch to Store Category section and click Add Category to add a new category.
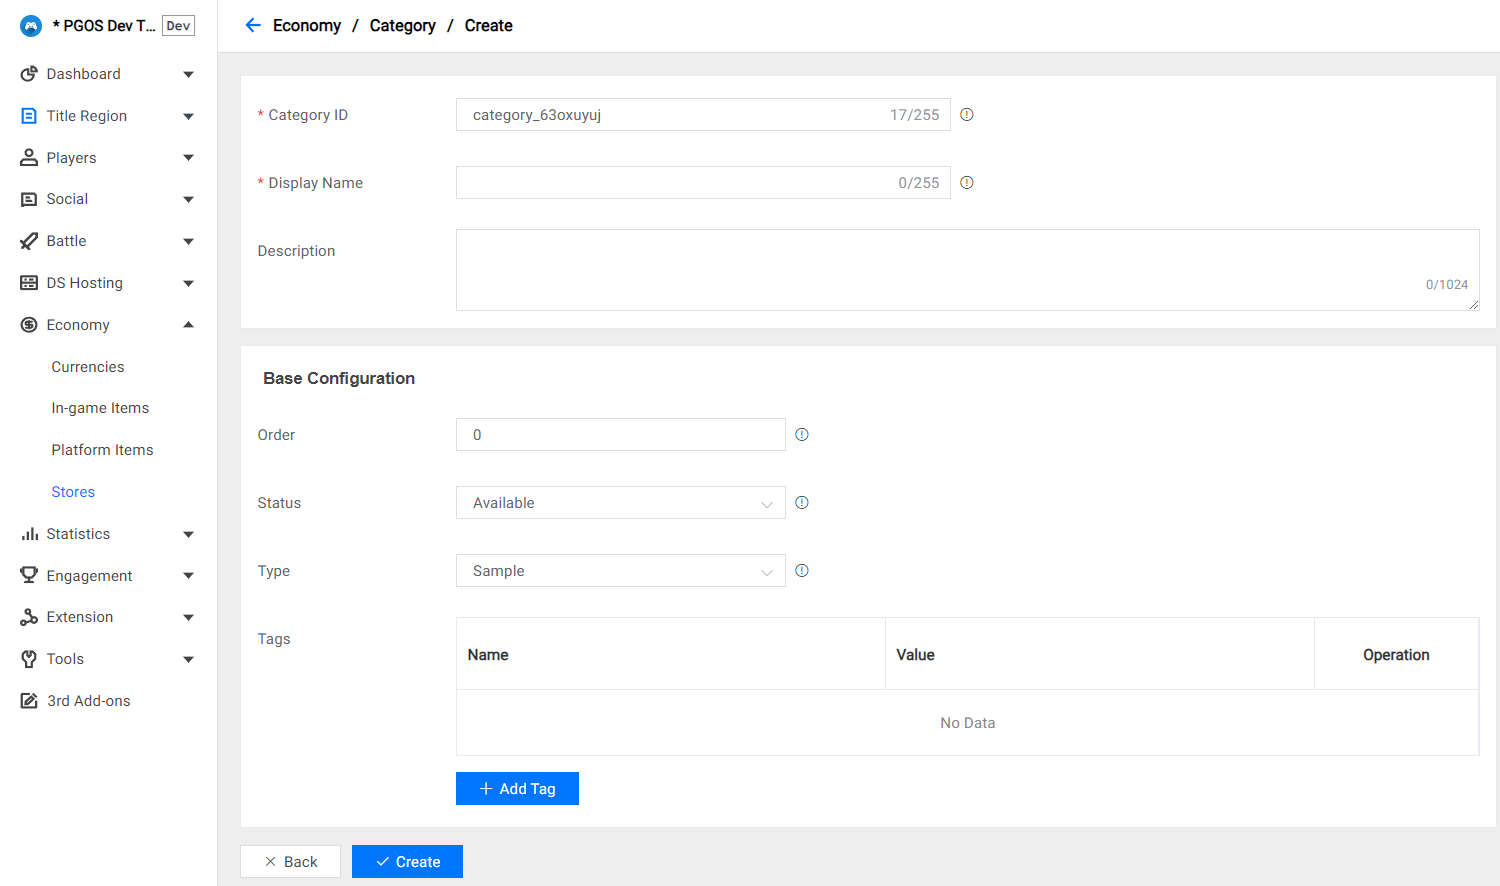
Field description for category:
- Category ID: The category identifier must be unique within the title region.
- Display Name: The display name of the category.
- Description: A short description of the category.
- Tags: You can use this field to store information used to classify categories.
- Order: The order weight of the category, which affects the sorting of the category.
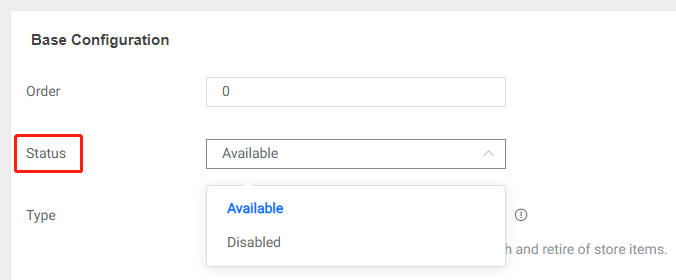
- Status: Specifies the status of the category after it is created. The game client cannot access categories with the Disabled status.
- Type: The type of the category,
- Simple: A simple type category does not have a publishing schedule feature; all store items added to the category are published directly.
- Manual: Manual schedule will be enabled to support multi-period publish schedule management.
- Rotation: Rotation schedule will be enabled to support long-term rotation publish schedule management.
3.3 Setup Store Items in Category
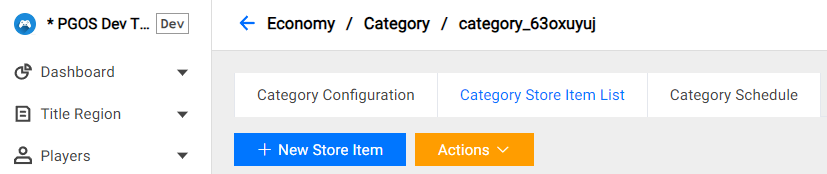
Select a category and switch to the Category Store Item List section, then click New Store Item to create a new store item.
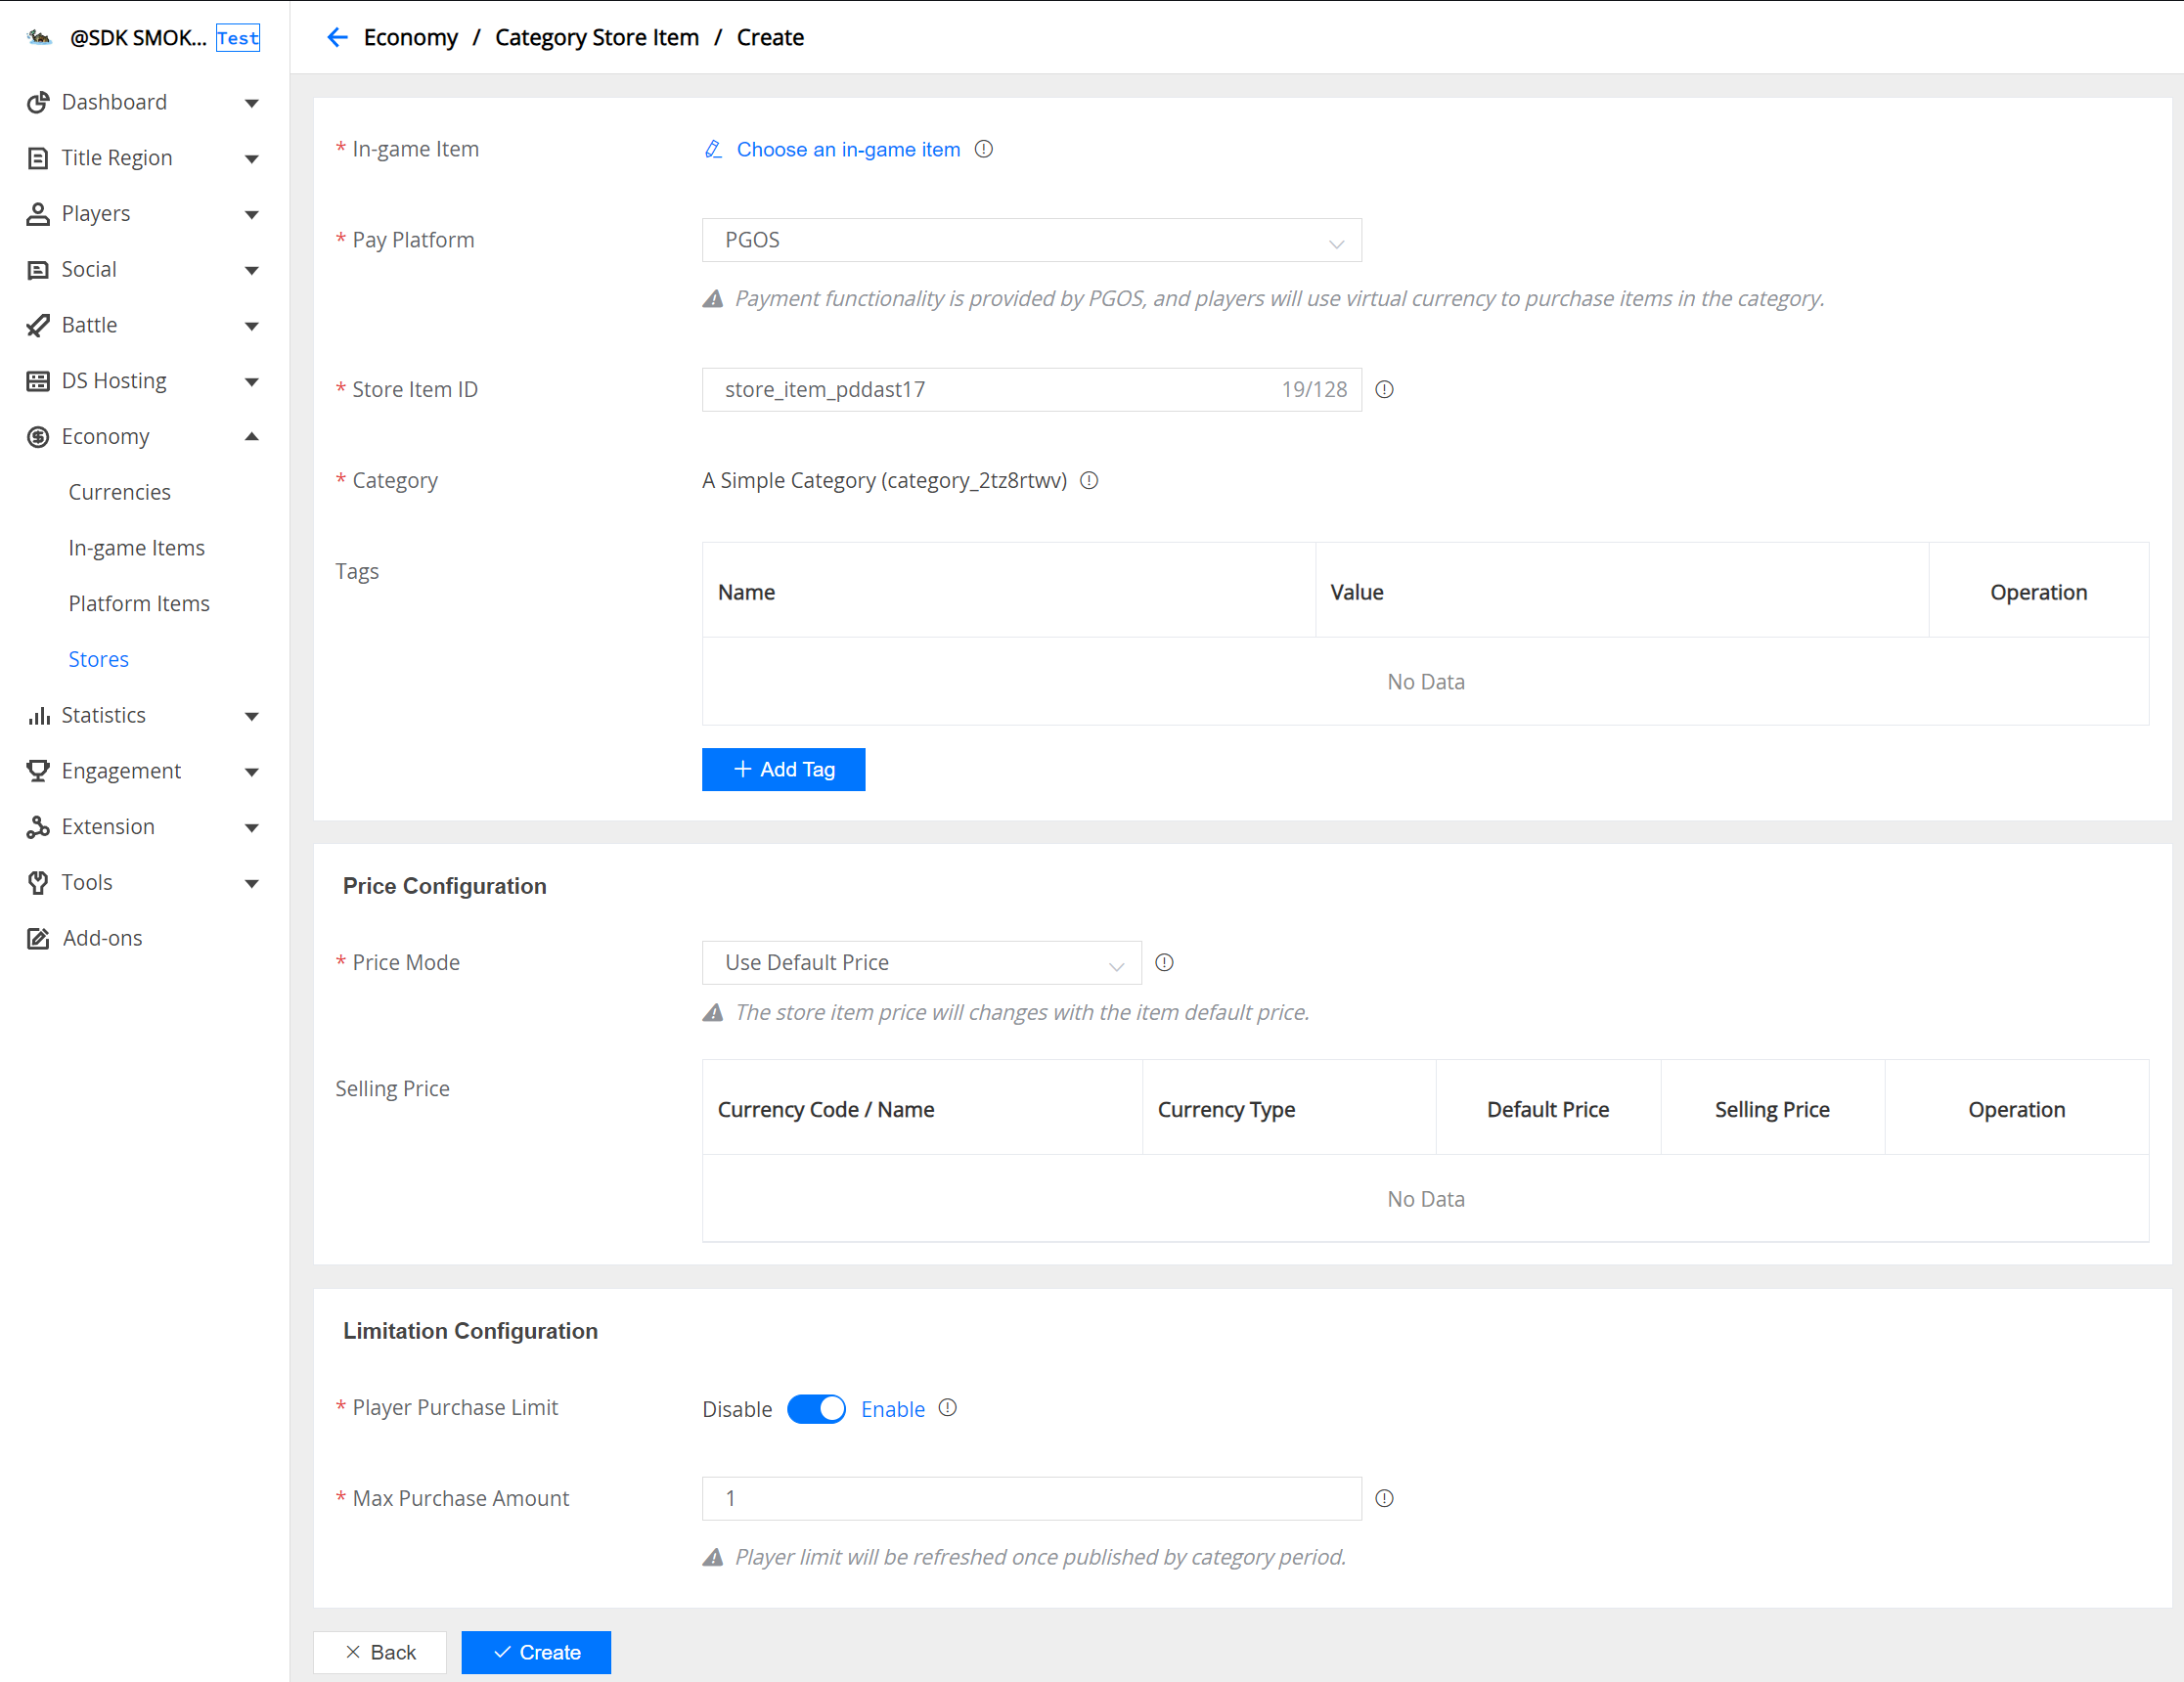
Field description for store item:
- In-game Item: Select an in-game item to serve as the prototype for the store item.
- Pay Platform: The payment service provider for this product:
- PGOS: This product is purchased using virtual currency.
- Midas Global: This product is purchased using cash, with payment services provided by Midas. The price configuration of the store item will be disabled in this mode.
- Store Item ID: The store item identifier must be unique within the title region.
- Category: The current category; this field can be modified after the store item has been created. Each store item must be in one and only one category.
- Tags: You can use this field to store information used to classify store items.
- Price Mode / Selling Prices: Configure the pricing information for the item, see details below.
- Player Purchase Limit: Configure the maximum amount that each player can purchase in a period. When maximum amount is greater than 0, it will record the amount that the player has purchased. When switching to the next period, the recorded amount of player purchased will be reset.
3.3.1 Configure Store Item Prices
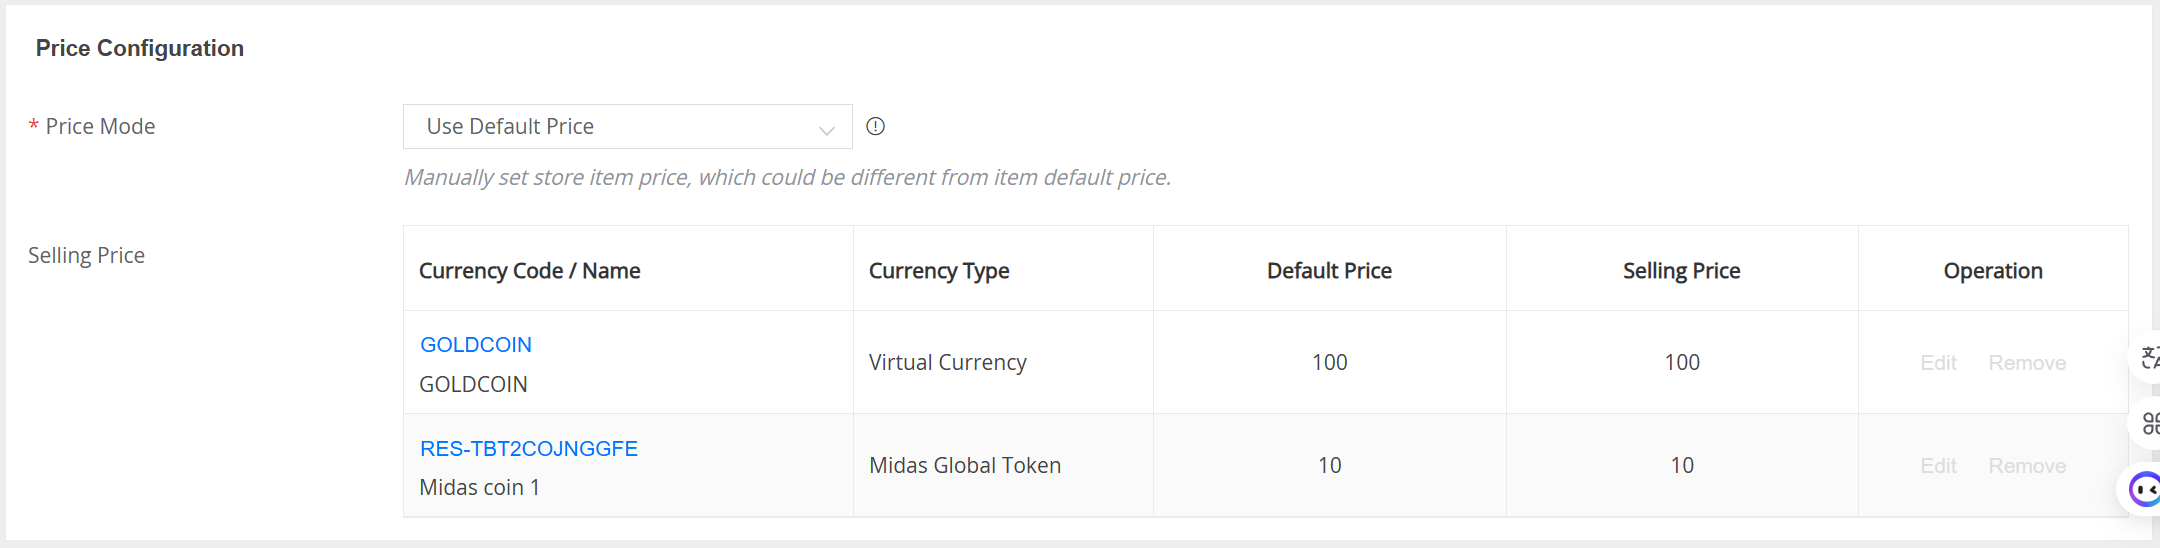
You can use multiple virtual currencies to price a store items, but each price entry must include both a Default Price and a Selling Price. Here are introductions to these two concepts:
- Default Price: The virtual currency price configured by the user in the item definition for an in-game item. This concept represents the original price of the item in the PGOS economy system.
- Selling Price: The in-game item selling price maintained by the user within the store item, which is allowed to be higher or lower than the default price. The selling price can be set to 0, allowing players to obtain the item for free; please proceed with caution. As the name implies, the Selling Price is the price players need to pay when purchasing the store item.
There are two ways to price store items; please choose the pricing mode that best suits your game's characteristics:
Use Default Price: Directly use the price information from the item definition as the store price. This mode does not support manual modification of the store item's pricing currency and value.
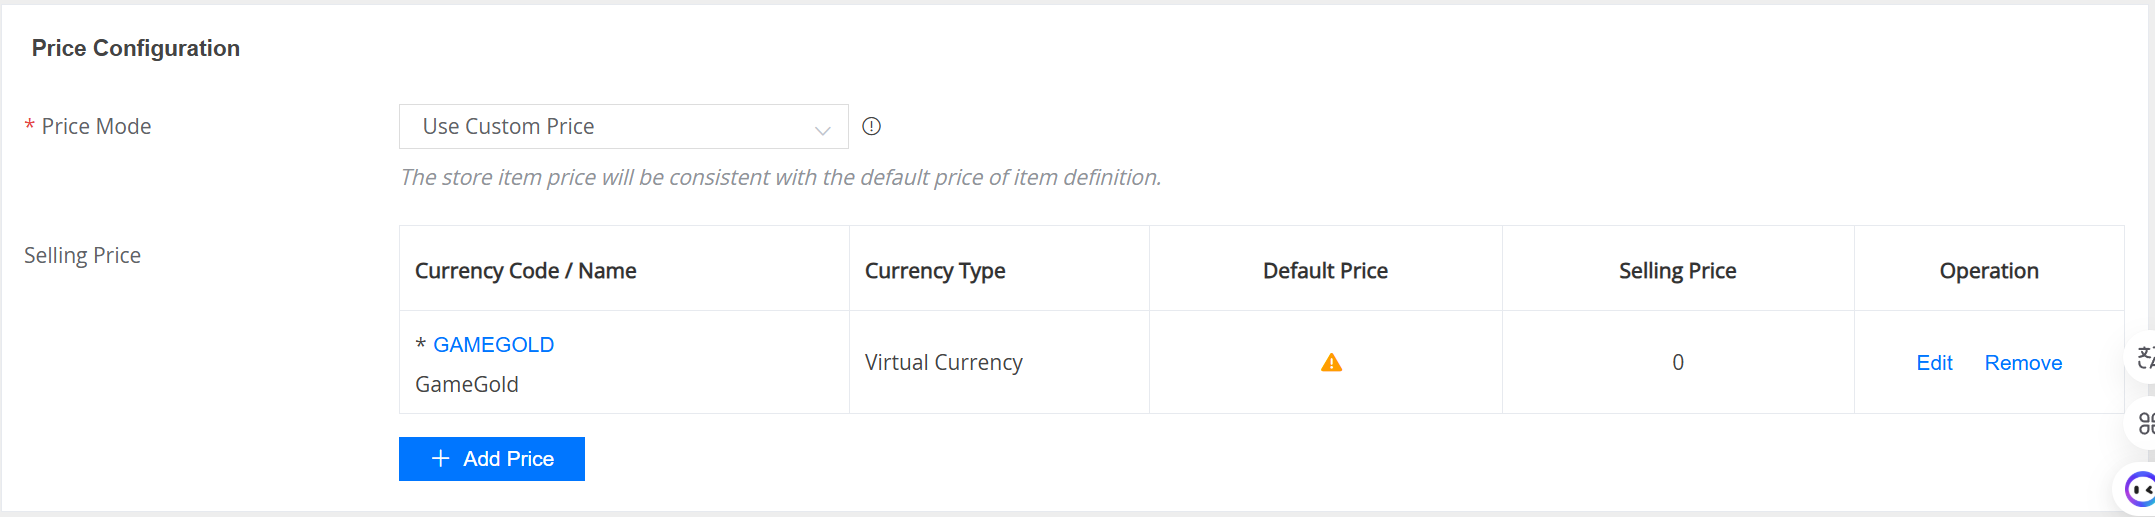
Use Custom Price: Users can modify the pricing currency and value information. If you need to sell the same in-game item at different prices, you can use this mode. Using this strategy can configure price information for store items without being constrained by default price.
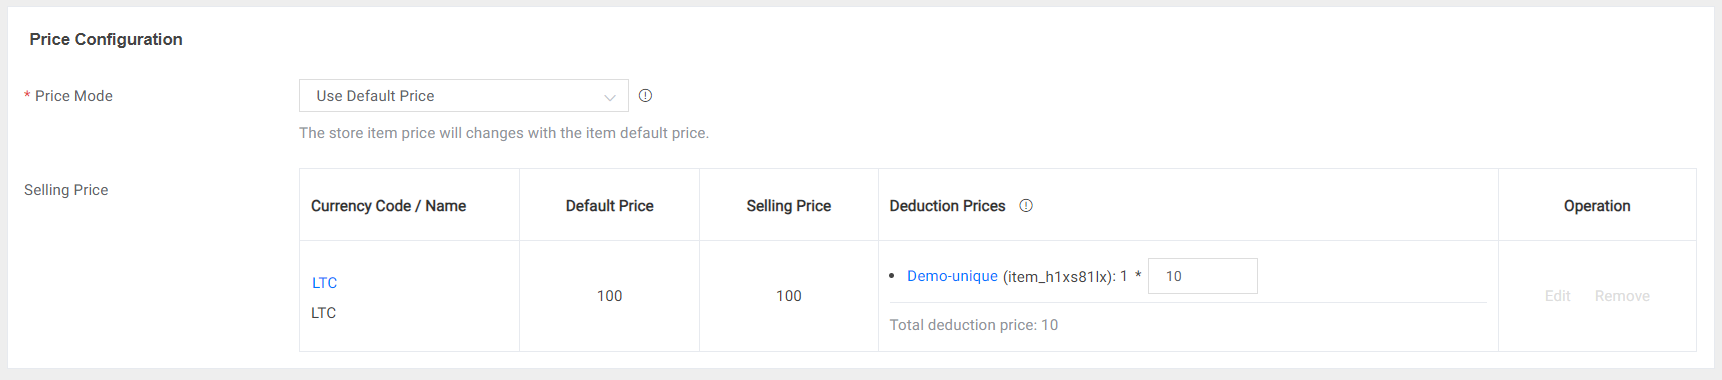
3.3.1 Configure Deduction Prices
The deduction prices for unique item contents must be configured when selling Bundle Items or Container Items. These deduction prices will be subtracted from the player's actual purchase price when the player already owns these unique items. It is important to note that deduction prices need to be configured for all pricing currencies, but we allow the deduction price to be configured as 0.
4. Publish Management
4.1 What is Publish Management
Your store is essentially ready after completing the configuration of categories and store items.
For simple categories, you can publish all or some of the products in the category at any time. For advanced categories, you have more flexibility to customize the release schedule for store products, which requires achieving a series of configurations. Detailed instructions are provided below.
The essence of publish management is to control the status of categories and store items whether it's Simple Categories or Advanced Categories. The status enumeration for categories is:
- Available: This means that store items with the status of Published within the category are visible to players and can be purchased by them.
- Disable: This means that all store items within the category are invisible to players and cannot be purchased by them.
The status enumeration for store items is:
- Published: The store item is visible to players and can be purchased when the belonging category is available.
- Retired: The store item is not accessible to players, but it is still under the control of the Category Schedule. That is, if the subsequent activated periods contain this item, it will be switched to Published status.
- Disabled: The store item is not accessible to players, and it is no longer under the control of the Category Schedule unless it is enabled. Even if the subsequent activated periods contains this item, it cannot be switched to Published status.
4.2 Publish in Simple Category
For simple categories, the management of publishing is the direct manipulation of the status of the category and store items. When creating a category, you can choose the default status of the category,
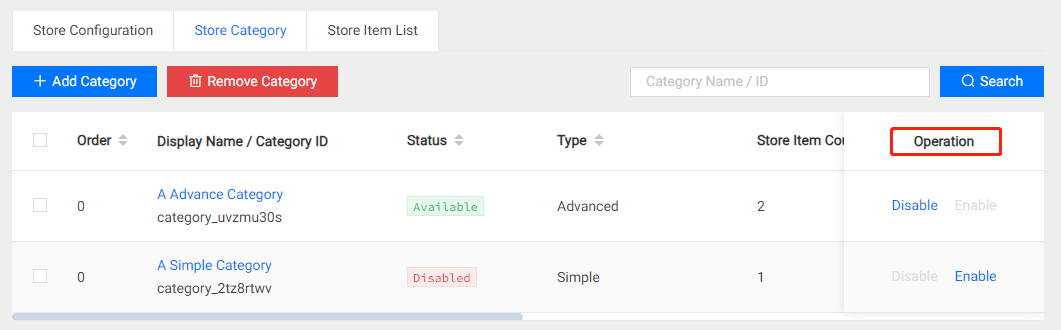
You can also modify the status of the category at any time after creation, which can quickly control player access to all store items in the category,
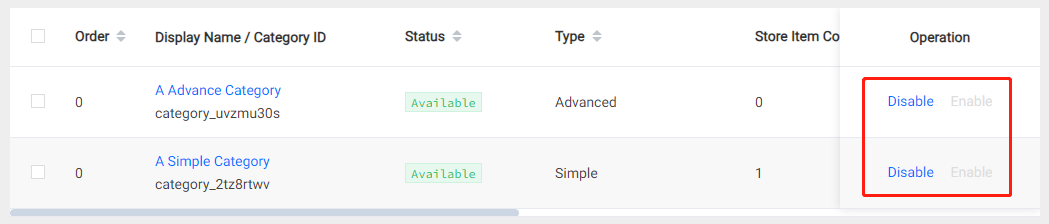
It is not possible to retire store items in simple categories, but you can quickly disable one or more store items through the Disable operation. Once the store items are ready, it can be activated through the Enable operation,
4.3 Publish with Manual Schedule
Setup a Manual Schedule
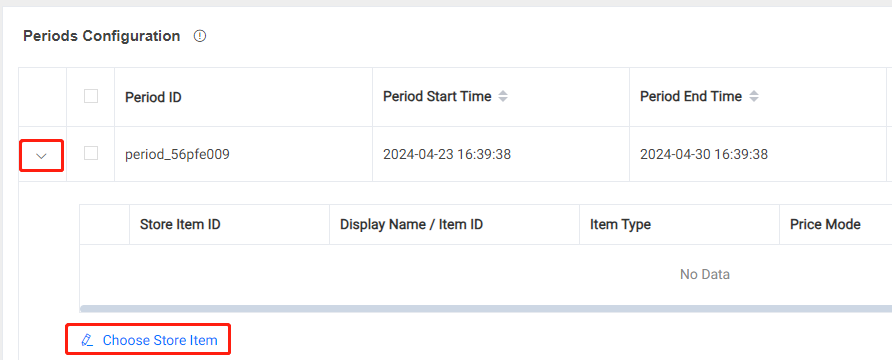
You can set up multiple publishing periods for store items using the Manual Schedule feature of advanced categories, with each publishing period able to allocate several store items.
You can freely customize the release schedule of store items with manual schedule, but please be aware of the following constraints:
- Periods created within the same Category must not have overlapping intervals.
- One store item can be added to multiple periods.
The working mechanism of periods is as follows:
- Whenever the start time of a period is reached, all non-Disabled store items assigned to that period will switch to the Published status.
- Whenever the end time of a period is reached, all Published store items assigned to the expired period will switch to the Retired status.
To add a period within a category, both Start Time and End Time are required fields.
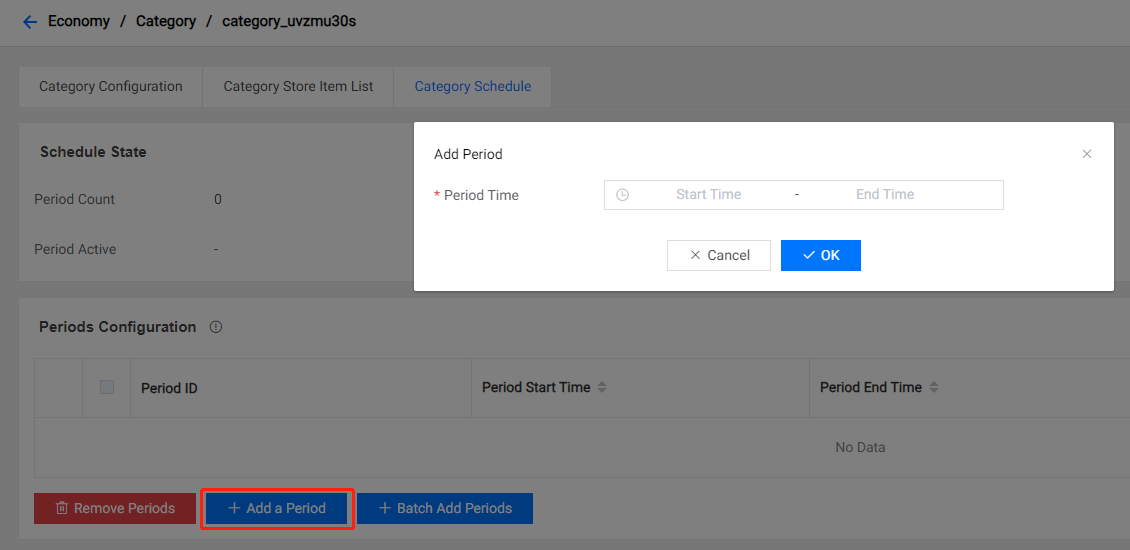
You can add several periods of specific lengths and specific intervals in bulk within a category:
- At least 1 period must be entered,
- The period Length must be greater than 0,
- The gap is an optional parameter.

Then assign store items to each period,
Publish Management
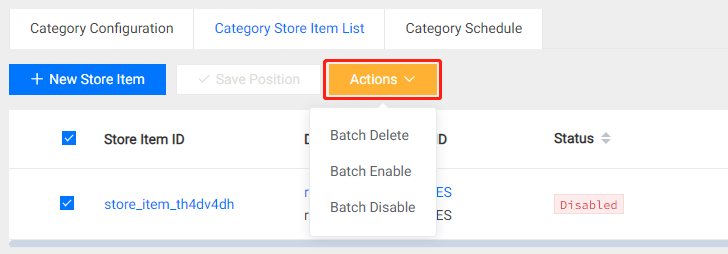
The store items in the category will be published as planned after completing the Schedule configuration. However, in some special scenarios, you may wish to temporarily remove published store items to make necessary modifications. There are several ways to achieve this:
Disable the category that is in the Available state. This action will prevent players from accessing all Published store items in the category, whether for viewing or purchasing. When ready, you can perform the Enable operation to restore the category.
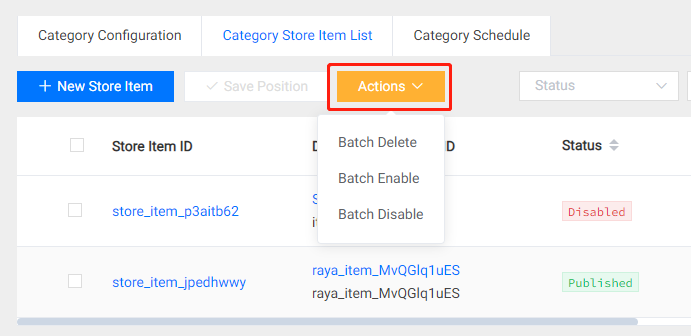
Disable the store items that are in the Published state. This action will temporarily disable certain store items within the category. Regardless of their state before being disabled, players will not be able to access them, whether for viewing or purchasing. When ready, you can perform the Enable operation to restore the status of the store items.
When Disable/Enable store items, it is important to note that PGOS will determine the state of the store item after Enabling based on its state before being Disabled and the state of its period. For example:
- If the store item's status is Published, and it is Disabled then Enabled before its period expires, it will remain in the Published status.
- If the store item's status is Published, and it is Disabled then Enabled after its period has expired, it will remain in the Retired status.
- If the store item's status is Retired, and it is Disabled then Enabled before its period starts, it will remain in the Retired status.
- If the store item's status is Retired, and it is Disabled then Enabled after its period has started, it will switch to the Published status.
4.4 Publish with Rotation Schedule
Manual Schedule is suitable for arranging short-term product release plans, such as coordinating with the category launched during the battle pass season. When dealing with long-term, recurring release scheduling, Manual Schedule may not be effective, and in such cases, you can use Rotation Schedule to handle these tasks.
When creating a category, configure the Type parameter as Rotation.

Rotation schedule will automatically assign store items to the periods created in bulk, so you must first populate the store item list for the category.

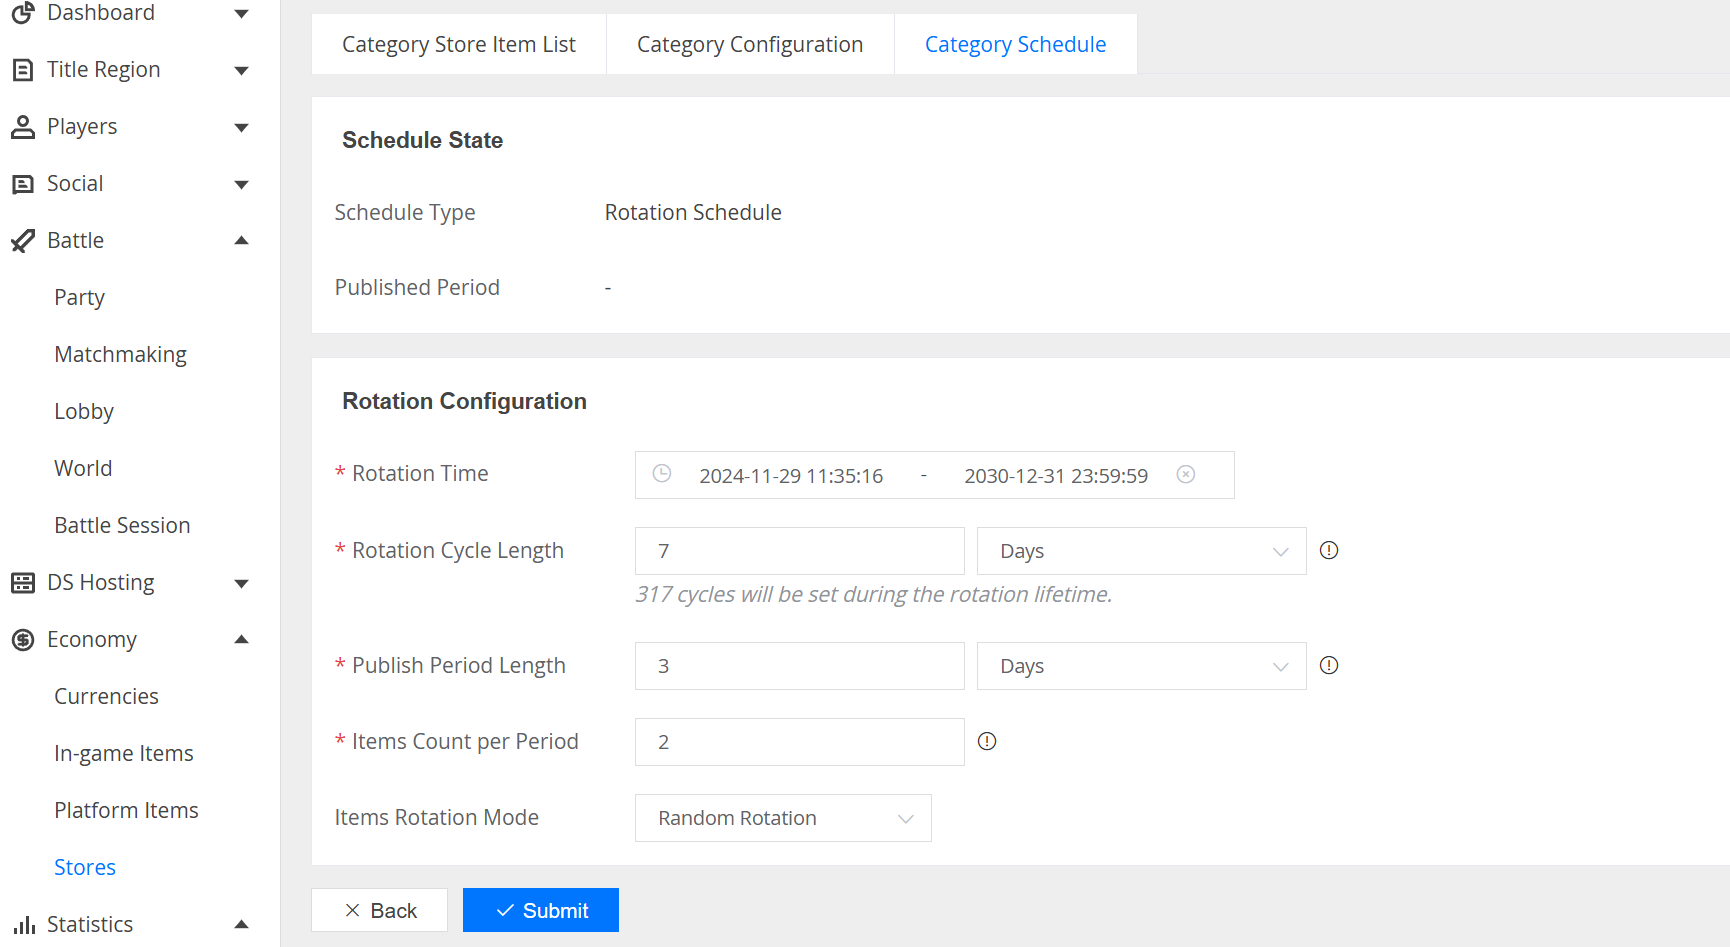
Rotation schedule could be configured then,
- Rotation Time: The start and end time of the rotation schedule.
- Rotation Cycle Length: The length of each rotation cycle, with the first cycle starting from the rotation start time.
- Publish Period Length: The length of the publish period within each rotation cycle. The publish period starts from the beginning of the cycle and cannot extend beyond the end of that cycle, which is an obvious constraint.
- Items Count per Period: The number of store items published in each publish period.
- Items Rotation Mode: This configuration item indicates how PGOS fills store items into each period, with currently two available strategies, Random / Sequential.
4.5 Using Time Machine
Feature Design
We provide a time machine feature for the store category in non-production title regions. This feature allows users to specify a backend virtual time that applies only to a designated store category, facilitating periods that take effect in the future.
Once the time machine is enabled, the store service will apply an offset to real time when processing requests related to the store category. Imagine an invisible hand dragging the timeline forward or backward, achieving forward or backward time jumps.
Every time the virtual time is updated, we will recalculate the publication status of periods within the store category. And the time machine feature ONLY affects the publication status of periods within the specified store category. For security and encapsulation reasons, this feature will not have any additional effects, such as:
- The time machine will not change store items within a period.
- The time machine will not alter information related to store item purchase limits.
- The time machine will not affect the
expired timeattribute of item instances in the inventory. - The time machine will not affect the
created timeattribute of item instances in the inventory.
Global Configuration
The time machine can be configured in Store Category Schedule > Time Machine. The configuration here will affect all players who access this store category.
Player Configuration
Time machine can also be configured for individual players, in player detail page > Economy > Time Machine. This configuration will only apply to this player.
Player-level data takes precedence over global-scope configurations if both are configured.
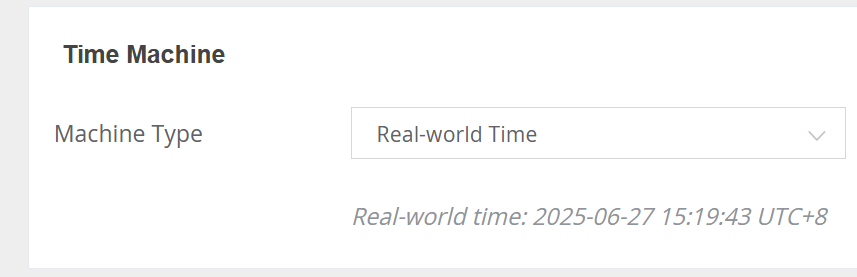
Time Machine Type
Real-world Time: Maintains 1:1 synchronization with real-world time.
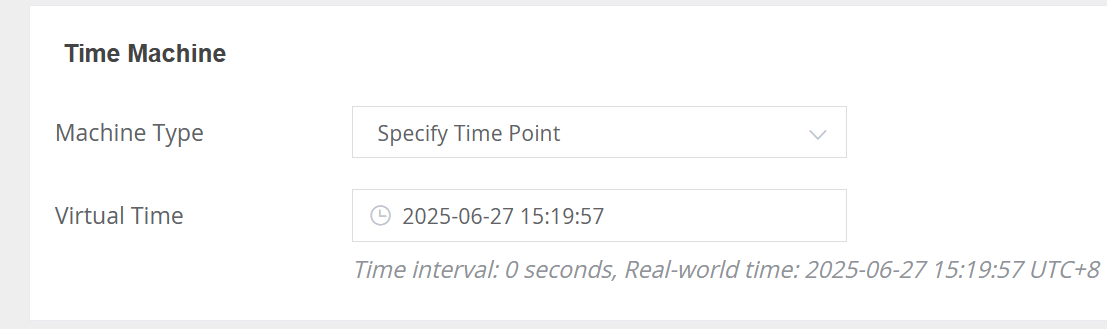
Specify Time Point: Specify a future or past time point as the backend virtual time.
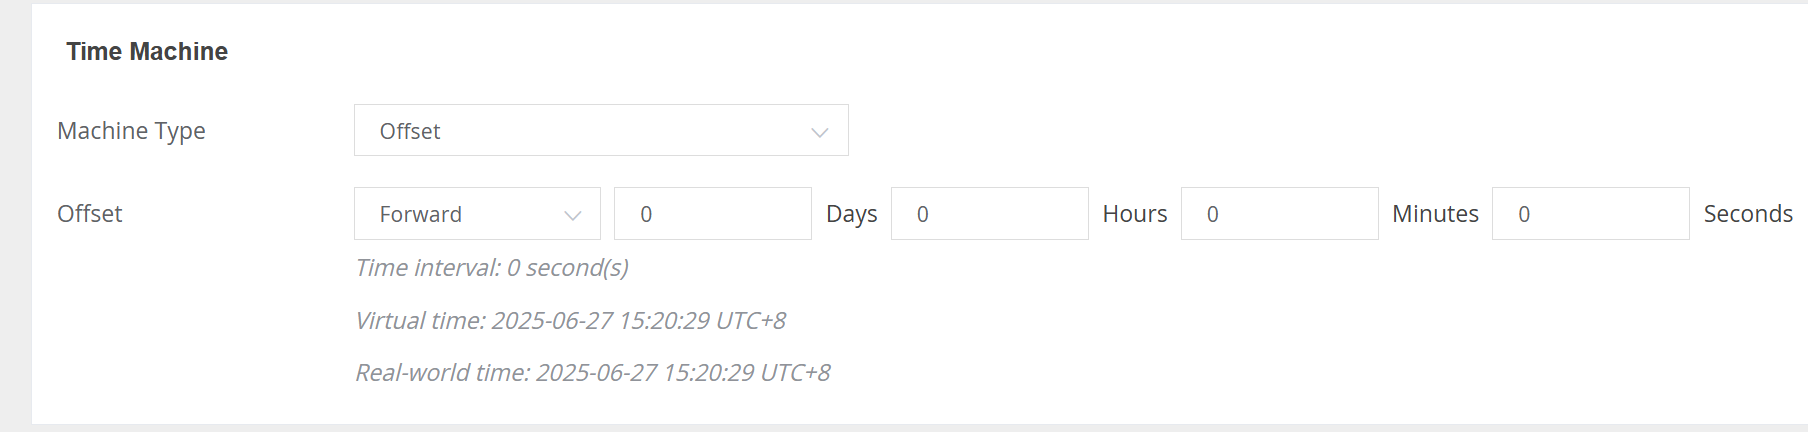
Offset: Directly specify the offset between the backend virtual time and real-world time.
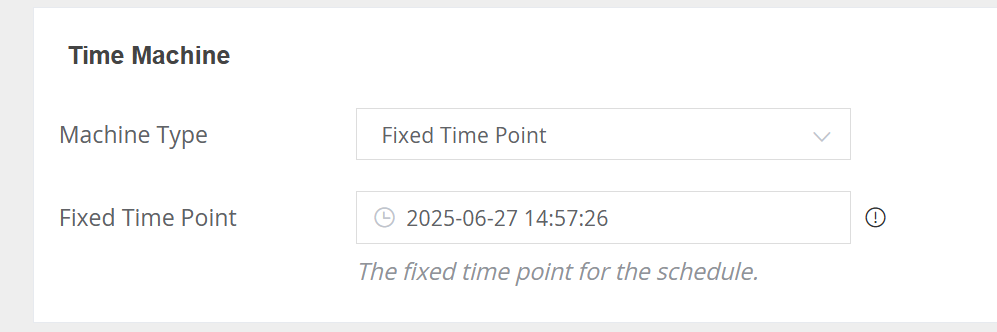
Fixed Time Point: Lock the server time to a specified time point.
5. Access Stores with PGOS SDK
5.1 Get Store Information
This operation acquires all store information configured in the Portal, including categories and the store item list.
In general, you don't need to worry about the pay_platform parameter. When pay_platform is passed, it will return the platform_item_mapping, which contains the mapping relationship between in-game items in PGOS and 3rd-party platform items configured on the PGOS portal. This parameter is only used if developers need to integrate third-party payments. For more details, you can refer to the Third-party Platform Purchase.
It is also worth mentioning FClientStoreCategory here. The GetStore API will only return a Category if there is at least one Store Item in that Category in the published state.
Interface prototype:
/**
* Get the specified store defined on the portal.
*
* @param Params Request params.
*/
void GetStore(
    const FClientGetStoreParams& Params,
    TFunction<void(const FPgosResult& Ret, const FClientStore* Data)> Callback) const;

struct FClientGetStoreParams
{
    /** The specified store id. */
    FString store_id;
    /** Pay platform name, such as: 'Steam', 'EpicGames', etc. You can use macros starting with 'PAY_PLATFORM' in `pgos_common_define.h` */
    FString pay_platform;
};

struct FClientStore
{
    /** The id of the store. */
    FString store_id;
    /** The name of the store. */
    FString display_name;
    /** The description of the store. */
    FString description;
    /** The custom tags of the store. */
    TMap<FString, FString> tags;
    /** The category list of the the store, each category has a store item list. */
    TArray<FClientStoreCategory> categories;
    /** In-game item defines that may be referenced in the 'item_content', and you can use 'ItemDict::FindItem' to search. */
    FItemDict item_dict;
    /** The mapping relationship between PGOS in-game items and 3rd-party platform items configured on the PGOS portal. key: PGOS in-game item id, value: 3rd-party platform item id. */
    TMap<FString, FString> platform_item_mapping;
};

struct FClientStoreCategoryBrief
{
    /** The id of the category. */
    FString category_id;
    /** The name of the category. */
    FString name;
    /** The description of the category. */
    FString description;
    /** The custom tags of the category. */
    TMap<FString, FString> tags;
    /** The type of the category. */
    EClientStoreCategoryType type = EClientStoreCategoryType::Simple;
    /** The Unix timestamp (in seconds) for the start time of the currently active period. It is always 0 under the simple type. */
    int64 published_start_time = 0;
    /** The Unix timestamp (in seconds) for the end time of the currently active period. It is always 0 under the simple type. */
    int64 published_end_time = 0;
};

/** The information of the store category. */
struct FClientStoreCategory : public FClientStoreCategoryBrief
{
    /** Store items in the category. */
    TArray<FClientStoreItem> content_items;
};

struct FClientStoreItem
{
    /** The id of the store item. */
    FString store_item_id;
    /** Store item status: Dummy / Available / Owned. */
    EClientStoreItemStatus status = EClientStoreItemStatus::Dummy;
    /** The currency to purchase the store item, it may be multiple. */
    TArray<FClientStoreItemPrice> prices;
    /** The in-game item related to the store item. */
    FInGameItem item;
    /**
     * The tags of store item
     * Fill in the tags of item on the portal.
     */
    TMap<FString, FString> tags;
    /** Purchase amount limit of store item. */
    FClientStoreItemPurchaseLimit purchase_limit;
};

struct FClientStoreItemPurchaseLimit
{
    /** The maximum amount limit that players can purchase for this store item. 0 means no limit. */
    int32 max_purchase_amount = 0;
    /** When max_purchase_amount is greater than 0, record the amount that the player has purchased. Please note that when the category period is switched, its value will be recalculated. */
    int32 purchased_amount = 0;
};

enum class EClientStoreItemStatus : uint8
{
    /** None. */
    Dummy = 0,
    /** The item can be purchased normally. */
    Available = 1,
    /** The unique item can't be purchased because the player already owns. */
    Owned = 2,
    /** The store item can't be purchased because the player have reached the maximum purchase limit. */
    ExceedLimit = 3
};
Example Code:
#include "PgosSDKCpp.h"

void SomeUObjectClass::SomeFunction()
{
    auto Economy = IPgosSDKCpp::Get().GetClientEconomyAPI();
    if (Economy)
    {
        FClientGetStoreParams Params;
        Params.store_id = TEXT("store123456");
        Params.pay_platform = TEXT("");
        Economy->GetStore(Params, [](const FPgosResult& Ret, const FClientStore* Data) {
            if (Ret.err_code == (int32)Pgos::PgosErrCode::kSuccess)
            {
                UE_LOG(LogTemp, Log, TEXT("GetStore Success"));
            }
            else
            {
                UE_LOG(LogTemp, Log, TEXT("GetStore Failed: err_code=%d, err_msg=%s"), Ret.err_code, *Ret.msg);
            }
        });
    }
}
5.2 Batch Get Stores' Brief Information
Get brief information of specified stores.
FClientStoreBrief lacks the information about In-Game Items compared to FClientStore.
Interface prototype:
/**
* Get brief information of specified stores.
*
* @param Params Request params.
*/
void GetStoreBriefs(
      const FClientGetStoreBriefsParams& Params,
      TFunction<void(const FPgosResult& Ret, const FClientGetStoreBriefsResult* Data)> Callback) const;

struct FClientGetStoreBriefsParams
{
  /** List of store IDs to be queried. */
  TArray<FString> store_ids;
};

struct FClientGetStoreBriefsResult
{
  /** List of store brief information queried. */
  TMap<FString, FClientStoreBrief> store_briefs;
};

struct FClientStoreBrief
{
  /** The id of the store. */
  FString store_id;
  /** The name of the store. */
  FString display_name;
  /** The description of the store. */
  FString description;
  /** The custom tags of the store. */
  TMap<FString, FString> tags;
  /** The category brief list of the the store. */
  TArray<FClientStoreCategoryBrief> category_briefs;
};
Example Code:
#include "PgosSDKCpp.h"

void SomeUObjectClass::SomeFunction()
{
   auto Economy = IPgosSDKCpp::Get().GetClientEconomyAPI();
   if (Economy)
   {
       FClientGetStoreBriefsParams Params;
       // Fill params
       Economy->GetStoreBriefs(Params, [](const FPgosResult& Ret, const FClientGetStoreBriefsResult* Data) {
           if (Ret.err_code == (int32)Pgos::PgosErrCode::kSuccess)
           {
               UE_LOG(LogTemp, Log, TEXT("GetStoreBriefs Success"));
           }
           else
           {
               UE_LOG(LogTemp, Log, TEXT("GetStoreBriefs Failed: err_code=%d, err_msg=%s"), Ret.err_code, *Ret.msg);
           }
       });
   }
}
5.3 Batch Get Categories From the Store.
Batch get categories from the Store.
Interface prototype:
/**
* Get the specified store categories defined on the portal.
*
* @param Params Request params.
*/
void GetStoreCategories(
    const FClientGetStoreCategoriesParams& Params,
    TFunction<void(const FPgosResult& Ret, const FClientGetStoreCategoriesResult* Data)> Callback) const;

struct FClientGetStoreCategoriesParams
{
    /** The specified store id. */
    FString store_id;
    /** List of category IDs to be queried. */
    TArray<FString> category_ids;
};

struct FClientGetStoreCategoriesResult
{
    /** The specified categories that have been queried. */
    TArray<FClientStoreCategory> categories;
    /** Categories that failed to query, key: player id, value: failed reason.  */
    TMap<FString, FString> fails;
    /** In-game item defines that may be referenced in the 'item_content', and you can use 'ItemDict::FindItem' to search. */
    FItemDict item_dict;
    /** The id of the store. */
    FString store_id;
    /** The name of the store. */
    FString display_name;
    /** The description of the store. */
    FString description;
    /** The custom tags of the store. */
    TMap<FString, FString> tags;
};
Example Code:
#include "PgosSDKCpp.h"

void SomeUObjectClass::SomeFunction()
{
   auto Economy = IPgosSDKCpp::Get().GetClientEconomyAPI();
   if (Economy)
   {
       FClientGetStoreCategoriesParams Params;
       // Fill Params
       Economy->GetStoreCategories(Params, [](const FPgosResult& Ret, const FClientGetStoreCategoriesResult* Data) {
           if (Ret.err_code == (int32)Pgos::PgosErrCode::kSuccess)
           {
               UE_LOG(LogTemp, Log, TEXT("GetStoreCategories Success"));
           }
           else
           {
               UE_LOG(LogTemp, Log, TEXT("GetStoreCategories Failed: err_code=%d, err_msg=%s"), Ret.err_code, *Ret.msg);
           }
       });
   }
}
5.4 Purchase Store Item
This operation purchases the specified amount of the specified items in the store. After a successful purchase, the amount of currency spent, the Item Instances and currency balance are returned by the system.
Purchasing is divided into two steps: create an order and commit the order.
1. Create an Order: Enter the items you want to purchase, their amount and unit price to generate a unique order ID.
/**
* Create an order before purchase the specified store item in the store.
*
* After committing the order, the PGOS backend events `event_item_granted`/`event_currency_changed` will be triggered.
*
* @param Params Request params.
* @param ResultCallback The result callback after the API execution ends, and it will be called in the GAME THREAD. For lifetime safety, it is recommended to use the CreateWeakCallback provided in PgosSDKCpp.h to create a lambda bound to an UObject.
*/
void CreateStoreOrder(
   const FClientCreateStoreOrderParams& Params,
   TFunction<void(const FPgosResult& Ret, const FClientCreateStoreOrderResult* Data)> ResultCallback) const;

struct FClientCreateStoreOrderParams : public FBaseBackendEventParams
{
   /** The store id of this store item. */
   FString store_id;
   /** The store item id. */
   FString store_item_id;
   /** The amount of store item will be purchased. */
   int32 amount = 0;
   /** The currency code and actual price to purchase the item, it must be one of the prices of this store item. */
   FClientItemPrice price;
};

struct FClientCreateStoreOrderResult
{
   /** Order ID required for purchase. */
   FString order_id;
};

struct FBaseBackendEventParams
{
   /**
    * [Optional] A game-defined custom value pass to PGOS backend event.
    * If you need to get a custom value in the event, pass it in, otherwise, ignore this field.
    * The size is limited to 4096 bytes (after converting the string to utf8 format).
    * Detail for PGOS backend event: https://pgos.intlgame.com/pgosdoc/manual/service_manual/extensions/event.html.
    * Detail for how to reference the 'event_custom_data':https://pgos.intlgame.com/pgosdoc/manual/service_manual/extensions/virtual_server_v2.html#43-the-request-and-response-protocol.
    */
   FString event_custom_data;
};
2. Commit the Order: Use the created order ID to commit the order. After the order status is completed, the user's currency will be deducted to obtain the purchased in-game items. The same order will only be deducted once at most. Commits multiple times will not deduct multiple times.
The callback of the commit order interface CommitStoreOrder will return FPgosResult and FClientCommitStoreOrderResult. If FPgosResult fails due to network-related reasons, you can call CommitStoreOrder again using the same order ID.
status in FClientCommitStoreOrderResult represents the status of the order:
- StoreOrderProcessing: The order is still being processed. You can wait a few seconds to get the status of the order again by calling the
QueryStoreOrderinterface. - StoreOrderCompleted: The order transaction was successful. Deduction and distribution of items are completed.
- StoreOrderFailed: The order transaction failed.
/**
* After committing the order, the payment will be deducted and the items will be dispatched.
*
* The PGOS backend events `event_item_granted`/`event_currency_changed` will be triggered.
* The `event_custom_data` filled in the parameter `CreateStoreOrderParams` will be passed to these events.
*
* @param Params Request params.
* @param ResultDelegate The result delegate after the API execution ends, and it will be called in the GAME THREAD.
*/
void CommitStoreOrder(
    const FClientCommitStoreOrderParams& Params,
    TFunction<void(const FPgosResult& Ret, const FClientCommitStoreOrderResult* Data)> ResultCallback) const;

struct FClientCommitStoreOrderParams
{
    /** The previously created order ID. */
    FString order_id;
};

struct FClientCommitStoreOrderResult
{
    /** The code of currency that has been spent to purchase the store item. */
    FString spent_currency_code;
    /** The amount of currency that has been spent to purchase the store item. */
    int32 spent_currency_amount = 0;
    /** The item instances obtained after purchase. */
    FItemInstPack item_insts;
    /** The currencies obtained after purchase. */
    TArray<FCurrency> currencies;
    /** Order status. */
    EClientStoreOrderStatus status = EClientStoreOrderStatus::Dummy;
};

enum class EClientStoreOrderStatus : uint8
{
    /** None. */
    Dummy = 0,
    /** Order is being processed. */
    StoreOrderProcessing = 1,
    /** Purchase successful. */
    StoreOrderCompleted = 2,
    /** Purchase failed. */
    StoreOrderFailed = 3
};
Call the CreateStoreOrder&CommitStoreOrder&QueryStoreOrder method of the Client Economy module:
#include "PgosSDKCpp.h"

void SomeUObjectClass::CreateStoreOrder()
{
    auto Economy = IPgosSDKCpp::Get().GetClientEconomyAPI();
    if (Economy)
    {
        FClientCreateStoreOrderParams Params;
        // Fill create order params
        Economy->CreateStoreOrder(Params, [](const FPgosResult& Ret, const FClientCreateStoreOrderResult* Data) {
            if (Ret.err_code == (int32)Pgos::PgosErrCode::kSuccess)
            {
                UE_LOG(LogTemp, Log, TEXT("CreateStoreOrder Success"));
                // you can call `CommitStoreOrder` to commit the order
            }
            else
            {
                UE_LOG(LogTemp, Log, TEXT("CreateStoreOrder Failed: err_code=%d, err_msg=%s"), Ret.err_code, *Ret.msg);
            }
        });
    }
}

void SomeUObjectClass::CommitStoreOrder(const FString& OrderId)
{
    auto Economy = IPgosSDKCpp::Get().GetClientEconomyAPI();
    if (Economy)
    {
        FClientCommitStoreOrderParams Params;
        Params.order_id = OrderId;
        Economy->CommitStoreOrder(Params, [](const FPgosResult& Ret, const FClientCommitStoreOrderResult* Data) {
            if (Ret.err_code == (int32)Pgos::PgosErrCode::kSuccess)
            {
                UE_LOG(LogTemp, Log, TEXT("CommitStoreOrder Success"));
                // If the returned order status is Processing, you can call QueryStoreOrder after a short period of time to query the order status.
            }
            else
            {
                UE_LOG(LogTemp, Log, TEXT("CommitStoreOrder Failed: err_code=%d, err_msg=%s"), Ret.err_code, *Ret.msg);
                // If there is a network error, you can commit it again.
            }
        });
    }
}

void SomeUObjectClass::QueryStoreOrder(const FString& OrderId)
{
    auto Economy = IPgosSDKCpp::Get().GetClientEconomyAPI();
    if (Economy)
    {
        FClientQueryStoreOrderParams Params;
        Params.order_id = OrderId;
        Economy->QueryStoreOrder(Params, [](const FPgosResult& Ret, const FClientQueryStoreOrderResult* Data) {
            if (Ret.err_code == (int32)Pgos::PgosErrCode::kSuccess)
            {
                UE_LOG(LogTemp, Log, TEXT("QueryStoreOrder Success"));
                // If the returned order status is Processing, you can call QueryStoreOrder after a short period of time to query the order status.
            }
            else
            {
                UE_LOG(LogTemp, Log, TEXT("QueryStoreOrder Failed: err_code=%d, err_msg=%s"), Ret.err_code, *Ret.msg);
            }
        });
    }
}
6. Orders
6.1 Overview
Each time a player purchases items from the store, the system generates an order. Go to Portal -> Economy -> Stores -> Orders to query and track order status information.
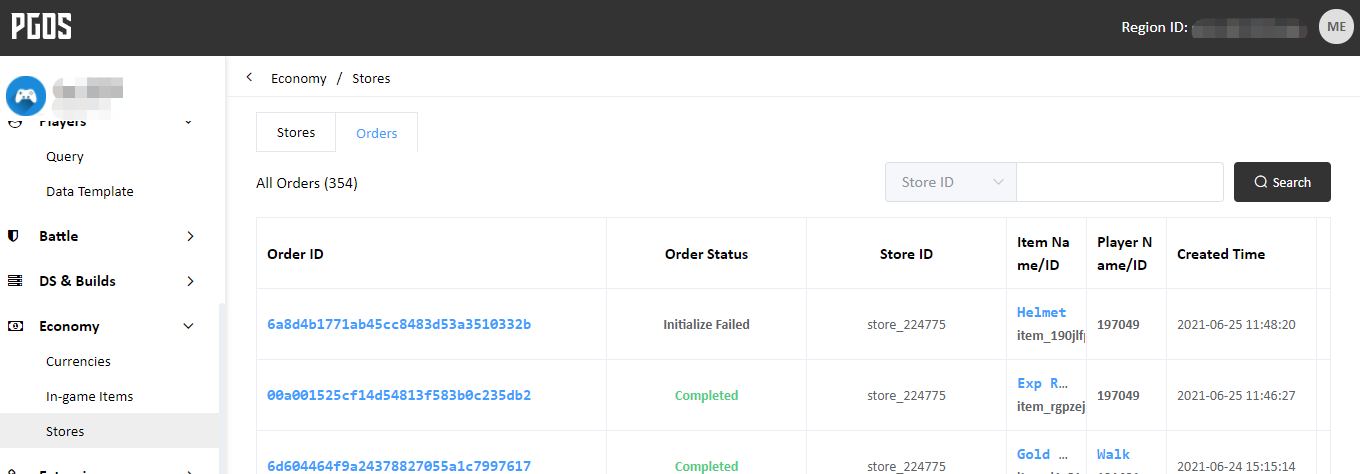
Each order contains the following information:
- Store ID: The ID of the store from which the order is placed.
- Category ID: The category of the purchased item. When an item has multiple categories, the order source can be tracked from this field.
- Player ID: ID of the player who initiated the order.
- Order ID: The order ID.
- In-game Item ID: The ID of the purchased item.
- Item Instance ID List: List of item instances granted to the player after the completion of the order.
- Virtual Currency: Currency used to pay for the order.
- Order Status: The current status of the order, which can be:
- Pending -- The order is waiting to be processed
- Initialize Failed -- Purchase conditions were not met
- Paid -- Order payment completed
- Pay Failed -- Order payment failed
- Granting -- Delivering order
- Grant Failed -- Failed to deliver order
- Completed -- Order completed
- Returning -- Reclaiming item instance
- Return Failed -- Failed to reclaim item instance
- Returned -- Item instance reclaimed
- Refunding -- Refunding payment
- Refund Failed -- Failed to refund payment
- Revoke Completed -- Order canceled
- Created Time: The creation time of the order
Orders that meet the conditions can be revoked on the Portal. When an order is revoked, the item instances involved will be reclaimed from the player and the payment made in virtual currency will be returned to the player.Orders that meet the following conditions can be revoked:
- The order status is COMPLETE.
- The item instances granted by the order are still valid.
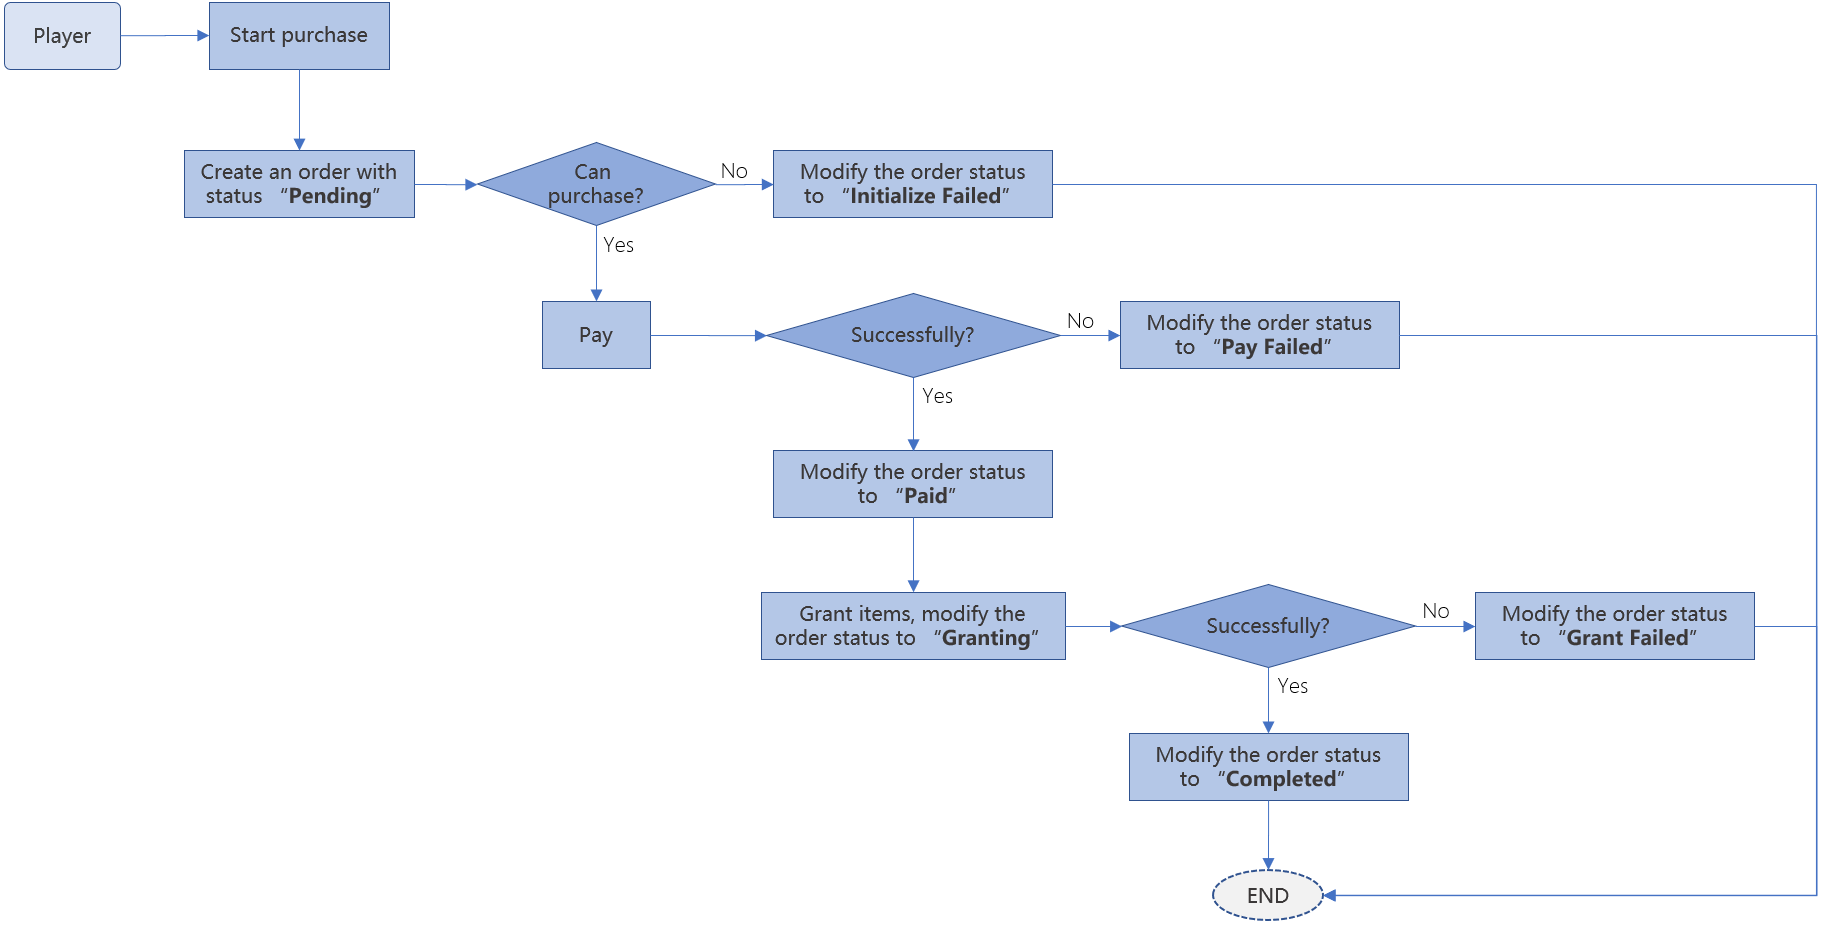
6.2 Order Handling Processes
When an item purchase order is initiated, the main handling processes are as follows:
- Order authentication: Authenticate the legitimacy of the order request by checking that the store ID and item ID are correct and the player's wallet balance is sufficient.
- Deduction (payment): The payment for this order is deducted from the player's wallet. If the payment is successful, it will trigger an OnBalanceChanged event in the Client SDK.
- Granting: The items purchased are delivered to the player's inventory. If successful, this will trigger an OnInventoryChanged event in the Client SDK. If the purchased item is a bundle or container containing virtual currency, the granting process will add the specified amount of virtual currency to the player's wallet. If successful, this will trigger an OnBalanceChanged event in the Client SDK.
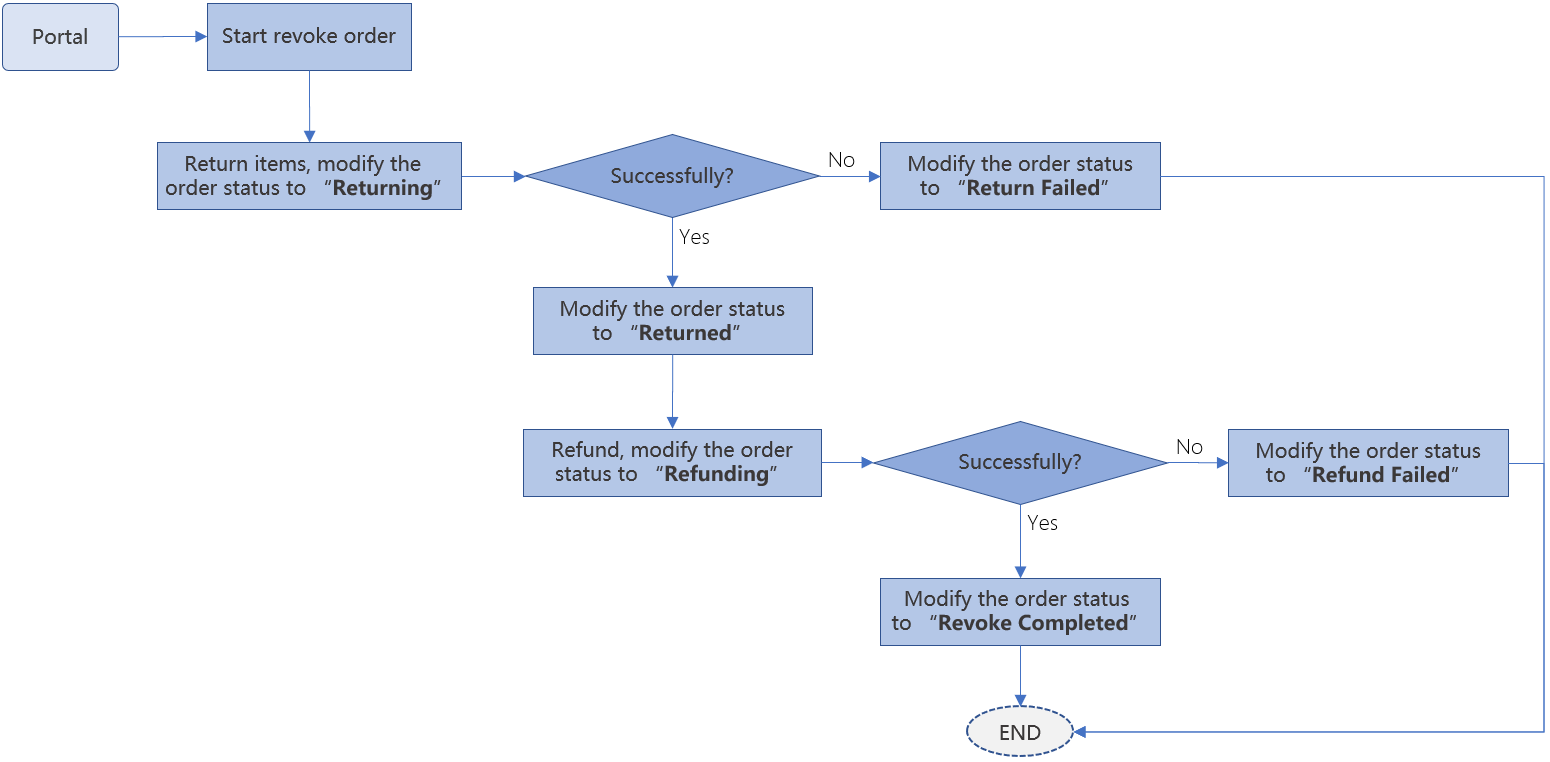
6.3 Order Revocation Process
When an order is revoked, the main handling processes are as follows:
- Reclaiming: The items purchased are reclaimed from the player's inventory. If successful, this will trigger an OnInventoryChanged event in the Client SDK. If the purchased item is a bundle or container containing virtual currency, the reclaiming process will deduct the specified amount of virtual currency from the player's wallet. If successful, this will trigger an OnBalanceChanged event in the Client SDK.
- Refund: The payment for this order is refunded to the player's wallet. If the refund is successful, it will trigger an OnBalanceChanged event in the Client SDK.