Configure the PgosSDK Plugin
There are several configurations for the PgosSDK, you can set up from editor setting or codes.
The following is the field explanation:
- title_id: The title id you retrieve from the web portal console.
- log_level: The minimum suppression level of logs from
PgosSDK. "0" for Info, "1" for Warn; "2" for Error, "3" for No Log. - http_request_timeout: The timeout (in seconds) of a
PgosSDKHTTP request. It must be positive, and a non-positive value is rejected and falls back to the default, which is "20" for the game client and "10" for the dedicated server. - dns_cache_timeout: How long (in seconds) a resolved domain stays in the DNS cache, so that the requests that follow do not have to look it up again. A larger value also means that an address change on the server side takes longer to reach a process that is already running. "0" means resolving the domain again for every new connection, and a negative value is rejected and falls back to the default "3600".
- secret_key: The client secret key retrieve from the web portal console. (GAME CLIENT ONLY)
- account_provider : "0" for FAS, "1" for INTL, "2" for MSDK, "3" for WeGame, "4" for PlayFab, "5" for Steam, "6" for Epic, "7" for XboxLive, "8" for PlayStationNetwork, "9" for Nintendo, "10" for JWT. (GAME CLIENT ONLY)
- chat_msg_cache_max_bytes: The maximum size of the local cache for chat messages. (in bytes). (GAME CLIENT ONLY)
- title_region_config_data_cache_max_bytes: The maximum size of the local cache for title region config data. (in bytes). (GAME CLIENT ONLY)
- group_event_msg_filter: Configure the event message types supported by the group, empty (default) means all types are supported. Click Event Message Filtering for detail. (GAME CLIENT ONLY)
- auth_request_timeout: The timeout (in seconds) of the
LoginPGOSHTTP request. It must be positive, and a non-positive value is rejected and falls back to the default "30". (GAME CLIENT ONLY) - latency_detection: Whether
PgosSDKmeasures the network latency and packet loss between the player's client and each Data Center where the DS are deployed. "0" for disable, "1" for enable (default). (GAME CLIENT ONLY) - http_prewarm_on_init: Whether to send one throwaway HTTP request to the title region of the last login right after
InitSdk, so that the domain is resolved and the connection is established before the game callsLoginPGOS. This makes the first login request faster. "0" for disable (default), "1" for enable. (GAME CLIENT ONLY) - http_prewarm_timeout: The timeout (in seconds) of a prewarm HTTP request. It must be positive, and a non-positive value is rejected and falls back to the default "30". (GAME CLIENT ONLY)
- title_region_id: Specify the title region that the server should access. This configuration is only applicable to servers that do not use the PGOS DS Hosting service, while both online DS (deployed in the PGOS cloud environment) and local DS (configured with a local placer ID) that utilize the PGOS DS Hosting service do not require this configuration. (DEDICATED SERVER ONLY)
- ds_hosting_feature_enable: Enable the PGOS DS Hosting feature or not. If this feature is not being used, disabling it can speed up SDK initialization. "true" for enable, "false" for disable. (DEDICATED SERVER ONLY)
1. Set up from Editor Setting (Recommended)
In the Unity Editor, navigate to Window->PgosSDK->Generate PGOS Setting file->PgosSDK, and you can see the settings as below:
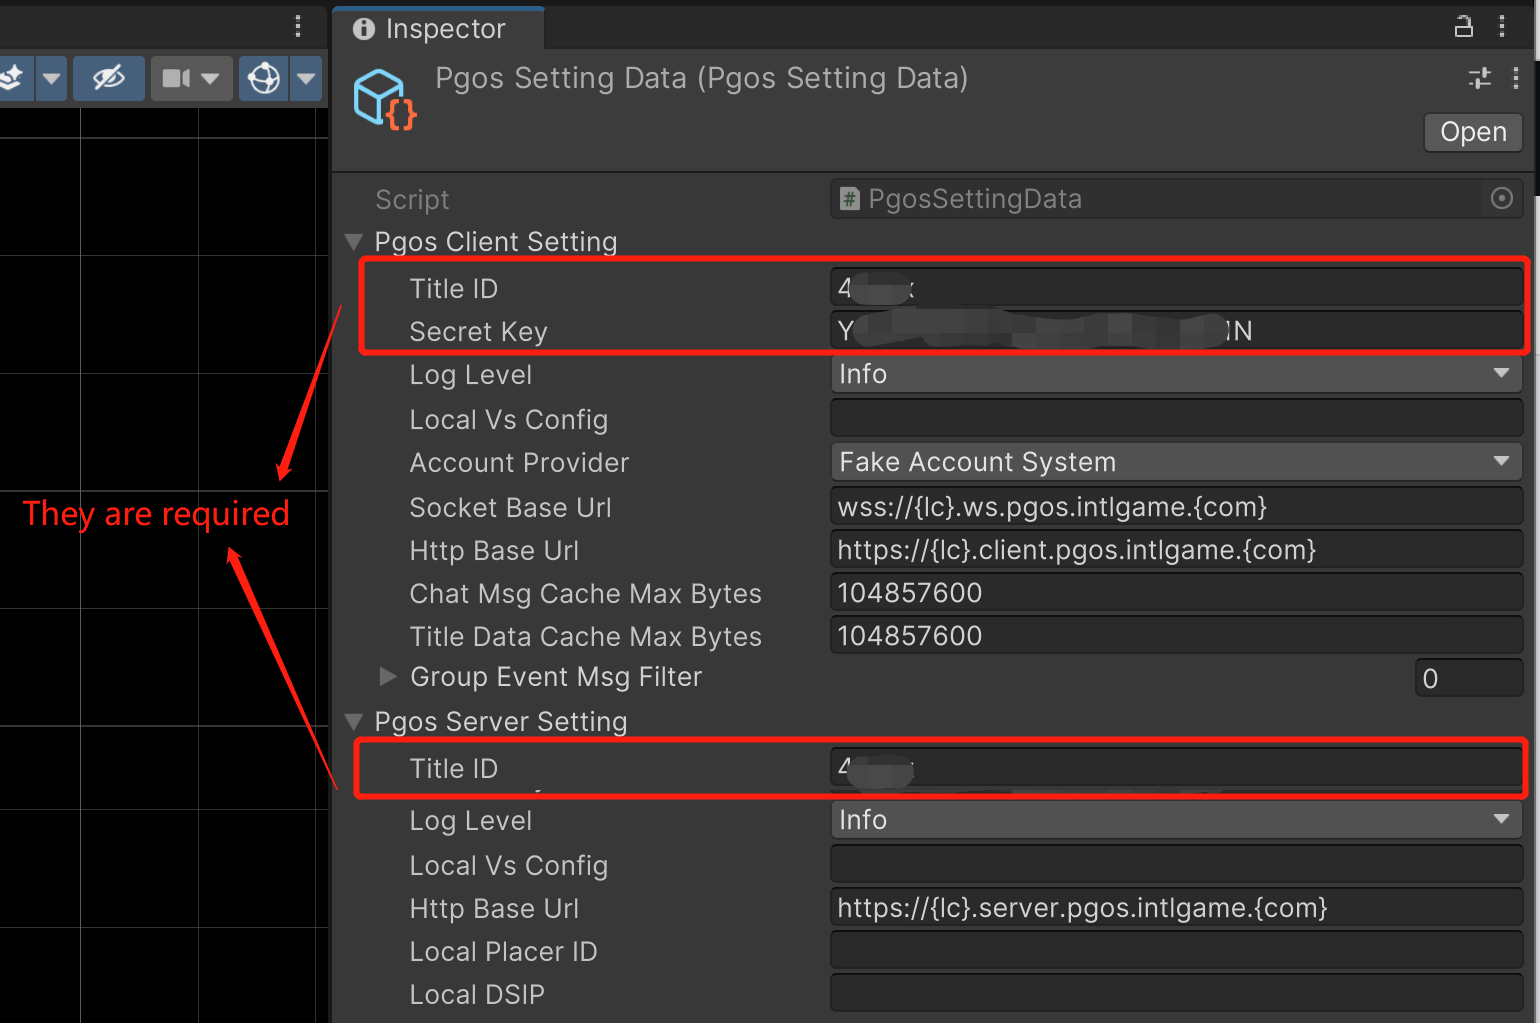
You need to set at least your Title ID and Secret Key to make PGOS work.
Assets/Resources/PgosSettingData.assetwill be created or updated if you change the default settings.
2. Set up from codes
When using C#, you can use a Dictionary to store the configurations and pass it to the InitConfig function, and the field name can refer to the field explanation above.
// For client
var clientConfig = new Dictionary<string, string>();
clientConfig.Add("title_id", "Your Title ID");
clientConfig.Add("secret_key", "Your Server Secret Key");
PgosClientSDK.Get().GetClientSDKAPI().InitConfig(clientConfig);

// For server
var serverConfig = new Dictionary<string, string>();
serverConfig.Add("title_id", "Your Title ID");
PgosServerSDK.Get().GetServerSDKAPI().InitConfig(serverConfig);
3. Additional setup for Android builds
When building for Android, a custom activity class is required to initialize the Java interop code of PgosSDK.
This
.javafile can be placed in any folder you want.
SimplyAssets/PGOSUnitySampleMainActivity.javafor instance.
package com.proxima.pgos.unitysample;
import com.unity3d.player.UnityPlayerActivity;
import android.os.Bundle;
import android.util.Log;

import com.pgos.client.PgosClientNative;

public class PGOSUnitySampleMainActivity extends UnityPlayerActivity {
    protected void onCreate(Bundle savedInstanceState) {
        super.onCreate(savedInstanceState);

        // call this function before the PgosSDK is initialized in C#.
        // `Activity.onCreate` is the most recommended place since it's prior to any C# code.
        PgosClientNative.initialize(this);
    }
}
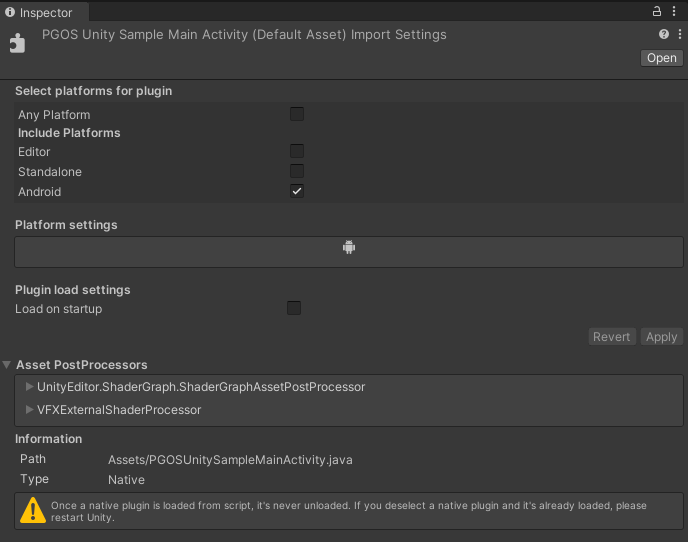
It will be checked for Android like a Plugin in the inspector:
Then, toggle on Custom Main Manifest in Project Settings -> Player -> Android Settings -> Publishing Settings:
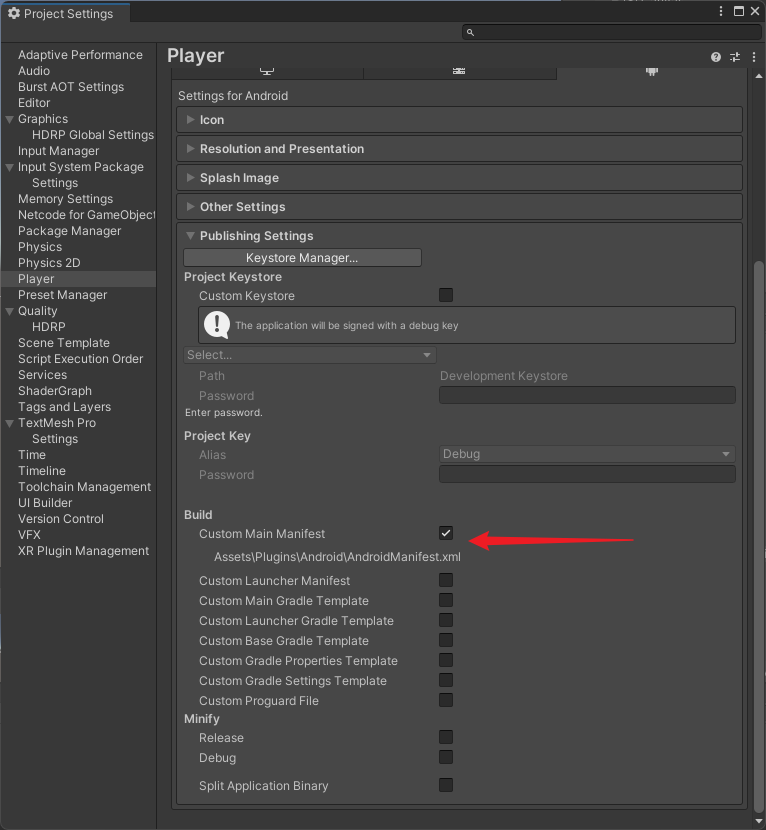
Change the activity class to PGOSUnitySampleMainActivity in the newly created AndroidManifest.xml. A simple example:
<?xml version="1.0" encoding="utf-8"?>
<manifest
    xmlns:android="http://schemas.android.com/apk/res/android"
    xmlns:tools="http://schemas.android.com/tools">
    <application>
        <activity android:name="com.proxima.pgos.unitysample.PGOSUnitySampleMainActivity"
                  android:theme="@style/UnityThemeSelector">
            <intent-filter>
                <action android:name="android.intent.action.MAIN" />
                <category android:name="android.intent.category.LAUNCHER" />
            </intent-filter>
            <meta-data android:name="unityplayer.UnityActivity" android:value="true" />
        </activity>
    </application>
</manifest>