Virtual Server
1. 概述
Virtual Server是 PGOS 提供的一项扩展服务,允许开发者通过编写代码来扩展功能、实现定制化特性,并部署第三方软件运行。Virtual Server的本质是开发者创建 Web 服务器,然后将其部署并运行在 PGOS 提供的容器运行时平台上。为了编排和管理开发者编写的Virtual Server,PGOS 使用 Knative 框架,并确保不同 Title Region 下的Virtual Server之间相互隔离。
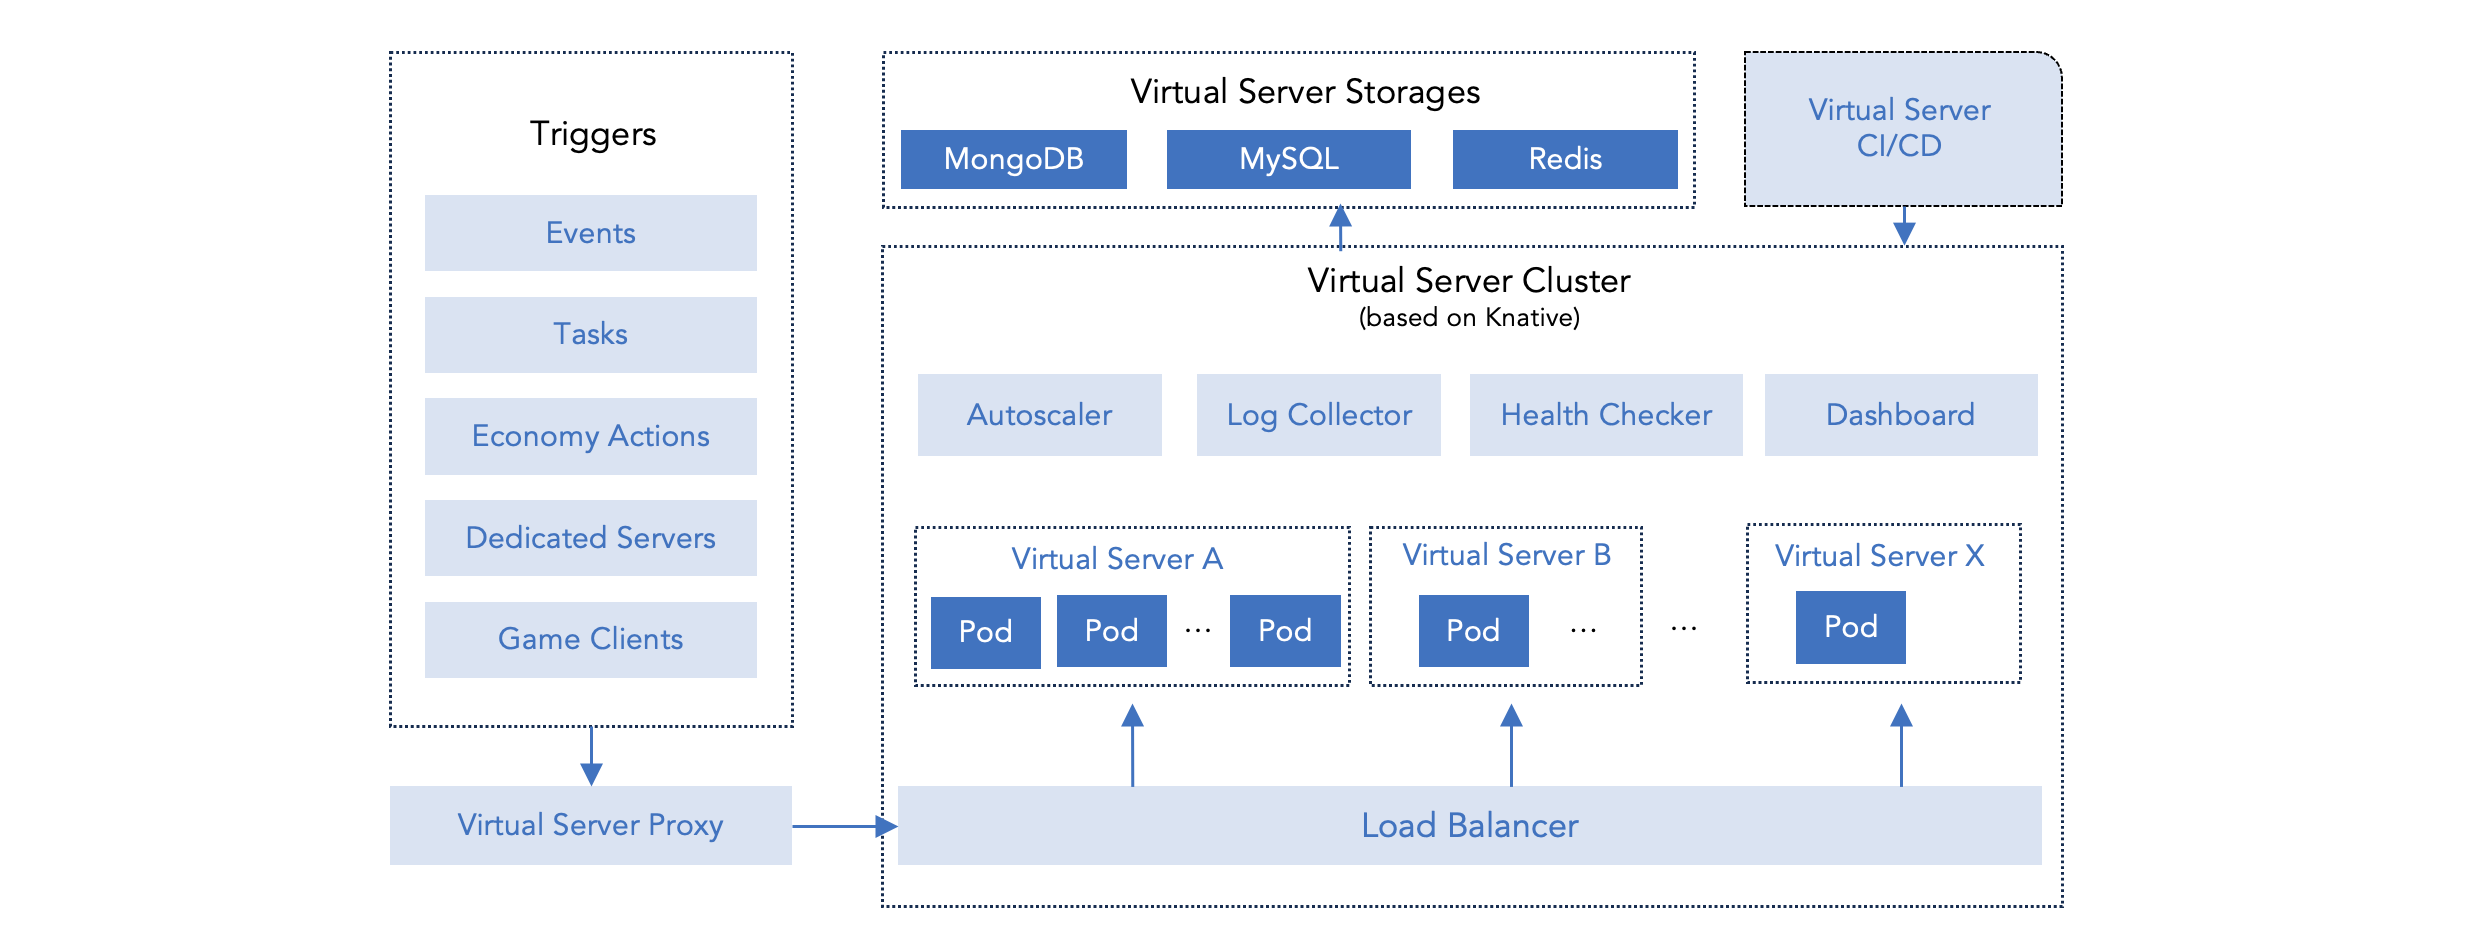
Virtual Server提供以下基本功能:
语言透明:开发者可以使用任何编程语言构建Virtual Server。
后端 HTTP API:开发者可以在代码中调用 PGOS 后端 API。我们提供示例代码,用于使用 Golang、Node.js 和 Python 编写正确的请求。
自动扩展:可以为每个Virtual Server实例设置 CPU 和内存使用率,并可根据实际负载和需求容纳多个实例。
触发执行:Virtual Server可以由游戏客户端和专用服务器触发,也可以与 PGOS 事件绑定,实现无缝集成。
CI/CD:开发者可以上传源代码,以便 PGOS 构建 Docker 镜像。或者,开发者可以上传包含导出 Docker 镜像的 zip 文件,或提供一个公共 Docker 仓库地址,供 PGOS 拉取镜像并相应地创建Virtual Server。
数据可视化:PGOS 可以生成图表,展示 CPU、内存和实例数量趋势,以及整体请求往返时间 (RTT) 和每秒查询次数 (QPS) 的统计数据。此外,它还可以以直方图的形式显示 RTT API 响应时间的分布。
日志收集:PGOS 可以存储、索引和分析Virtual Server在控制台 shell 上打印的日志,这些日志按版本进行组织。这为开发者提供了高效的日志管理和跟踪功能。值得一提的是,访问日志支持 Nginx 默认日志格式。
VS 存储:访问Virtual Server中的数据库和云盘。
内网通信:Virtual Server之间可以通过内网进行内部通信。
浏览器访问:您可以直接在浏览器中访问您的Virtual Server。请注意,您只能通过 PGOS 门户进行访问。
2. 创建和管理 Virtual Server
要创建Virtual Server,需要准备一个 Docker 镜像。这可以通过三种方式完成:
- 将 Docker 镜像导出为 zip 文件,并使用
docker save命令上传到 Web 门户。 - 上传包含
Dockerfile的源代码,PGOS 将为您完成 CI 工作。 - 提交一个公共 Docker 镜像仓库路径,以便 PGOS 能够拉取镜像。
然后导航到“Virtual Server”页面,点击“+ 添加Virtual Server”按钮。
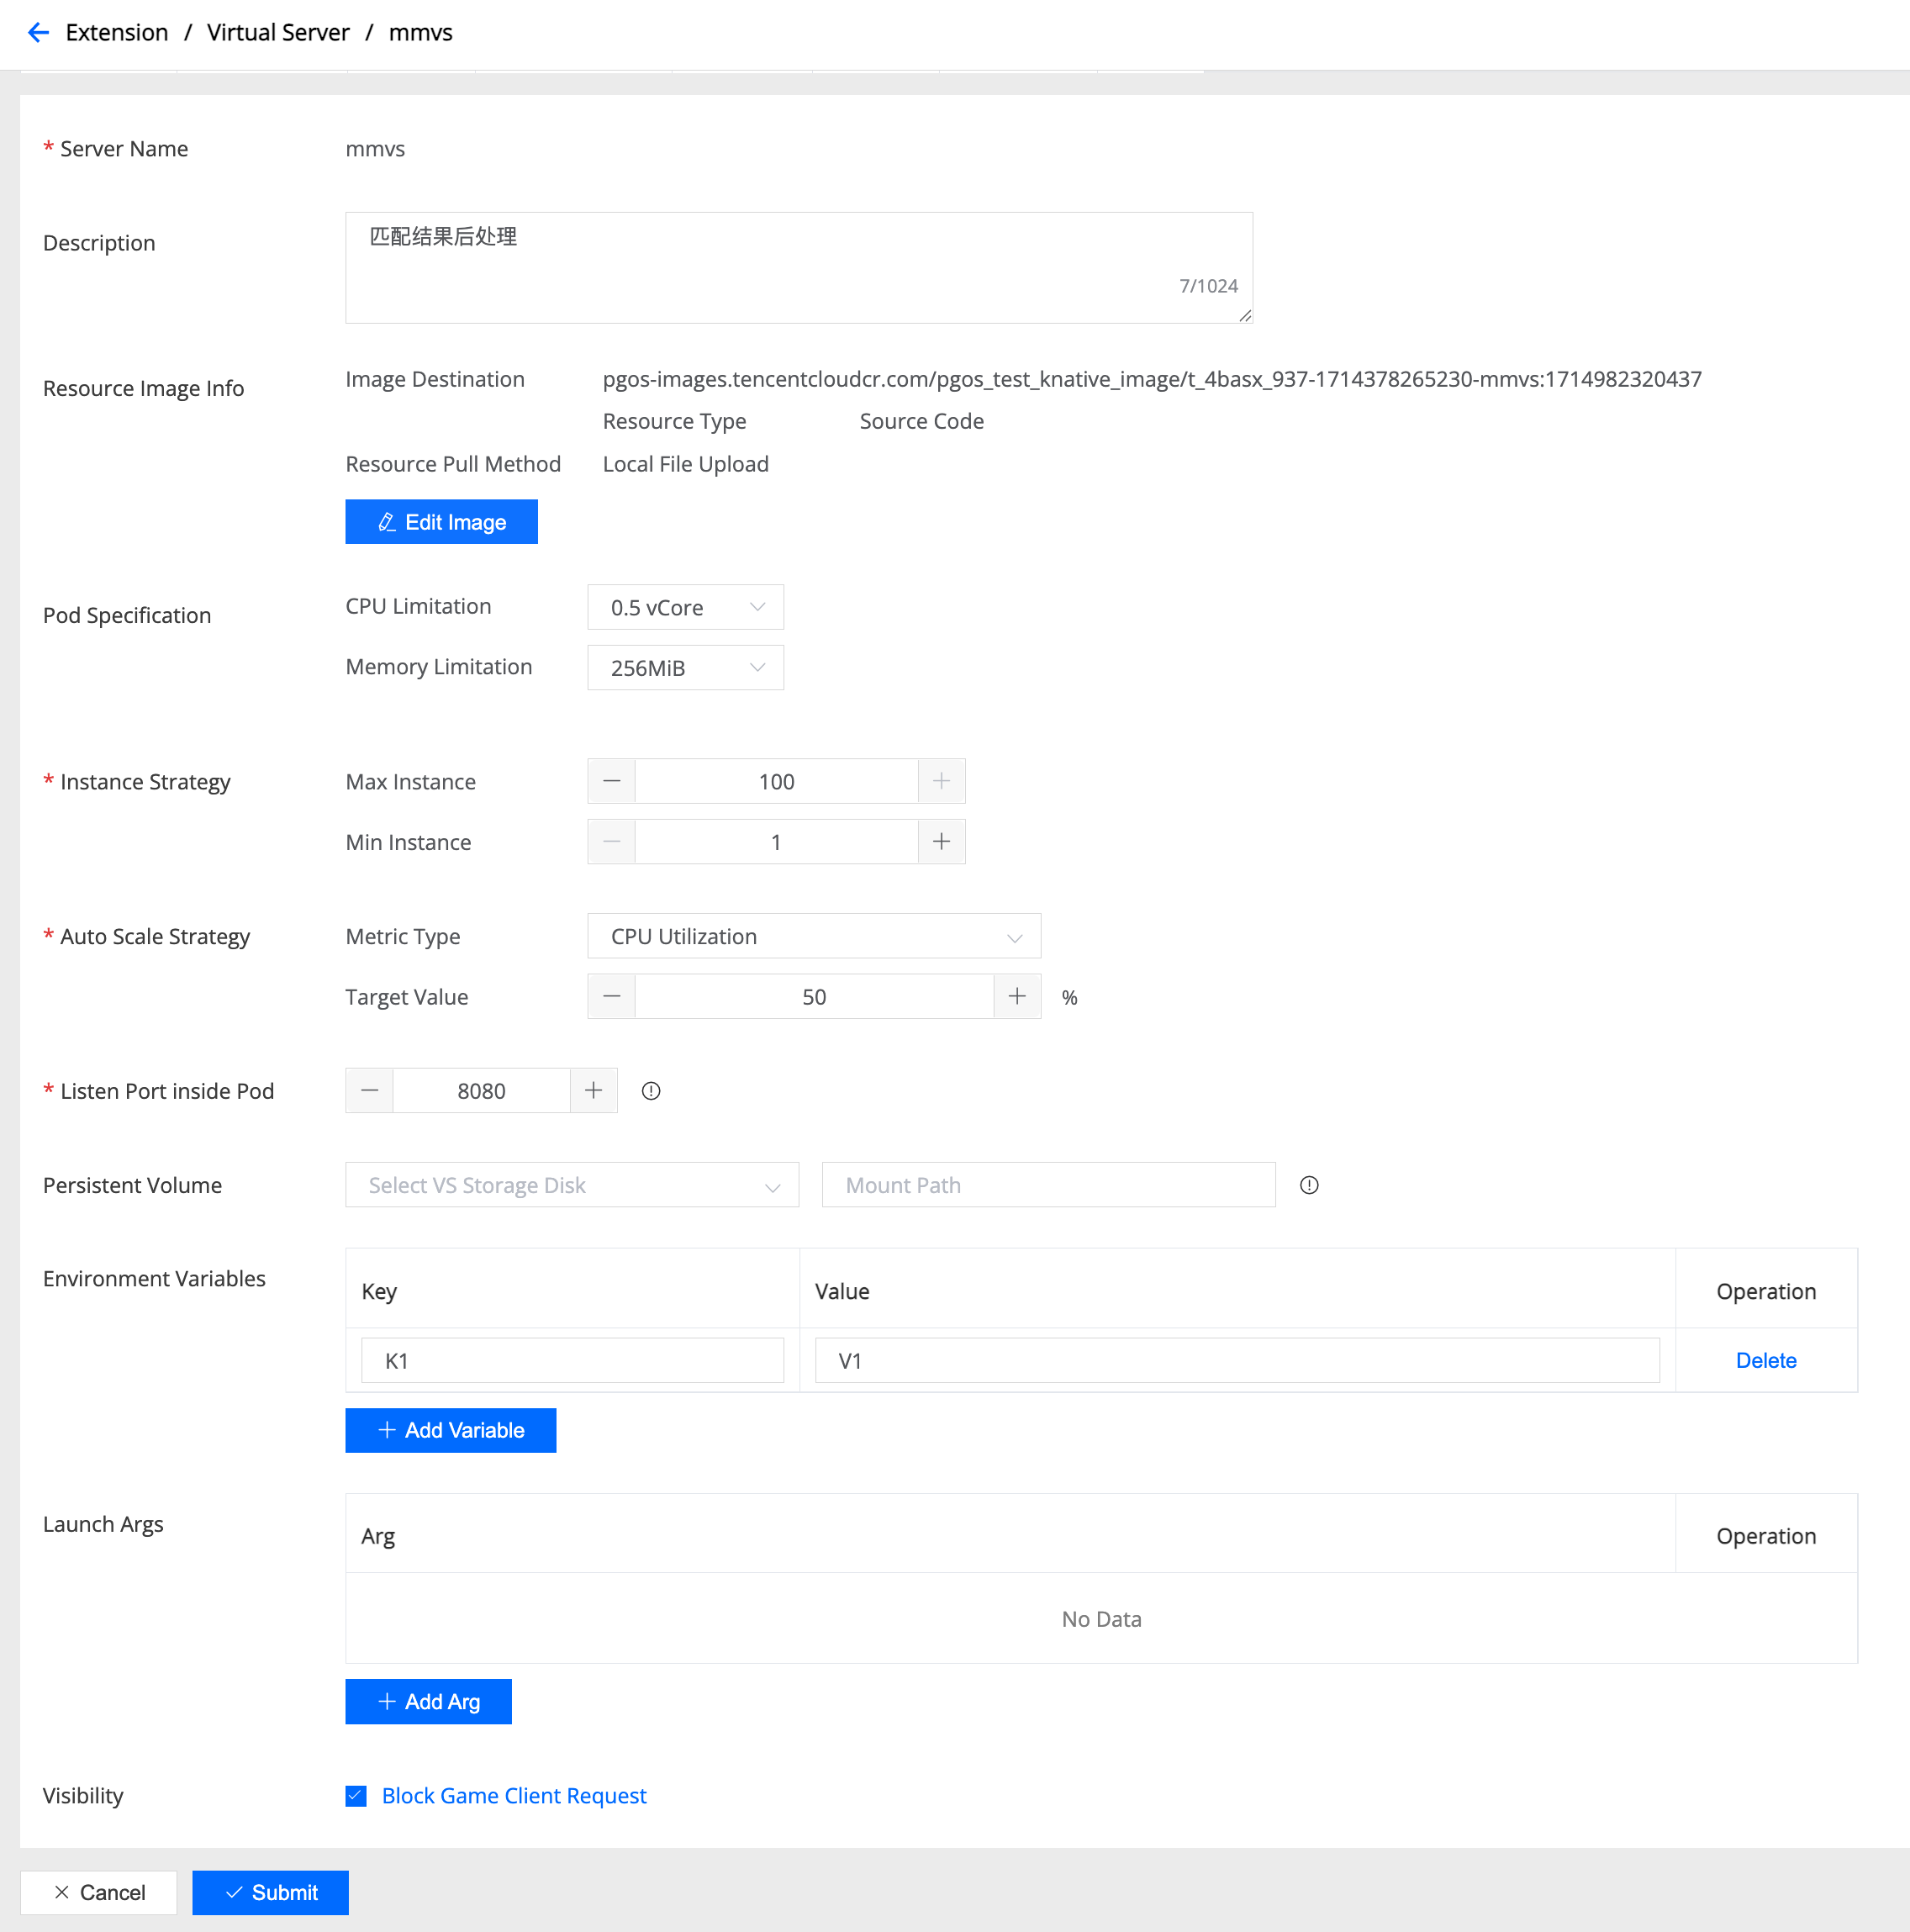
以下字段必填:
Server Name:只能包含大小写字母、数字和连字符 (-)。
Resource Type & Pull Method:资源类型和拉取方式,选择 Docker 镜像的构建方式。
包含 Dockerfile 的源代码:PGOS 会为您构建镜像,您必须将包含 Dockerfile 的源代码上传到根文件夹。
从本地文件获取 Docker 镜像:上传您已构建的 Docker 镜像,您可以使用 docker save 命令导出。
从镜像仓库拉取 Docker 镜像:PGOS 会从公共镜像仓库中获取镜像。
Specification per Instance & Max Instances: 每个实例的规格和最大实例数
Virtual Server的最小运行单元称为 Pod,每个 Pod 的 CPU 和内存使用量均可配置。Virtual Server支持自动扩容,允许您自定义最大并发实例数。
您可以根据程序的需求分配所需的 CPU 和内存大小,并考虑其是计算密集型还是空间密集型。这种灵活性使您能够根据应用程序的需求进行最佳的资源管理。
Listen Port: 监听端口,由于Virtual Server本质上是一个 Web 服务器,因此需要一个端口来监听 HTTP 请求。需要注意的是,这只是 Pod 内部的监听端口。如果您从外部访问Virtual Server,例如通过浏览器或 Http API,则端口将为 443。
AutoScale Metric Type & Target Value:自动扩缩容指标类型和目标值,用于配置 Virtual Server 如何根据负载进行扩缩容。
- Metric Type(指标类型):选择用于自动扩缩容决策的指标:
cpu:CPU 利用率百分比(例如 70 表示 CPU 请求量的 70%)memory:内存利用率百分比(例如 80 表示内存限制的 80%)rps:每个实例每秒请求数(绝对值,例如 100)concurrency:每个实例的并发请求数(绝对值,例如 50)
- Target Value(目标值):触发扩缩容的阈值。对于
cpu和memory,指定百分比(1-100)。对于rps和concurrency,指定请求的绝对数量。 - 工作原理:自动扩缩容器会持续监控所有运行实例的平均指标值。当平均值超过目标值时,会增加实例数量以分散负载;当平均值低于目标值时,会减少实例数量以节省资源。例如,如果您设置
cpu目标值为70,而当前平均 CPU 使用率为 140%,自动扩缩容器会将实例数量翻倍,使平均值回到约 70%。
- Metric Type(指标类型):选择用于自动扩缩容决策的指标:
Persistent Volume: 持久化存储,挂载到Virtual Server的磁盘。您需要在“Virtual Server存储”页面中创建一个。将程序运行的数据存储到磁盘上,就永久存在,不会随着VS的销毁和停止而销毁。
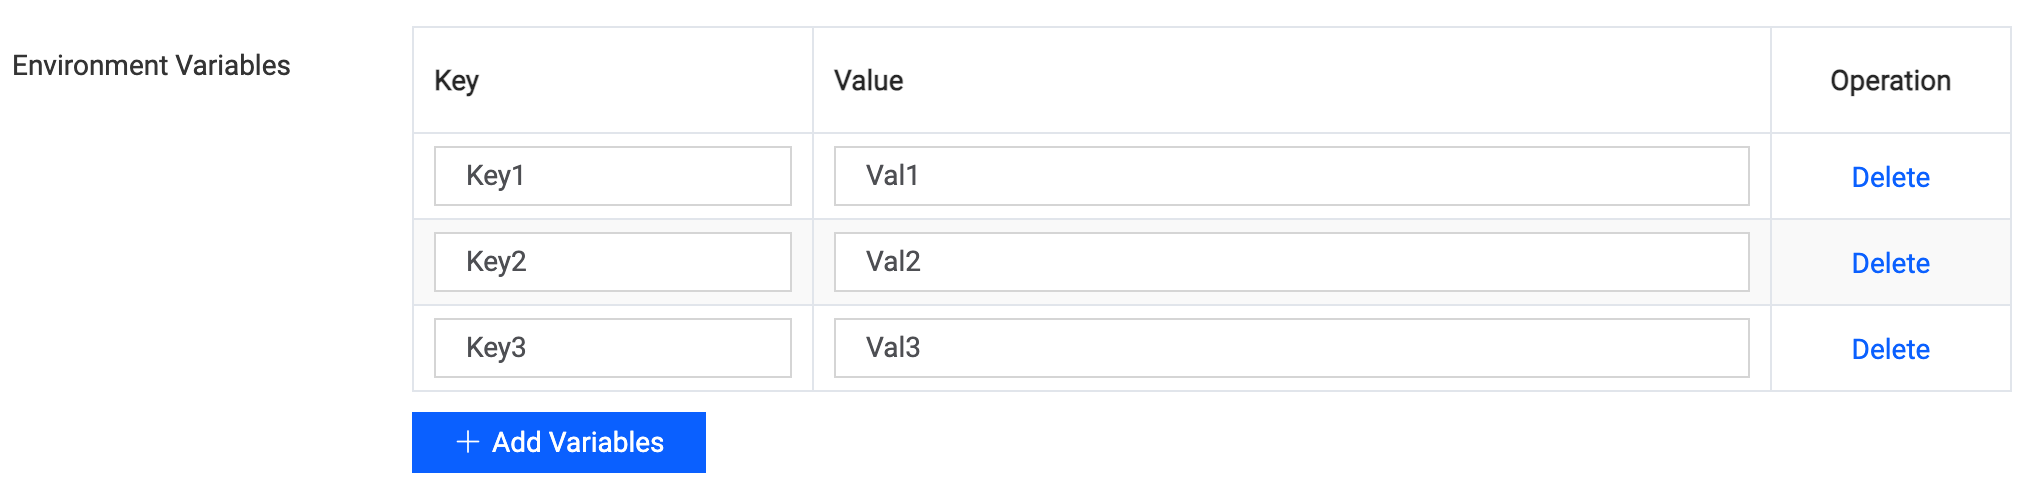
Environment Variables: 环境变量,您的程序可以访问环境变量,使其能够有效地适应和响应不同的配置和运行时条件。
Launch Args: Virtual Server启动的参数。
Visibility: 可见性,Virtual Server可通过游戏客户端、后端 http API 以及专用服务器访问。出于安全考虑,您可以选择屏蔽来自客户端的请求。
创建Virtual Server后,您可以检查部署状态:

正常情况下,“构建状态”会先尝试构建 Docker 镜像,“运行状态”初始会显示“正在部署”。镜像构建成功后,“运行状态”会转为“正在运行”。但如果镜像启动过程中发生致命错误或无法正常启动,则状态会显示为“异常”。
Virtual Server启动失败的常见原因可能包括:
- 程序中的监听端口号与配置中的端口号不一致。
- 服务器监听的 IP 地址应为“0.0.0.0”,而不是“127.0.0.1”。
- 程序崩溃。
- 提供的图像地址无法访问,无法检索,以及其他问题。
- 内存不足,无法启动占用大量空间的程序。
当Virtual Server长时间处于低负载状态时,最小实例数将降至 1,并继续消耗 CPU 和内存资源。如果您希望在开发阶段最大限度地减少资源使用,可以点击页面上的“停止”按钮暂停Virtual Server实例并完全回收所有资源。当您需要再次运行Virtual Server时,只需点击“启动”按钮即可快速恢复。
3.Virtual Server环境变量
Virtual Server的环境变量在创建Virtual Server时设置,可以在Virtual Server运行时访问这些变量,以访问不同的配置和运行时环境。我们也可以在之后修改它们。当前PGOSVirtual Server的环境变量来自两个来源:
- 用户定义的环境变量。
- 系统预设的环境指标。
3.1 用户定义的环境变量
创建或更新Virtual Server时,您可以设置环境变量。这些环境变量可在Virtual Server运行时访问,以访问不同的配置和运行时环境。环境变量的设置方法如下:
3.2 系统预设环境变量
系统预设环境变量是系统为当前title region设置的变量,可在Virtual Server运行时访问,以访问不同的配置和运行时环境。预设环境变量如下:
| Environment Variables | 描述 | 举例 |
|---|---|---|
| PGOS_Title_ID | 游戏ID | 5tcsa |
| PGOS_Title_Name | 游戏名字 | PGOS Test Game |
| PGOS_Title_Logo | 游戏logo | https://pgos-1303878176.cos.eu-frankfurt.myqcloud.com/logo/1629706971800-sh.png |
| PGOS_Title_Region_ID | 游戏Title Region ID | euff_5tcsa_812179_dev |
| PGOS_Title_Region_Name | 游戏Title Region 名字 | PGOS Dev Title Region |
| PGOS_Title_Region_Type | 游戏Title Region类型 | dev, test, release |
| PGOS_Title_Region_Cloud_Provider | Title Region部署的云 | tcloud, aws |
| PGOS_Title_Region_Backend_API_Domain | Title Region backend API 域名 | euff.server.pgos.intlgame.com |
| PGOS_Title_Region_CLI_API_Domain | Title Region CLI API 域名 | euff.pgos.intlgame.com |
| PGOS_VS_Name | Virtual Server名称 | PGOS-Test-Virtual-Server-001 |
| PGOS_VS_Listen_Port | Virtual Server监听端口 | 8080 |
| PGOS_VS_Storage_<Storage Name> | the Virtual Server 存储的配置 | PGOS 提供了 Redis and MongoDB 存储, 每个都有不同的配置信息,如下所示。 |
3.2.1 Redis 环境变量
假如我们有一个名为“RedisA”的 Redis 存储,我们可以通过环境变量 PGOS_VS_Storage_RedisA 访问这个存储的配置信息,该 Redis 存储的配置信息如下:
PGOS_VS_Storage_RedisA = '{"type":"Redis","version":"5.2.0","name":"RedisA","memory":1,"network":[{"port":6379,"inner_ip":"172.21.0.81"}],"password":"TVCND0FHGk4jE8x7","instanceId":"crs-9vnjdg8g","clusterType":"Standard","shardNumber":0,"masterSlaveNumber":1}',
环境变量值是一个JSON字符串,其中包含了Redis存储的配置信息,如下:
{
    "type": "Redis",
    "version": "5.2.0",
    "name": "RedisA",
    "memory": 1,
    "network": [
        {
            "port": 6379,
            "inner_ip": "172.21.0.0"
        }
    ],
    "password": "xxxxx",
    "instanceId": "crs-9vnjdg8g",
    "clusterType": "Standard",
    "shardNumber": 0,
    "masterSlaveNumber": 1
}
- type**:存储类型,即 Redis
- version:Redis 版本
- name:Redis 名称
- memory:Redis 内存大小
- network:Redis 网络配置,包含端口和内网 IP
- password:Redis 密码
- instanceId:Redis 实例 ID
- clusterType:Redis 集群类型
- shardNumber:Redis 分片号
- masterSlaveNumber:Redis 主从号
3.2.2 MongoDB 环境变量
假设我们有一个名为“MongoDBA”的 MongoDB 存储,我们可以通过环境变量“PGOS_VS_Storage_MongoDBA”访问该存储的配置信息。该 MongoDB 存储的配置信息如下:
PGOS_VS_Storage_MongoDBA = '{"type":"MongoDB","version":"5.0.0","cpu":2,"disk":100,"name":"MongoDBA","memory":4,"account":"mongouser","network":[{"port":27017,"role":"Primary","inner_ip":"172.21.0.42"},{"port":27017,"role":"Secondary","inner_ip":"172.21.0.116"},{"port":27017,"role":"Secondary","inner_ip":"172.21.0.145"}],"password":"2bnUyqZ3fbgUxM4T","mongosCpu":0,"instanceId":"cmgo-rgde6vl5","replicaSet":"cmgo-rgde6vl5_0","clusterType":"Standard","shardNumber":0,"mongosMemory":0,"mongosNodeNum":0,"masterSlaveNumber":3}'
环境变量值是一个JSON字符串,其中包含了MongoDB存储的配置信息,如下:
{
    "type": "MongoDB",
    "version": "5.0.0",
    "cpu": 2,
    "disk": 100,
    "name": "MongoDBA",
    "memory": 4,
    "account": "mongouser",
    "network": [
        {
            "port": 27017,
            "role": "Primary",
            "inner_ip": "172.21.0.1"
        },
        {
            "port": 27017,
            "role": "Secondary",
            "inner_ip": "172.21.0.2"
        },
        {
            "port": 27017,
            "role": "Secondary",
            "inner_ip": "172.21.0.3"
        }
    ],
    "password": "xxxx",
    "mongosCpu": 0,
    "instanceId": "cmgo-rgde6vl5",
    "replicaSet": "cmgo-rgde6vl5_0",
    "clusterType": "Standard",
    "shardNumber": 0,
    "mongosMemory": 0,
    "mongosNodeNum": 0,
    "masterSlaveNumber": 3
}
- type:存储类型,即 MongoDB
- version:MongoDB 版本
- cpu:MongoDB CPU 核心数
- disk:MongoDB 磁盘大小
- name:MongoDB 名称
- memory:MongoDB 内存大小
- account:MongoDB 账户
- network:MongoDB 网络配置,包括端口、角色和内部 IP
- password:MongoDB 密码
- mongosCpu:MongoDB Mongos CPU 核心数
- instanceId:MongoDB 实例 ID
- replicaSet:MongoDB 副本集
- clusterType:MongoDB 集群类型
- shardNumber:MongoDB 分片号
- mongosMemory:MongoDB Mongos 内存大小
- mongosNodeNum:MongoDB Mongos 节点数字
- masterSlaveNumber:MongoDB 主从编号
3.3 访问环境变量
Virtual Server运行时,您可以通过代码访问环境变量。不同的编程语言和框架有不同的访问方式。以下是使用 NodeJS/Golang/Python 访问环境变量的示例:
- Golang
- NodeJS
- Python
  package main

  import (
    "fmt"
    "os"
  )

  func main() {
    // 1. Print all environment variables
    for _, e := range os.Environ() {
      fmt.Println(e)
    }

    // 2. Print specified environment variables
    titleID := os.Getenv("PGOS_Title_ID")
    titleName := os.Getenv("PGOS_Title_Name")
    titleLogo := os.Getenv("PGOS_Title_Logo")
    titleRegionID := os.Getenv("PGOS_Title_Region_ID")
    titleRegionName := os.Getenv("PGOS_Title_Region_Name")
    titleRegionType := os.Getenv("PGOS_Title_Region_Type")
    titleRegionCloudProvider := os.Getenv("PGOS_Title_Region_Cloud_Provider")
    titleRegionBackendAPIDomain := os.Getenv("PGOS_Title_Region_Backend_API_Domain")
    titleRegionCLIAPIDomain := os.Getenv("PGOS_Title_Region_CLI_API_Domain")

    vsName := os.Getenv("PGOS_VS_Name")
    vsListenPort := os.Getenv("PGOS_VS_Listen_Port")

    vsStorageRedis := os.Getenv("PGOS_VS_Storage_Redis")
    vsStorageMongoDB := os.Getenv("PGOS_VS_Storage_MongoDB")
  }
  // 1. Print all environment variables
  const env = process.env;
  console.log('All Environment Variables are: ', env)

  // 2. Print specified environment variables
  const titleId = process.env.PGOS_Title_ID;
  const titleName = process.env.PGOS_Title_Name;
  const titleLogo = process.env.PGOS_Title_Logo;
  const titleRegionId = process.env.PGOS_Title_Region_ID;
  const titleRegionName = process.env.PGOS_Title_Region_Name;
  const titleRegionType = process.env.PGOS_Title_Region_Type;
  const titleRegionCloudProvider = process.env.PGOS_Title_Region_Cloud_Provider;
  const titleRegionBackendAPIDomain = process.env.PGOS_Title_Region_Backend_API_Domain;
  const titleRegionCLIAPIDomain = process.env.PGOS_Title_Region_CLI_API_Domain;

  const vsName = process.env.PGOS_VS_Name;
  const vsListenPort = process.env.PGOS_VS_Listen_Port;

  const vsStorageRedis = process.env.PGOS_VS_Storage_Redis;
  const vsStorageMongoDB = process.env.PGOS_VS_Storage_MongoDB;
  import os

  # 1. Print all environment variables
  for key, value in os.environ.items():
      print(f"{key}={value}")

  # 2. Print specified environment variables
  title_id = os.environ.get("PGOS_Title_ID")
  title_name = os.environ.get("PGOS_Title_Name")
  title_logo = os.environ.get("PGOS_Title_Logo")
  title_region_id = os.environ.get("PGOS_Title_Region_ID")
  title_region_name = os.environ.get("PGOS_Title_Region_Name")
  title_region_type = os.environ.get("PGOS_Title_Region_Type")
  title_region_cloud_provider = os.environ.get("PGOS_Title_Region_Cloud_Provider")
  title_region_backend_api_domain = os.environ.get("PGOS_Title_Region_Backend_API_Domain")
  title_region_cli_api_domain = os.environ.get("PGOS_Title_Region_CLI_API_Domain")

  vs_name = os.environ.get("PGOS_VS_Name")
  vs_listen_port = os.environ.get("PGOS_VS_Listen_Port")

  vs_storage_redis = os.environ.get("PGOS_VS_Storage_Redis")
  vs_storage_mongodb = os.environ.get("PGOS_VS_Storage_MongoDB")
4. 触发Virtual Server
Virtual Server可以与 PGOS 上的其他服务交互,例如订阅事件、执行计划任务以及与经济系统事件集成。开发者也可以使用 HTTP API 从客户端或专用服务器 (DS) 访问Virtual Server,就像与其他 PGOS 服务交互一样。
4.1 由 PGOS 事件触发
PGOS 会生成各种事件,包括玩家登录/退出、房间创建、房间解散、玩家进入以及游戏会话开始/结束。您可以编写Virtual Server来订阅这些事件,并在触发事件时执行自定义操作。
有关处理事件的说明,请点击此处。
有关所有 PGOS 事件的结构定义,请点击此处。
4.2 通过后端 HTTP API 触发
PGOS 允许游戏后端通过 HTTP API 访问 PGOS 服务,其中包括Virtual Server。您可以通过后端 HTTP API 直接向Virtual Server发起请求,例如:
curl
-H "content-type: application/json" \
-H "TitleId: your_title_id" \
-H "TitleRegionId: your_titleregion_id" \
-H "SecretId: your_secret_id" \
-H "ServerTicket: your_server_ticket" \
-X POST -d "I am request body" -v http://your_titleregion_domain/virtualserver/invoke/vs-sample-python/backend_hello
注意:SecretId 是服务器密钥的第一部分,ServerTicket 是通过 PGOS 后端 Http ticket算法 计算得出的ticket。当然,您也可以在源代码中执行此操作,以便在您自己的程序中访问Virtual Server。更多说明,请点击此处。
4.3 由 PGOS 任务触发
PGOS 支持按指定间隔运行的计划任务。有关配置计划任务以触发Virtual Server的信息,请点击此处。
4.4 由 PGOS 经济服务触发
PGOS 的经济系统允许玩家在使用消耗性物品时通过Virtual Server触发游戏内逻辑。有关使用说明,请点击此处。
4.5 由 PGOS 匹配服务触发
PGOS 的匹配系统允许开发者通过Virtual Server更改匹配结果,例如修改队伍分配、拆分战斗或从战斗中移除部分票证。使用方法请点击此处。
4.6 由 IDIP 适配器触发
在 IDIP 插件中绑定Virtual Server。
4.7 由游戏客户端触发
PGOS 允许游戏通过以下 PgosSDK API 在游戏客户端上触发Virtual Server:
/**
* Invoke the specified virtual server.
*
* @param Req The request info of the call.
*/
void InvokeVirtualServer(
    const FVirtualServerReq& Req,
    TFunction<void(const FPgosResult& Ret, const FVirtualServerResp* Data)> Callback) const;

struct FVirtualServerReq
{
  /** The name of the virtual server. */
  FString server_name;
  /** [Optional] The requested url if there is any. For example: "/battle/settlement". */
  FString url;
  /**
   * Extra header fields required by the game.
   * It is advisable to add a "Content-Type" field to avoid being rejected by the server, based on the request body format.
   *   for example: extra_headers["Content-Type"] = "text/plain"
   * Here are the fields reserved for PGOS that cannot be used by the game:
   *   "SDKVersion", "ProtoVersion", "TitleId", "TitleRegionId", "SessionId", "PlayerId", "PlayerTicket",
   *   "RoutingKey", "UicAccountInfo", "SecretID", "Pid", "ServerTicket", "DstAddr", "DstCode", "AccTicket".
   */
  TMap<FString, FString> extra_headers;
   /** [Optional] The request binary data. */
   TArray<uint8> body;
};

struct FVirtualServerResp
{
  /** The HTTP status code of the response. */
  int32 status = 200;
  /** The HTTP header of the response. */
  TMap<FString, FString> resp_headers;
  /** The HTTP body of the response. */
  FString resp_body;
};
代码示例:
#include "PgosSDKCpp.h"

void SomeUObjectClass::SomeFunction()
{
 auto Extension = IPgosSDKCpp::Get().GetClientExtensionAPI();
 if (Extension)
 {
     FVirtualServerReq Req;
     Req.server_name = TEXT("sample_vs");     // Virtual Server name
     Req.url = TEXT("/battle/settlement");    // Virtual Server respond to /battle/settlement
     Req.extra_headers.Add("Content-Type", "text/plain");   // Based on the request body format
     FString BodyString = TEXT("This is a test string from the game client.");
     int32 Utf8Length = FTCHARToUTF8_Convert::ConvertedLength(*BodyString, BodyString.Len());
     Req.body.SetNumUninitialized(Utf8Length);
     FTCHARToUTF8_Convert::Convert((ANSICHAR*)req.body.GetData(), req.body.Num(), *BodyString, BodyString.Len());
     Extension->InvokeVirtualServer(Req, [](const FPgosResult& Ret, const FVirtualServerResp* Data) {
         if (Ret.err_code == (int32)Pgos::PgosErrCode::kSuccess)
         {
             UE_LOG(LogTemp, Log, TEXT("InvokeVirtualServer Success"));
         }
         else
         {
             UE_LOG(LogTemp, Log, TEXT("InvokeVirtualServer Failed: err_code=%d, err_msg=%s"), Ret.err_code, *Ret.msg);
         }
     });
 }
}
4.8 由Game Server触发
PGOS 允许游戏通过Game Server上的以下 PgosSDK API 触发Virtual Server:
/**
* Invoke the specified virtual server.
*
* @param Req The request info of the call.
*/
void InvokeVirtualServer(
    const FVirtualServerReq& Req,
    TFunction<void(const FPgosResult& Ret, const FVirtualServerResp* Data)> Callback) const;

struct FVirtualServerReq
{
  /** The name of the virtual server. */
  FString server_name;
  /** [Optional] The requested url if there is any. For example: "/battle/settlement". */
  FString url;
  /**
   * Extra header fields required by the game.
   * It is advisable to add a "Content-Type" field to avoid being rejected by the server, based on the request body format.
   *   for example: extra_headers["Content-Type"] = "text/plain"
   * Here are the fields reserved for PGOS that cannot be used by the game:
   *   "SDKVersion", "ProtoVersion", "TitleId", "TitleRegionId", "SessionId", "PlayerId", "PlayerTicket",
   *   "RoutingKey", "UicAccountInfo", "SecretID", "Pid", "ServerTicket", "DstAddr", "DstCode", "AccTicket".
   */
  TMap<FString, FString> extra_headers;
  /** [Optional] The request binary data. */
  TArray<uint8> body;
};

struct FVirtualServerResp
{
  /** The HTTP status code of the response. */
  int32 status = 200;
  /** The HTTP header of the response. */
  TMap<FString, FString> resp_headers;
  /** The HTTP body of the response. */
  FString resp_body;
};
代码示例:
#include "PgosSDKCpp.h"

void SomeUObjectClass::SomeFunction()
{
 auto Extension = IPgosSDKCpp::Get().GetServerExtensionAPI();
 if (Extension)
 {
     FVirtualServerReq Req;
     Req.server_name = TEXT("sample_vs");     // Virtual Server name
     Req.url = TEXT("/battle/settlement");    // Virtual Server respond to /battle/settlement
     Req.extra_headers.Add("Content-Type", "text/plain");   // Based on the request body format
     FString BodyString = TEXT("This is a test string from the game server.");
     int32 Utf8Length = FTCHARToUTF8_Convert::ConvertedLength(*BodyString, BodyString.Len());
     Req.body.SetNumUninitialized(Utf8Length);
     FTCHARToUTF8_Convert::Convert((ANSICHAR*)req.body.GetData(), req.body.Num(), *BodyString, BodyString.Len());
     Extension->InvokeVirtualServer(Req, [](const FPgosResult& Ret, const FVirtualServerResp* Data) {
         if (Ret.err_code == (int32)Pgos::PgosErrCode::kSuccess)
         {
             UE_LOG(LogTemp, Log, TEXT("InvokeVirtualServer Success"));
         }
         else
         {
             UE_LOG(LogTemp, Log, TEXT("InvokeVirtualServer Failed: err_code=%d, err_msg=%s"), Ret.err_code, *Ret.msg);
         }
     });
 }
}
5. 在Virtual Server中处理请求
5.1 URI 规范
Virtual Server本质上是一个 Web 服务器。因此,每个请求都将基于 URI 进行处理。URI 有两种类型:预定义 URI 和自定义 URI。预定义 URI 由 PGOS 后端预定义,用于特定场景。自定义 URI 由您定义,用于向游戏客户端或后端请求Virtual Server。下表列出了所有情况:
| URI | 触发方式 | HTTP Method | 定义者 | 是否 PGOS定义的 | 描述 | Related Data Schema |
|---|---|---|---|---|---|---|
| /pgos_event | PGOS Event | POST | PGOS | Yes | Event Handler触发 | Event Data Schema |
| /pgos_task | PGOS Task | POST | PGOS | Yes | Task触发 | Task Data Schema |
| /pgos_economy | PGOS Economy Services | POST | PGOS | Yes | 经济系统服务触发 | Economy Data Schema |
| /pgos_matchmaking | PGOS Matchmaking Services | POST | PGOS | Yes | 匹配服务触发 | Matchmaking Post Processing Schema |
| /pgos_idip | Tencent IDIP Protocol | Defined by IDIP | PGOS | Yes | 仅限Tencent Game | Defined by IDIP |
| URI only for game backend | Game Backend | POST | Game Developer | No | 调用者是game server Backend API: InvokeVirtualServer | Defined by Game Developer |
| URI only for game client | Game Client | POST | Game Developer | No | 调用者是game client Client API: InvokeVirtualServer | Defined by Game Developer |
如果游戏客户端或后端直接请求预定义 URI(例如 /pgos_event),请求者将收到错误消息。因为预定义 URI 仅供特定服务访问,并由 PGOS 自动触发。
5.2 Request Header和安全处理
一些预定义的Request Header可能对游戏有帮助。您也可以使用任何其他Request Header,只要它们不是将要提到的已定义的header即可。
| Header Key | Value Spec | Scope | 是否PGOS 定义的 |
|---|---|---|---|
| Titleid | 游戏ID | All | Yes |
| Titleregionid | 游戏的title region ID | All | Yes |
| Playerid | Player ID | Only Game Client Request | Yes |
| Sessionid | Player Session ID | Only Game Client Request | Yes |
| Invoker | event / task / economy / idip / backend/client / intranet | All (intranet only from virtual server) | Yes |
| X-Forwarded-For | 请求IPs . 第一个 IP 来自于客户端请求 | Game Backend/Client Request | No (在 RFC 2616定义) |
注意:Header Invoker 由 PGOS 后端自动设置。即使请求者设置了该header,PGOS 也能保证其被设置或覆盖为正确的值。此header对于游戏开发者来说非常重要,它可以帮助Virtual Server验证请求是否有效。出于安全考虑,您应该在每次请求处理开始时验证此header。例如,您实现了 URI /backend_func。它仅对后端可见。因此,任何从客户端到 /backend_func 的请求都将失败,因为您通过检查header Invoker 是否等于 backend 来进行验证。Node.js 示例代码如下:
var invoker = ctx.request.headers['Invoker'];
if (invoker != 'backend') {
  ctx.status = 401; // return http code 401 to the requester
  return;
}
这是“Invoker”的规范。
| URI | Invoker Header Value | Desc |
|---|---|---|
| /pgos_event | event | Event Handler触发 |
| /pgos_task | task | Task触发 |
| /pgos_economy | economy | 经济系统服务触发 |
| /pgos_matchmaking | matchmaking | 匹配服务触发 |
| /pgos_idip | idip | 仅限Tencent Game IDIP 系统触发 |
| URI only for game backend | backend | 调用者是game server Backend HTTP API: InvokeVirtualServer |
| URI only for game client | client | 调用者是game client Client API: InvokeVirtualServer |
如果您不想将服务器完全暴露给游戏客户端,一个更简单的方法是在Virtual Server的配置页面中设置“阻止游戏客户端请求”。请参考2. 创建和管理Virtual Server。
5.3 请求和响应协议
对于自定义 URI,您可以决定请求和响应的状态码、标头和正文架构。因此,您可以使用Virtual Server实现后端服务。 但是,对于已定义的URI,您应该遵循 PGOS 定义的协议规范。以下是详细信息:
5.3.1 /pgos_event 协议
/pgos_event 用于在门户上将事件处理程序与Virtual Server绑定时处理 PGOS 事件。
Content-Type:application/json
Request body结构:
// e.g. event_player_login_pgos
{
  "trigger_id": "24ea65b9-a6fb-4de7-9622-410e33c73339",
  "event_name": "event_player_login_pgos",
  "event_time": "1683603150102",
  "event_data": {
    "custom_data": "123",
    "ip_addr": "183.14.133.2",
    "is_new_player": false,
    "location": "-",
    "platform": "WINDOWS",
    "player_id": "123",
    "session_id": "1655777737338073088",
    "start_time": 1683603150
  },
  "args": {
    "arg1": 1
  }
}
以下是每个事件的详细Extension Data Schema。
- Response body结构
PGOS 会将Response body存储到事件的访问日志中。因此,您可以将其保留为空字符串,也可以填写任何字符串。您可以在门户的Extensions/Events/Trigger Logs页面查看访问日志。
- HTTP 状态码
如果您成功处理事件,则应该返回 HTTP 200;如果您这边发生任何错误,则可能会返回其他异常代码。这些代码也会被存储到访问日志中。
5.3.2 /pgos_task 协议
/pgos_task用于在门户上将 PGOS 任务与Virtual Server绑定时处理该任务。Content-Type:application/json
Request body:
// e.g. event_player_login_pgos
{
  "trigger_id": "24ea65b9-a6fb-4de7-9622-410e33c73339",
  "task_name": "event_player_login_pgos",
  "task_time": "1683603150102",
  "args": {
    "arg1": 1
  }
}
以下是该任务的详细Extension Data Schema。
- Response body结构
PGOS 会将Response body存储在事件的访问日志中。因此,您可以将其保留为空字符串,也可以填充任何字符串。您可以在门户的“扩展/事件/触发器日志”页面查看访问日志。
- HTTP 状态码
如果您成功处理事件,则应该返回 HTTP 200;如果您这边发生任何错误,则可能会返回其他异常代码。这些状态码也会存储在访问日志中。
5.3.3 /pgos_economy 协议
当您在门户上绑定经济服务的Virtual Server时,/pgos_economy 用于处理 PGOS 经济。
Content-Type:application/json
Request body结构:
 // e.g. item_consume
 {
    "trigger_id": "24ea65b9-a6fb-4de7-9622-410e33c73339",
    "operation": "item_consume",
    "trigger_time": "1683603150102",
    "data": {
        ...
    }
 }
以下是每个经济系统处理的详细Extension Data Schema。
- Response body结构
PGOS 会将Response body存储在经济系统的日志中。因此,您可以将其保留为空字符串,也可以填充任何字符串。您可以在门户的“Players/Query/Economy/Logs”页面上查看特定玩家的日志。
- HTTP 状态码
如果您成功处理事件,则应返回 HTTP 200;如果您这边发生任何错误,则可能返回其他异常代码。该状态码也将存储在访问日志中。
5.3.4 /pgos_matchmaking 协议
当您拥有与Virtual Server关联的匹配配置时,/pgos_matchmaking 用于处理匹配任务。
Content-Type: application/json
Request body 结构:
 // e.g. matchmaking_post_processing
 {
    "trigger_id": "24ea65b9-a6fb-4de7-9622-410e33c73339",
    "operation": "matchmaking_post_processing",
    "trigger_time": "1683603150102",
    "data": {
        "battle": { ... } ,
    "battle_properties": [ ... ]
    }
 }
以下是每个匹配请求处理的详细Extension Data Schema。
- Response body结构:
 // e.g. matchmaking_post_processing
 {
    "battles": [ ... ],
  "requeued_tickets": [ ... ]
 }
以下是每个匹配响应处理的详细Extension Data Schema。
- 注意事项
实施Virtual Server时,请遵循 PGOS 文档中推荐的最佳实践。
- HTTP 状态码
如果您成功处理事件,则应返回 HTTP 200;如果您这边发生任何错误,则可能会返回其他异常代码。这些代码也将存储在访问日志中。
5.3.5 /pgos_idip 协议
如果您在 IDIP 插件上配置了Virtual Server,则 /pgos_idip 用于处理 IDIP 系统(腾讯自研系统,仅适用于腾讯游戏)的消息。
- Content-Type:由 IDIP 系统定义
- Request body格式:由 IDIP 系统定义
- Response body格式:由 IDIP 系统定义
- HTTP 状态码:HTTP 200。错误码和消息包含在Response body中。
5.4 在Virtual Server中访问VS Storage
PGOS 为游戏提供了VS Storage,用于将数据存储在数据库或缓存中。由于Virtual Server可以使用任何语言和技术栈构建。获取VS Storage实例后,您可以使用任何合适的驱动程序访问该存储。以下示例:语言为 Golang,VS Storage为 Redis,驱动程序 github.com/gomodule/redigo 可能是个不错的选择。
有关如何创建VS Storage,请访问 VS Storage手册。
5.5 在Virtual Server中使用 HTTP API 访问 PGOS 后端
您可能需要在Virtual Server中访问 PGOS 后端,例如获取玩家信息、修改玩家数据等。您也可以使用任何语言的 HTTP API 在Virtual Server中访问 PGOS 后端,就像在游戏服务器中一样。这两种方式没有区别。请访问 Backend HTTP API 了解如何操作。
出于性能和成本考虑,如果您的Virtual Server访问同一区域的 PGOS 后端 HTTP API 端点,请求将自动路由到 PGOS 的内部网。
5.6 超时限制
每个请求都有超时限制。如果Virtual Server的 RTT 超过该限制,PGOS 后端将中断请求并向请求者返回 HTTP 504 错误。因此,您应该在Virtual Server中设置最大超时时间。
| URI | Timeout Limitation |
|---|---|
| /pgos_event | 3 seconds |
| /pgos_task /pgos_economy /pgos_idip /pgos_matchmaking | 10 seconds |
| URI only for game client | 10 seconds |
| URI only for game backend | 10 seconds |
为什么我们将事件超时限制设置为仅 3 秒?因为事件由底层队列系统(例如 Kafka)调度,以保证后端触发事件的顺序。如果每个事件处理程序耗时过长,可能会导致大量阻塞,最终导致整个系统的吞吐量急剧下降。因此,出于性能考虑,需要为每个事件处理程序设置更短的超时限制。
6. 本地 Virtual Server
您可以在本地运行Virtual Server进行调试或测试,然后再将其部署到线上。作为 Web 服务器,您可以通过任何 HTTP 工具(cURL、Postman 等)直接访问本地Virtual Server。不过,本章将讲解如何让游戏客户端或本地 DS(游戏服务器)访问本地Virtual Server。
6.1 运行本地Virtual Server
完成Virtual Server的编码后,您可以通过 IDE 在本地运行它,也可以直接启动它。以下屏幕截图是通过 VS Code 启动的示例。
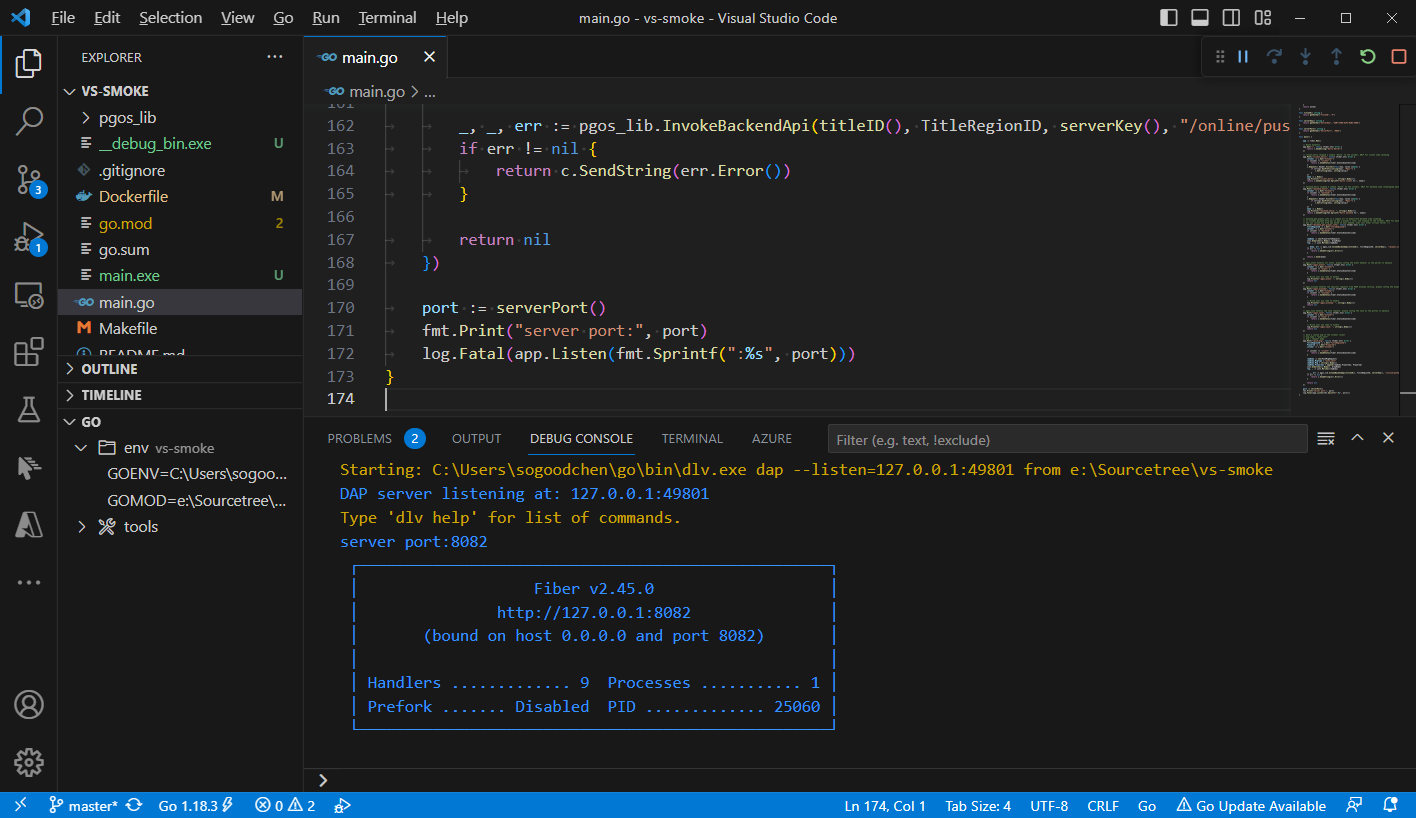
在这个例子中,我们将在门户控制台上配置以下信息,以便游戏客户端和 DS 调用代码可以与此Virtual Server正常工作,无论是本地运行还是在线运行:
- Server Name: vs-smoke
- Listen Port: 8082
6.2 添加代码以调用Virtual Server
无论Virtual Server是在本地运行还是在线运行,您都可以从游戏客户端或游戏服务器调用它。点击链接了解如何从游戏客户端和从游戏服务器调用Virtual Server。
6.3 配置本地Virtual Server
配置本地Virtual Server,供您的游戏客户端或游戏服务器访问。找到并打开配置文件:pgos_config.ini(用于游戏客户端)或 pgos_server_config.ini(用于游戏服务器)。
这些配置文件的位置:
- 如果通过 UE 项目启动客户端/服务器,请查找以下目录:
{GameProjectPath}\Saved\PgosRes\- 如果从打包程序启动客户端/服务器,请查找以下目录:
{PackedGamePath}\{GameName}\Binaries\pgos_res
在配置文件中添加local_vs_config配置项:
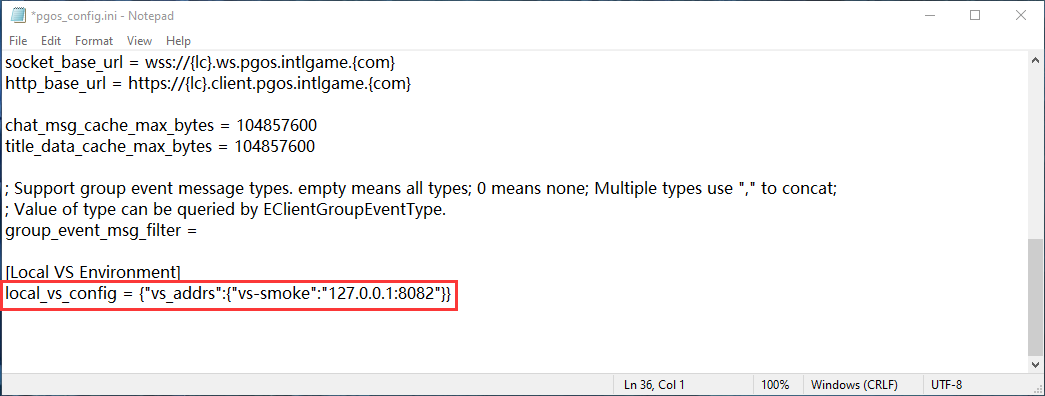
[Local VS Environment]
local_vs_config = {"vs_addrs":{"vs-smoke":"127.0.0.1:8082"}}
local_vs_config 配置项的值是一个 JSON 字符串,您可以在 vs_addrs 中添加任何您想要本地访问的Virtual Server:
- JSON 键:Virtual Server的服务器名称
- JSON 值:Virtual Server的地址(包含端口),例如:127.0.0.1:8082
6.4 访问本地Virtual Server
完成以上操作后,运行您的游戏客户端或游戏服务器。相关代码执行后,将触发访问本地Virtual Server。
7. 通过浏览器访问Virtual Server
PGOS v0.27.0 之后,您可以通过浏览器访问Virtual Server,此功能在以下场景中非常有用:
- 在Virtual Server中部署开源软件,例如 Prometheus、Grafana 等。
- 安装开源数据库控制台来管理数据库或磁盘。
- 编写并部署您自己的管理系统,用于管理Virtual Server存储(Redis/MongoDB/磁盘)中存储的数据。例如,您自己实现的玩家管理系统。
7.1 如何通过浏览器访问Virtual Server
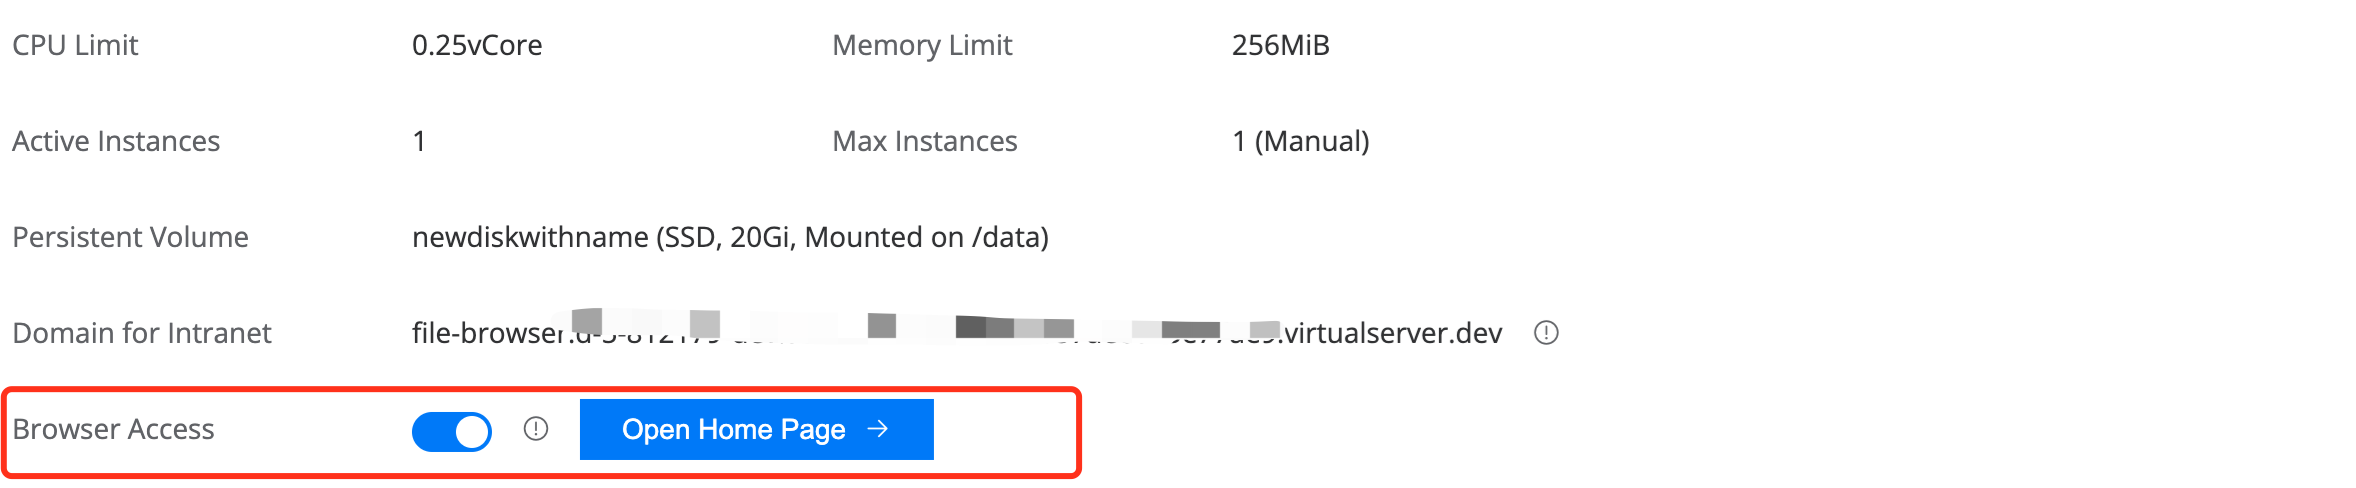
浏览Virtual Server的入口默认处于禁用状态。您可以在Virtual Server的“摘要”页面中找到该入口。您需要像屏幕截图所示那样在浏览之前启用它。启用后,您可以点击“打开主页”链接,在浏览器的新标签页中打开您的Virtual Server。
7.2 Virtual Server浏览安全
PGOS 对Virtual Server浏览进行了安全验证。每次在浏览器中打开Virtual Server时,PGOS 都会验证 Portal 的权限,只有合法的请求才能被允许访问。只有您的域名管理员(拥有您域名所在区域的Virtual Server更新权限的用户)才能访问Virtual Server。如果有人直接在浏览器中输入Virtual Server的 Portal 域名来访问Virtual Server,则会失败。因此,访问是安全的。
7.3 已知问题
目前,Virtual Server不支持 Web Socket 连接。因此,如果您的应用在 VS 中使用 Web Socket 部署,则可能无法正常工作。
8. Virtual Server的内网通信
Virtual Server目前可以与其他Virtual Server通信。您可以在Virtual Server的“概要”页面中找到“内网域名”字段,如下所示。

注意:内网域名仅用于同名用户内部通信。目前域名后缀为 virtualserver.int,协议为 HTTP,端口为 80。例如 http://prometheus.xxx.xxx.virtualserver.int
9. 日志收集
目前支持两种类型的日志:服务器日志和访问日志。
- 服务器日志
只要您的服务器将日志打印到标准输出,PGOS 就会自动收集您的服务器日志。您可以在Virtual Server的“日志”页面中查询它们。
- 访问日志
在“摘要”页面中打开此选项后,PGOS 将以 Nginx 默认格式收集每个Virtual Server的访问日志,如下所示。您也可以在“日志”页面中查询它们。

10. 监控Virtual Server
每个Virtual Server都提供了仪表盘。您可以在Virtual Server的“仪表盘”页面找到它,如下所示。
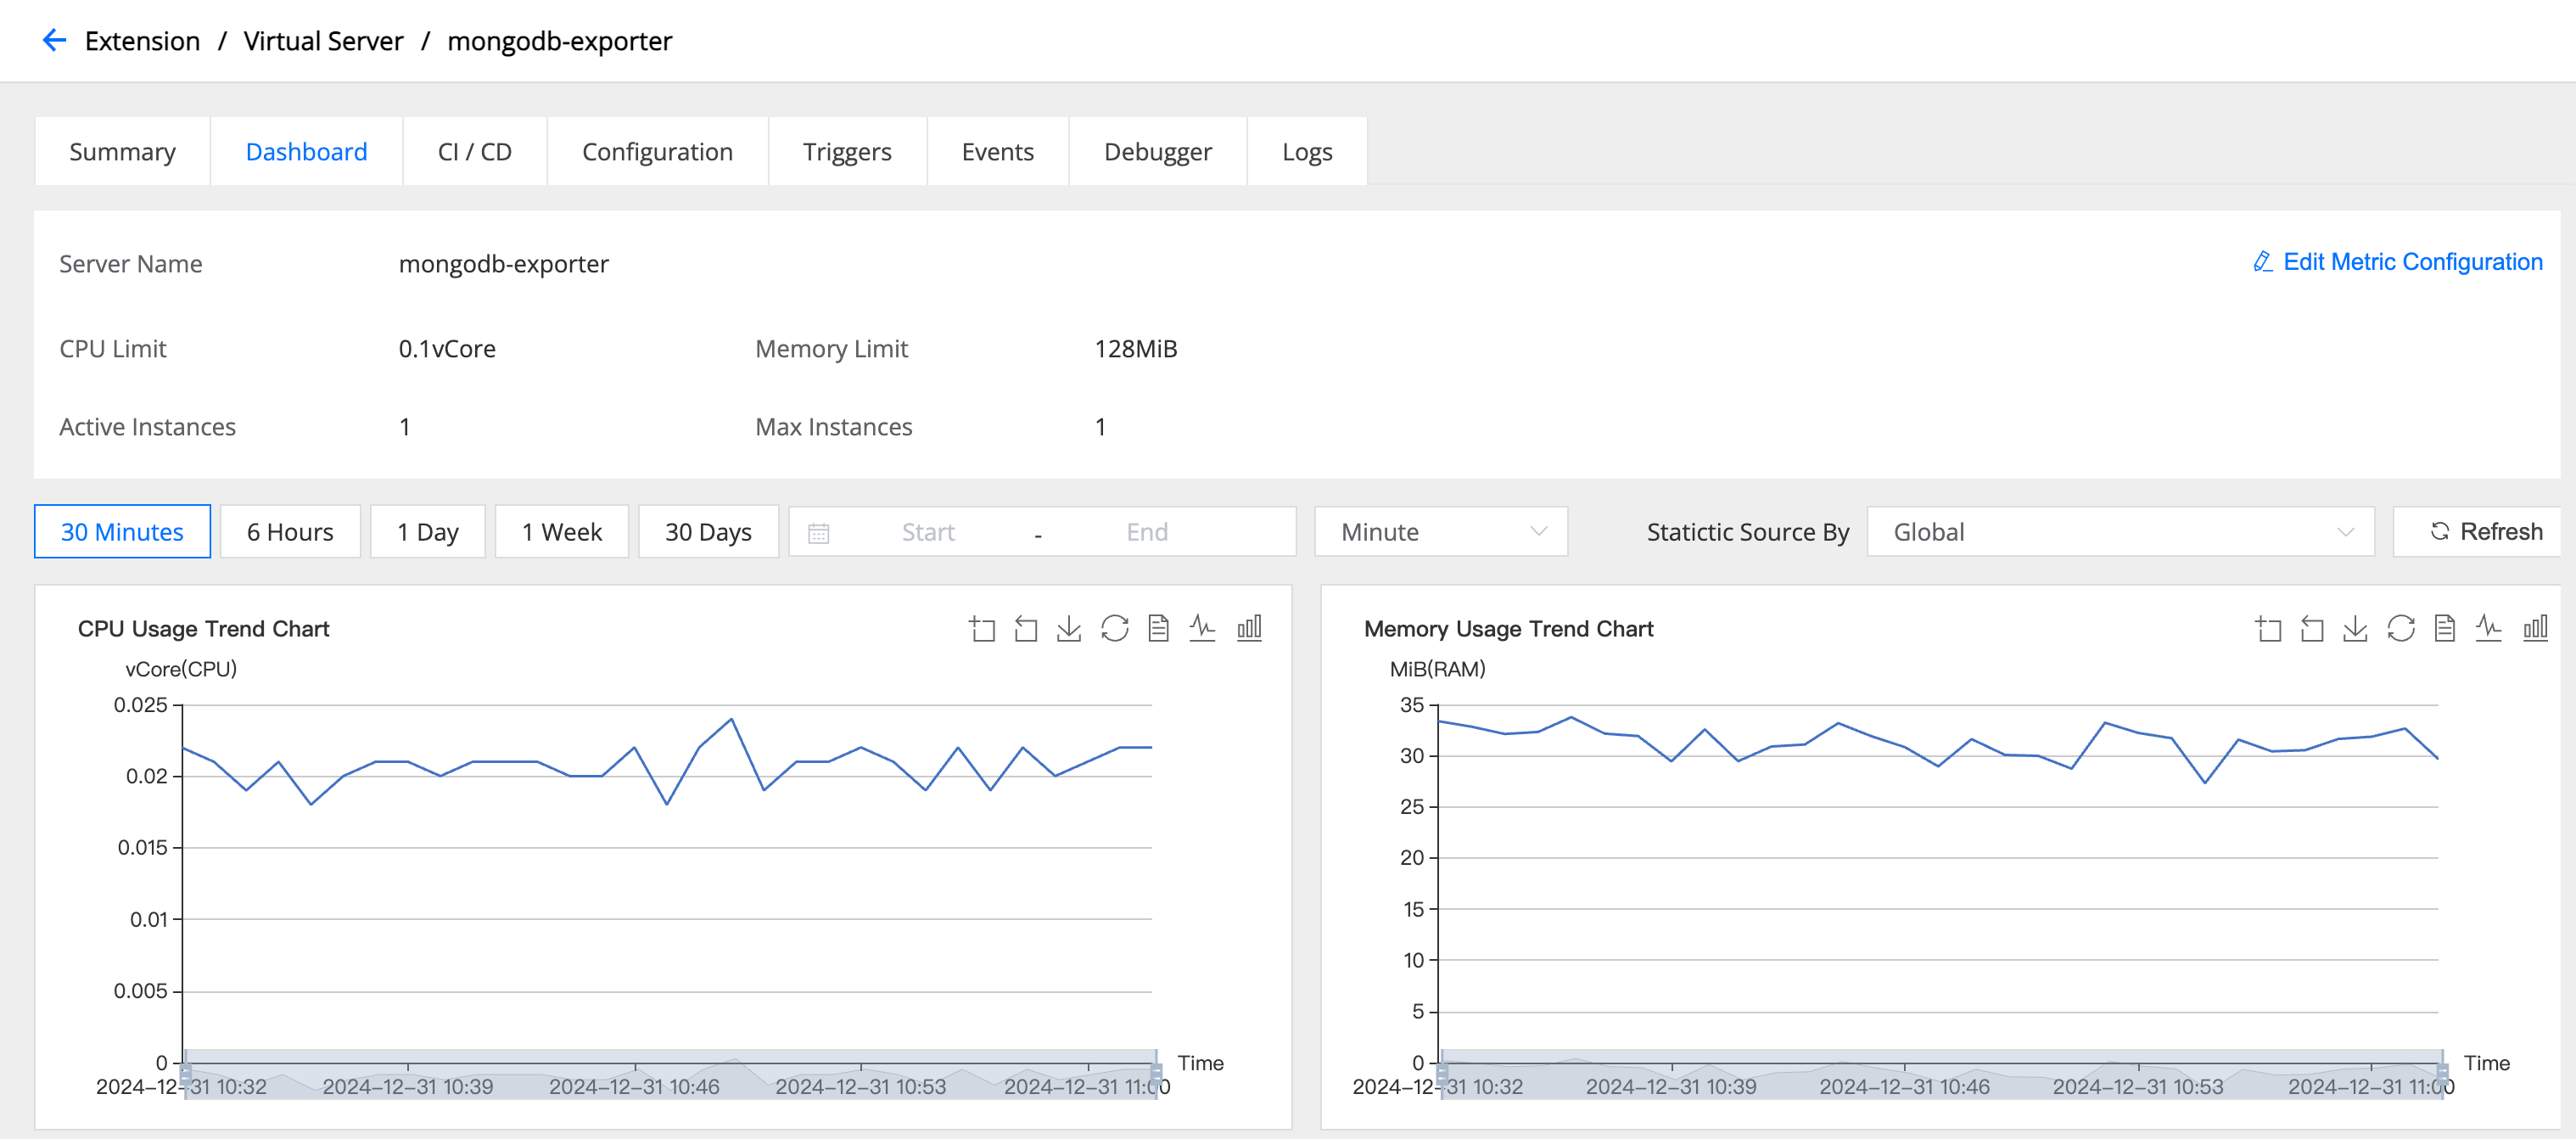
目前我们提供以下指标:
- CPU 使用率
- 内存使用率
- 实例数量
- QPS
- 平均 RTT
- RTT 分布
- 状态码分布
- 入站流量和出站流量
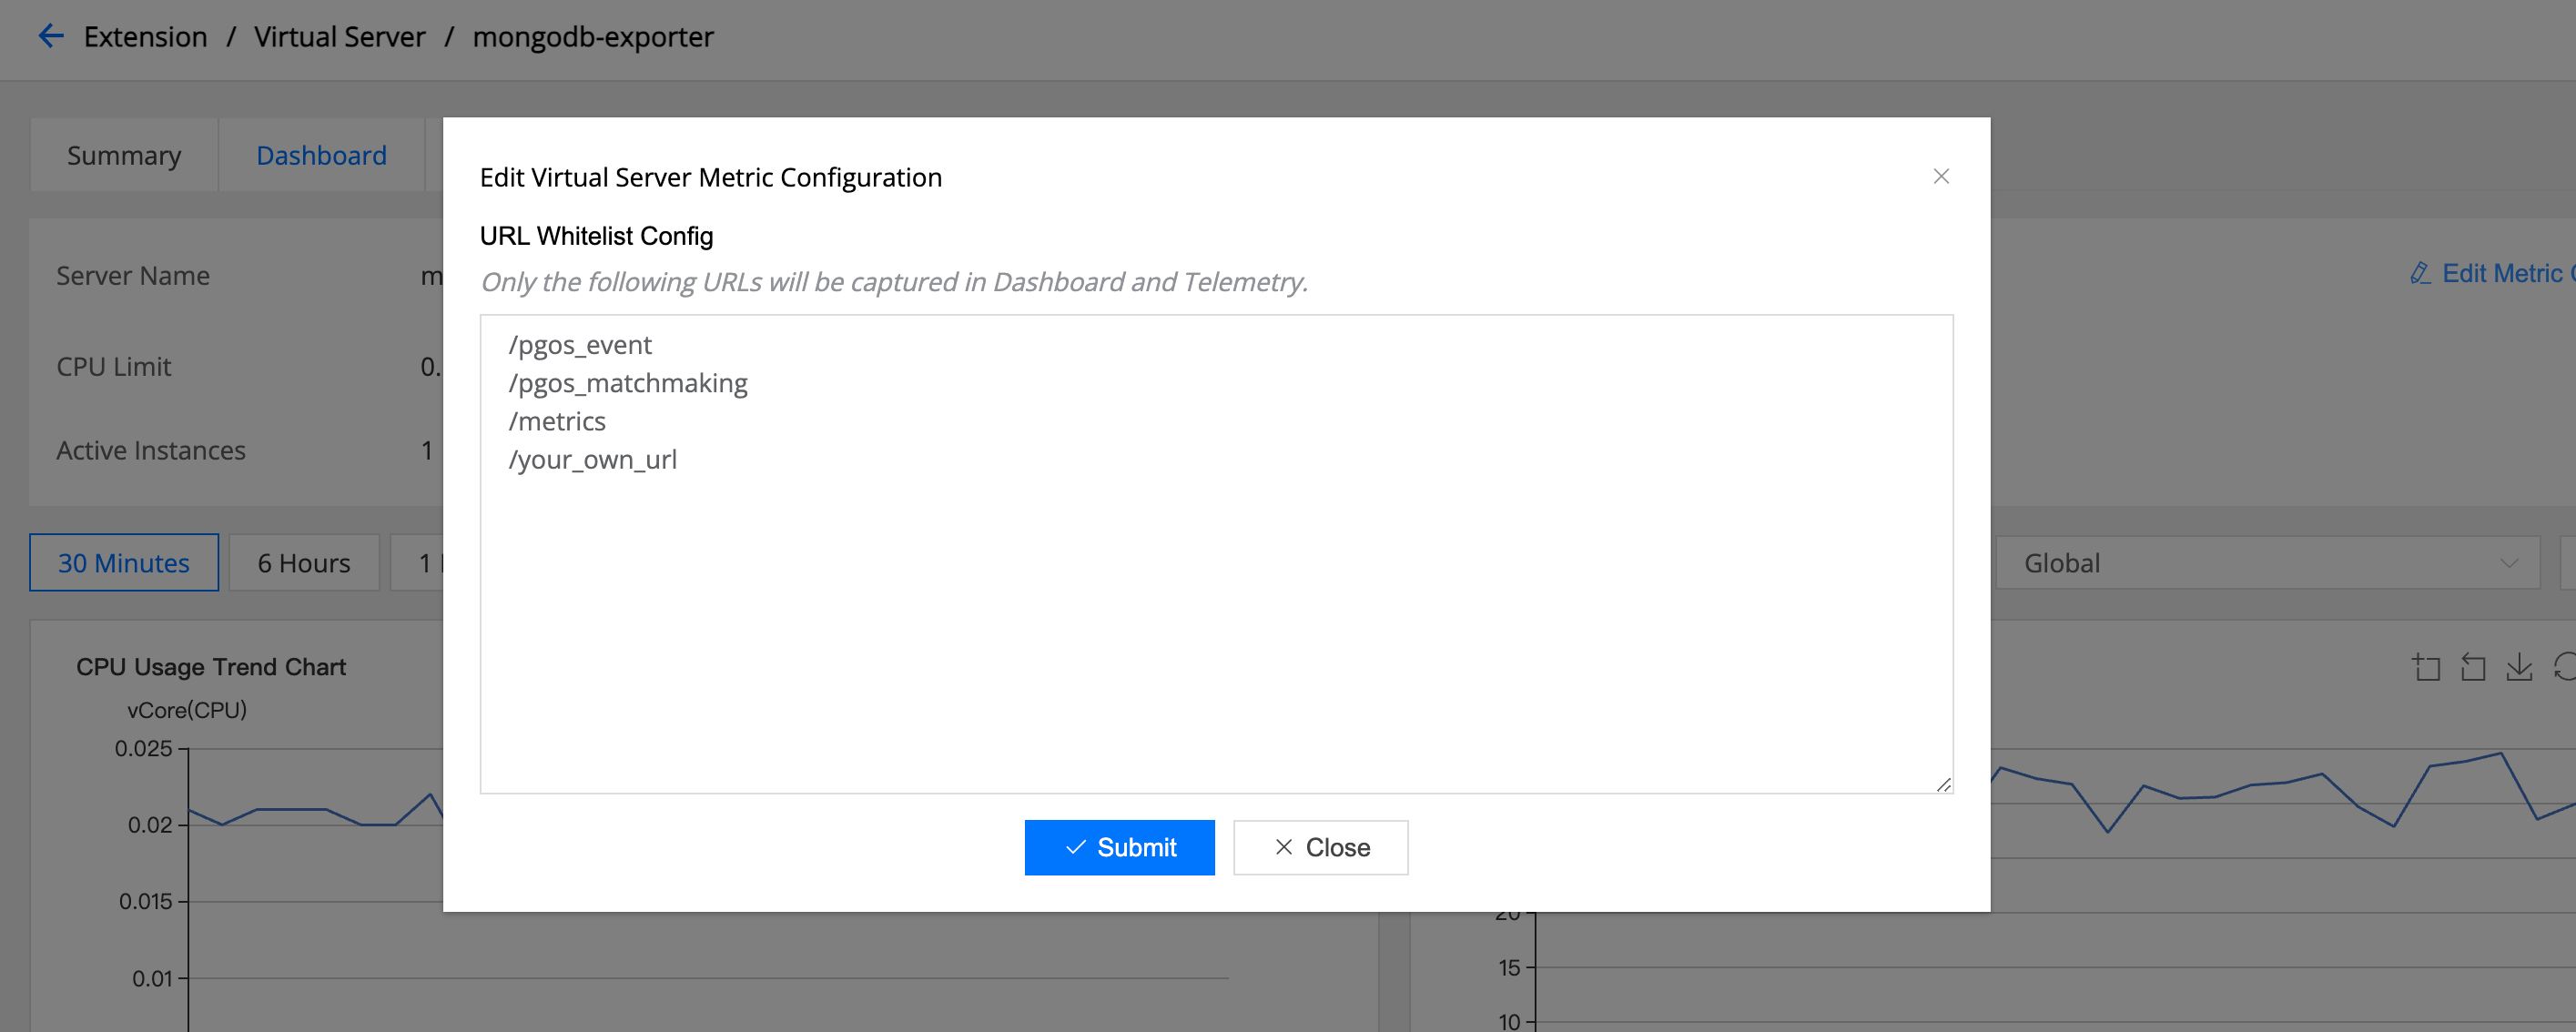
一些指标还可以通过配置的 URL 维度生成,包括 QPS、平均 RTT、RTT 分布、状态码分布以及入站流量和出站流量。您可以点击“编辑指标配置”链接来配置 URL 白名单,如下所示。值得注意的是,只有白名单中的 URL 才会被捕获。
所有指标都将输出到 PGOS Prometheus Exporter。
11. 编写Virtual Server的最佳实践
11.1 建议步骤
由于Virtual Server本质上是一个 Web 服务器,因此您需要选择合适的语言和框架来实现 Web 服务器。以下是建议步骤:
步骤 1. 根据场景选择合适的语言
要实现服务器,语言的选择是重中之重。您始终需要考虑许多因素,例如:
- 服务器的需求和场景
- 开发团队的语言习惯
- 性能期望
- 语言生态系统的完善程度
- 开发效率
以下是一些可用于实现服务器的主流语言:Golang、NodeJS、Python 等。
步骤 2. 选择合适的 Web 服务器框架
确定语言后,服务器框架的选择是下一个重要环节。一个好的框架应该可靠且高性能。以下是一些主流框架供您参考:
- Golang:Fiber、Beego
- NodeJS:Koa、Express
- Python:Flask、Bottle
步骤 3. 编写server
您应该确认Virtual Server需要实现的功能。例如:
- 如果它处理 PGOS 事件、任务、经济等,您应该处理特定的 URL。
- 如果它处理来自游戏客户端的请求,您应该制定游戏客户端和Virtual Server之间的通信协议。
- 如果它处理来自游戏服务器的请求,您应该制定游戏服务器和Virtual Server之间的通信协议,然后编写代码来处理来自游戏服务器的请求。由于服务器可以同时为服务器和客户端提供服务,因此不要忘记调用者验证。
- 如果它需要访问VS Storage,您需要提前创建VS Storage实例,然后选择合适的驱动程序来编写访问它的代码。
步骤 4. 本地调试或测试
由于Virtual Server是独立的 Web 服务器,您可以在本地进行调试和测试。但是,如果您想对直接访问VS Storage的代码进行本地调试,由于VS Storage部署在 PGOS 后端的内网中,您将无法访问VS Storage。您可能需要一个调试代理来本地访问VS Storage(仅适用于 Dev Title Region)。
步骤 5. 上传镜像并测试
完成所有开发和调试工作后,您可以通过门户或 CLI 将构建版本上传到Virtual Server。之后,您可能需要直接在游戏客户端或 DS 上进行测试。请确保所有功能均正常运行,然后再发布游戏客户端。
步骤 6. 高效利用资源
为了在保持成本效益的同时提供无缝且稳健的体验,高效利用资源至关重要。通过对服务进行压力测试,并观察仪表盘上的 CPU 和内存使用情况图表,您可以评估服务对计算还是空间需求更敏感。这些信息有助于更科学地调整 CPU 和内存的规格,确保最佳性能和资源分配。 当单个实例由于性能限制而无法处理用户请求时,您可以通过调整“最大实例数”的值,按比例提升无状态服务的性能水平。这种扩展机制可确保平台能够适应不断增长的需求,同时保持无缝的用户体验和运营效率。
11.2 示例代码
我们编写了几个示例代码,演示如何使用不同的语言编写Virtual Server以及如何编写合适的 Dockerfile。您可以复制并修改代码来实现您的版本:) 如果您想使用它来部署您的Virtual Server,请注意,您应该将其作为包含 Dockerfile 的源代码上传。我们为您提供了 Golang、Python 和 NodeJS 示例代码。您可以在 Virtual Server市场 中找到它们,请尽情使用。
11. 部署第三方软件的最佳实践
PGOS 增强了Virtual Server的功能,使其能够支持数据库、磁盘和浏览器访问。我们的目标是让软件的直接运行更加便捷。目前,市面上几乎大多数软件都可以在Virtual Server上运行,例如 Docker Hub、GitHub 等。我们正在构建Virtual Server,使其成为一个游戏后端生态系统。以下是一些典型的应用场景:
- 部署监控软件来监控游戏后端,您可能需要使用在“Virtual Server存储”中创建的数据库或磁盘。
- 编写您自己的服务器并访问存储在数据库或磁盘中的数据,从而为您的玩家提供定制服务。
- 编写您自己的管理系统来管理您的游戏后端,该系统可通过浏览器直接在 PGOS 门户中访问。
如果您部署的软件需要内部通信,您也可以使用“内网域”来实现。例如,您可以将部署的 MongoDB Exporter 的内网域配置为所部署 Prometheus 的抓取目标。
我们发布了Virtual Server市场,其中包含主流软件镜像和安装指南。我们相信这将极大地提高您的工作效率。点击 Virtual Server市场 查看详情。