Goals
1. Overview
Goal service that allows you to set numerous goals for players and then package these goals into a variety of outer loop features, for example Achievement, Quests, Battle Pass, etc. Games can use the Client SDK to access goal service to retrieve the goals progress and claim rewards for a player.
2. Goal in PGOS
Goal is closely related to several services in PGOS:
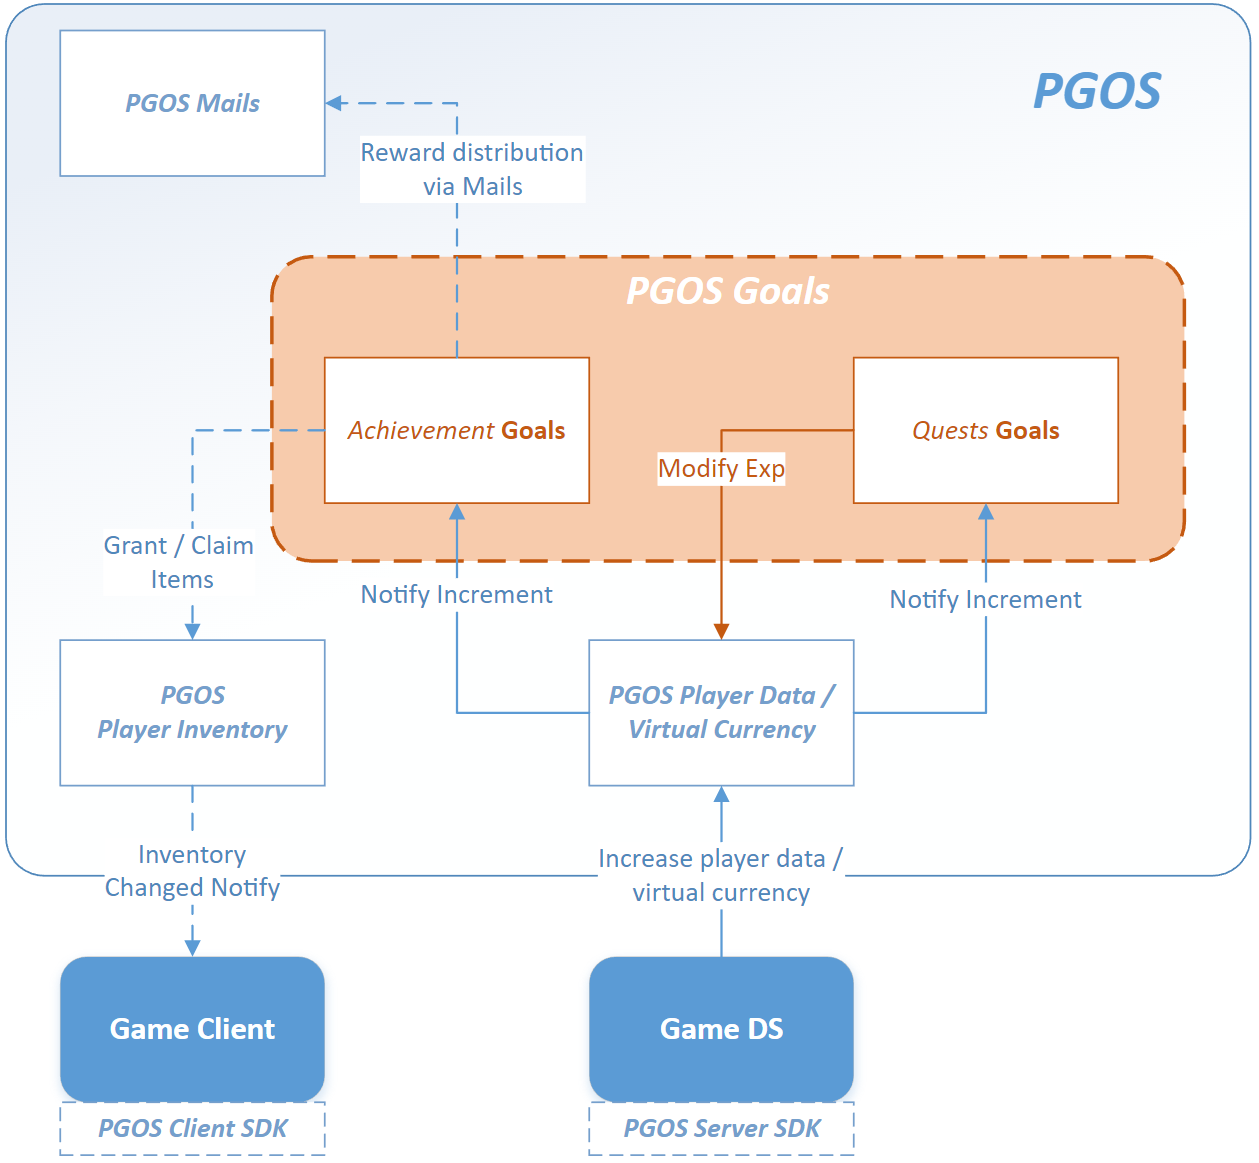
Player Data / Player Wallet: Goal service monitoring changes for player data and virtual currencies to update the progress of a goal for players.
In-game Items: Goal service uses the in-game items as the player's achievement reward.
Player Inventory / Mails: Rewards will be issued to players' inventory, and mail could be chosen as the automatic distribution way.
3. Key Concepts
The challenges defined in Goal are only for individual players.
The Goal service is built on four key concepts: Simple Goal, Hyper Goal, Goals Schedule, and Player Goal.
3.1 Simple Goal
A simple reward object that defines the conditions and rewards to achieve a goal.
3.1.1 Property Reference
Goal ID: The goal identifier that can be assigned by the user and must be unique within the title region. Once submitted, it can not be changed.
Display Name: The display name of the goal.
Icon: Used to record the resource address of the goal icon shown to players.
Description: The description of the item.
Tags: You can use this field to store information used to classify goals.
Achieve Data Source: Data source of achieve data. The options are Player Data and Virtual Currency.
- When Player Data is selected, the player data key that the goal focuses on is specified by the Achieve Data field.
- When Virtual Currency(VC) is selected, the VC code that the goal focuses on is specified by the Achieve Data field.
Achieve Data: The player data key or VC code that the goal focuses on. Once the goal is available in a goals schedule, PGOS will check and monitor whether the player's player data value or VC amount meets the goal's achievement condition (i.e. whether it is not less than the value specified in the Achieve Data Value field).
tipOnly player data keys of type Integer can be used as Achieve Data.
Achieve Value: The value of Achieve Data of a player to achieve the goal.
Algorithm Type: Algorithm to calculate whether a player's current achieve value is satisfied Achieve Value. The options are Absolute and Increment.
- When Absolute is selected, PGOS will only focus on whether a player's player data value or VC amount is reached the Achieve Value.
- When Increment is selected, PGOS will focus on whether the increment of the player's player data value or VC amount during the time the goal is in effect satisfies Achieve Value.
Rewards: The rewards available to players when a goal is reached. Rewards will be selected from In-game Items and Virtual Currencies and null are allowed.
Reward Way: The way players get rewards when a goal is achieved. The options are By Mail and Manual.
3.1.2 Achieve Data Algorithms in Simple Goals
Achieve data algorithms define how to calculate a player's progress toward a goal. This section describes the effect of different algorithms on simple goals.
Absolute
Sample for Achieve Data:
{
    "Achieve Data Source":"PlayerData",
    "Achieve Data":"adventure_level",
    "Achieve Value":30,
    "Algorithm Type":"ABSOLUTE"
}
Algorithm description: The sample data means that the goal will be achieved once a player's adventure level reaches 30.
Increment
Sample for Achieve Data:
{
    "Achieve Data Source":"PlayerData",
    "Achieve Data":"monster_killed",
    "Achieve Value":30,
    "Algorithm Type":"INCREMENT"
}
Algorithm description: After the simple goal is available through a goals schedule, PGOS will monitor the changes of the monster_killed field of players and add up the increments for the players. When the cumulative increment of a player
monster_killedreaches 30, the goal will be achieved by the player.
The differences between these two algorithms can be illustrated with the help of the following diagram:
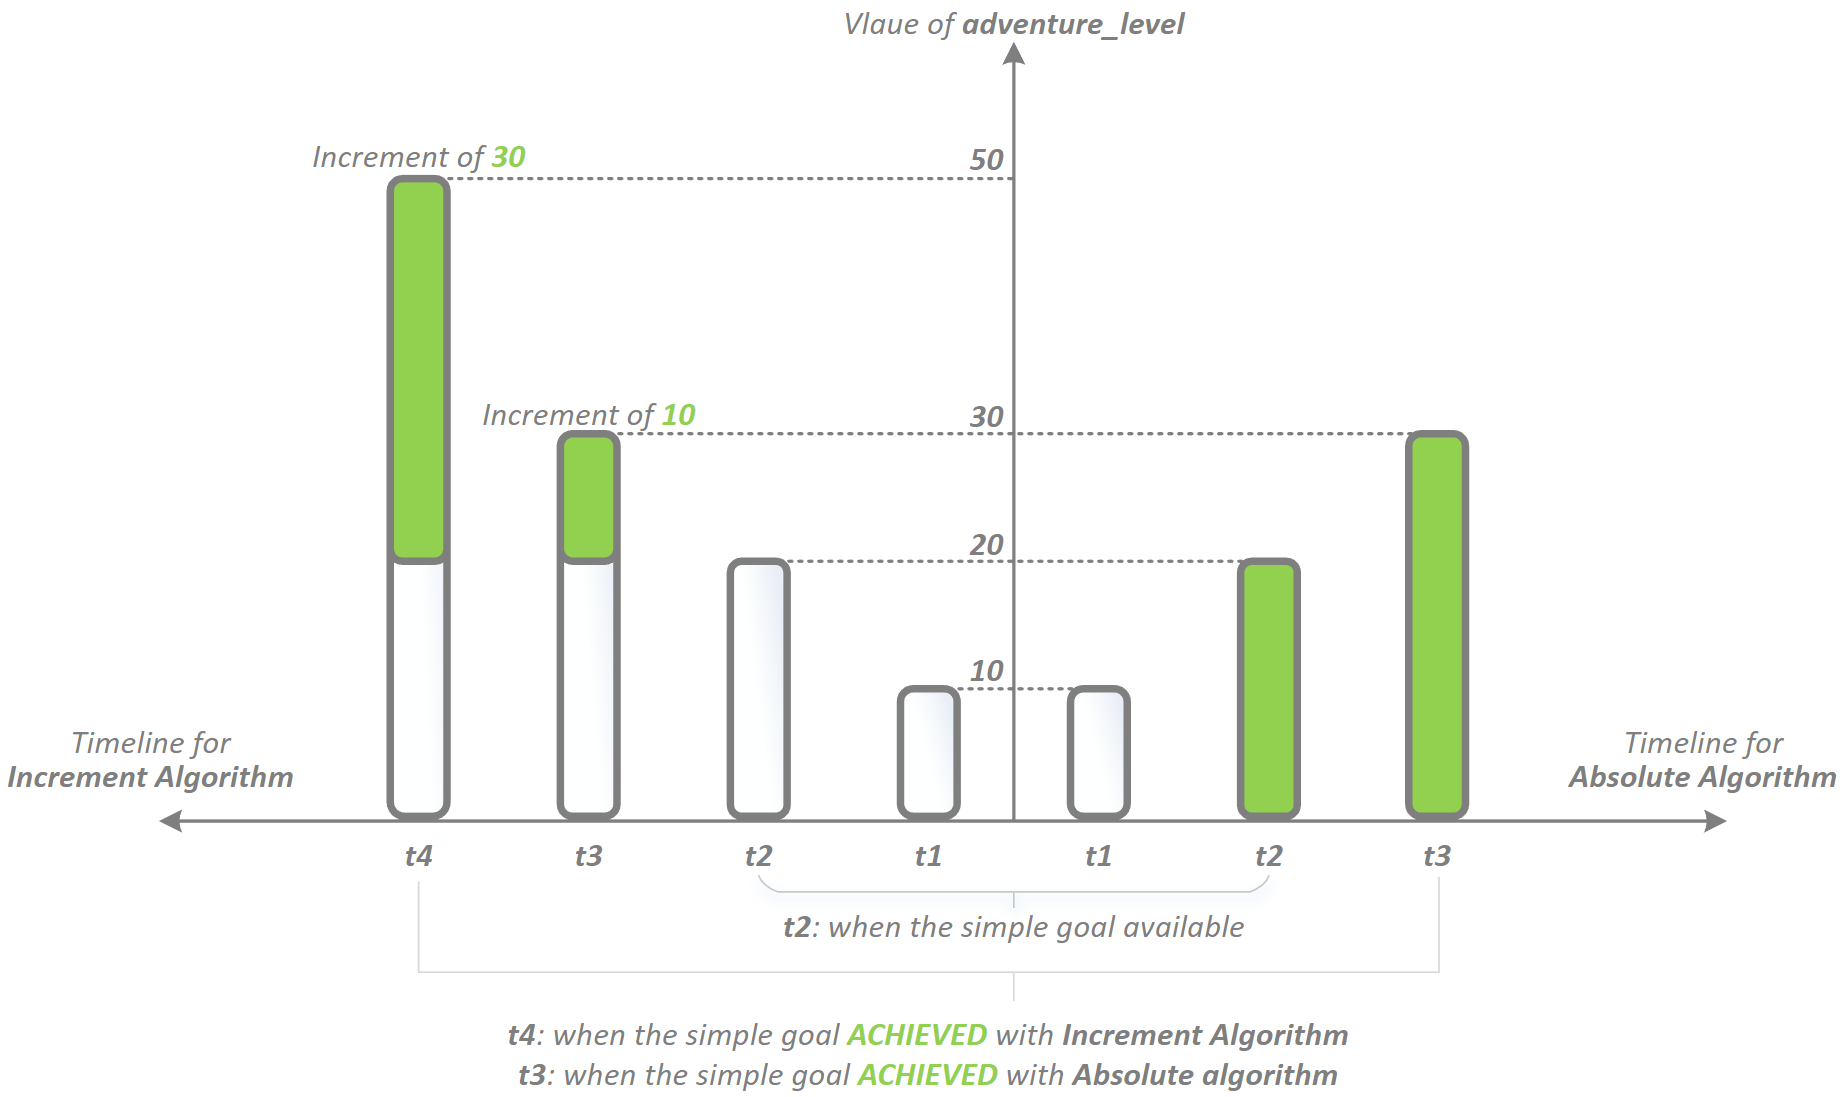
If Player Data is used as Achieve Data Source and Algorithm Type is Increment, PGOS could only respond to data changes from the interface collection Incr(OneOf)MyKVData or (Batch)Incr(OneOf)PlayerKVData when recording increments of achieve data.
3.2 Hyper Goal
A two-dimensional layered reward object. One dimension is defined as Tiers and the other dimension is defined as Passes.
3.2.1 Property Reference
Goal ID: The goal identifier that can be assigned by the user and must be unique within the title region. Once submitted, it can not be changed.
Display Name: The display name of the goal.
Icon: Used to record the resource address of the goal icon shown to players.
Description: The description of the item.
Tags: You can use this field to store information used to classify goal.
Achieve Data Source: Data source of achieve data. The options are Player Data and Virtual Currency.
- When Player Data is selected, the player data key that the goal focuses on is specified by the Achieve Data field.
- When Virtual Currency(VC) is selected, the VC code that the goal focuses on is specified by the Achieve Data field.
Achieve Data: The player data key or VC code that the goal focuses on. Once the goal is available in a goals schedule, PGOS will check and monitor whether the player's player data value or VC amount meets the goal's achievement condition (i.e. whether it is not less than the value specified in the Achieve Data Value field).
tipOnly player data keys of type Integer can be used as Achieve Data.
Algorithm Type: Algorithm to calculate whether Achieve Value is satisfied. The options are Absolute and Increment.
- When Absolute is selected, PGOS will only focus on whether a player's player data value or VC amount is reached the Achieve Value.
- When Increment is selected, PGOS will focus on whether the increment of player's player data value or VC amount during the time the goal is in effect satisfies Achieve Data Value.
Tiers: Hyper goals can have multiple tiers that break a challenge into multiple progressive smaller challenge and allows to assign rewards for each tier. Players can move up into new tiers by increasing their achieve data and rewards will be granted each time they clear a tier.
- Tier ID: The identifier of the tier, assigned by PGOS.
- Display Name: Name of the tier, unnecessary field.
- Order: Order of the tier.
- Achieve Value: The value of Achieve Data of a player to achieve the tier.
- When the Algorithm Type is Absolute, the meaning of value is the absolute value of Achieve Data when achievie the tier.
- When the Algorithm Type is Increment, the meaning of value is the increment of Achieve Data to achievie the tier.
- Rewards: The rewards available to players when a tier is cleared. You need to specify the pass to which the reward belongs when assigning rewards to a tier. Rewards will be selected from In-game Items and Virtual Currencies and null are allowed.
Passes: Hyper goals can have multiple passes that give players access to a certain classes of rewards. Pass can be activated by granting certain item to a player or activated by default. Passes, together with Tiers, constitute the two dimensions for assigning rewards in Hyper Goal.
- Pass ID: The identifier of the pass, assigned by PGOS.
- Display Name: Name of the pass, unnecessary field.
- Description: Description of the pass, unnecessary field.
- Icon: Used to record the resource address of the pass icon shown to players.
- Pass Item: Specify the In-game Item that activates the pass for a player. Anytime a player owns this item, the pass will be activated. Leaving it blank means that the pass will be active by default for players.
Reward Way: The way players get rewards when a goal is achieved. The options are Auto Directly, Auto Mail and Manual.
The meaning of Achieve Value is not the same when choosing different algorithm types, see the property reference to the achieve value in tiers for more details.
3.2.2 Achieve Data Algorithms in Hyper Goals
Achieve data algorithms define how to calculate a player's progress toward a goal. This section describes the effect of different algorithms in hyper goals.
A huge challenge could be split into several of progressive tiers with the help of hyper goals. The sample data below is based on the sample data for the simple goal in the previous section and provides a glimpse of the relationship between the two goal types.
Absolute
Sample for Achieve Data: Split the achieve value of field
adventure_levelinto three tiers.{
"Achieve Data Source":"PlayerData",
"Achieve Data":"adventure_level",
"Tiers":[
{
"Tier Order":1,
"Achieve Value":10
},
{
"Tier Order":2,
"Achieve Value":20
},
{
"Tier Order":3,
"Achieve Value":30
}
],
"Algorithm Type":"ABSOLUTE"
}Algorithm description:
- If a player's
adventure_levelvalue reaches 10, then tier with order 1 is achieved for the player. - If a player's
adventure_levelvalue reaches 20, then tier with order 2 is achieved for the player. - If a player's
adventure_levelvalue reaches 30, then tier with order 2 is achieved for the player.
- If a player's
Increment
Sample for Achieve Data: Split the achieve value of field
adventure_levelinto three tiers.{
"Achieve Data Source":"PlayerData",
"Achieve Data":"monster_killed",
"Tiers":[
{
"Tier Order":1,
"Achieve Value":10
},
{
"Tier Order":2,
"Achieve Value":10
},
{
"Tier Order":3,
"Achieve Value":10
}
],
"Algorithm Type":"INCREMENT"
}Algorithm description: After the simple goal is available through a goals schedule, PGOS will monitor the changes of the monster_killed field of players and add up the increments for the players. Every time the cumulative increment of a player
monster_killedreaches 10, a new tier is achieved.
The differences between these two algorithms can be illustrated with the help of the following diagram:
3.3 Goals Schedule
The definitions of Simple Goal and Hyper Goal were introduced in the previous sections, but it should be noted that players cannot challenge these goals immediately after they are created, because in most game scenarios goals are not permanent, they may be turned on and off at a certain time, or they may be turned on in some cycle periods. To support variable application scenarios we introduce the concept of Goals Schedule.
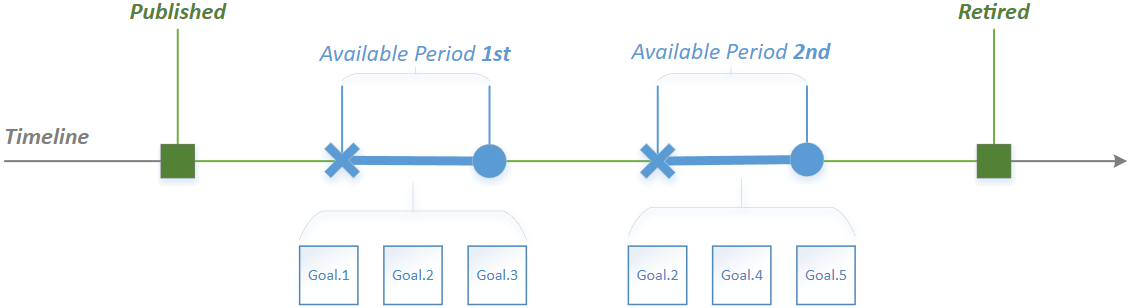
3.3.1 Available Periods
A Goals Schedule could define multiple (goals') available periods, and you can freely arrange goals into these available periods. A player can challenge a goal only when it is in an available period.
For each goal in each available period, PGOS will create an object named Player Goal for the player who challenges it, which records the challenging progress of a player for the goal. This is important because it means that the same goal appearing in different available periods will be different challenges(player goals) for the players.
3.3.2 Current Period and Next Period
These two concepts are very important to schedule querier and they are defined as follows:
- Current Period: The nearest available period to the current time, which is already active. This represents the period in effect or just completed.
- Next Period: The nearest available period to the current time that is not yet active. This represents the upcoming effective period.
As it can be seen from the definition, the pointing of current period and next period is constantly changing with the timing of the player's access to the schedule. For current period, players have access to its full information, which includes the player goals in the available period. For the next period, the player has access to its start and end time, which is equivalent to a release preview.
3.3.3 Publishing of Goals Schedule
All available periods in a schedule will take effect after the schedule is published. The goals schedule could be published or retired at any time, and can also be published in advance at a preset time.
Published:
- Only the published schedules could be accessed by the game client.
- Only the available periods in a published schedule take effect. That means the player's challenging progress will be recorded during the periods.
Retired:
- A retired schedule is inaccessible by the game client.
- Available periods in a retired schedule will not take effect. That means the player's challenging progress will not be recorded during the periods.
- The player's challenge progress will be suspended during the retirement period. This means that if the schedule is published again, the player's challenge progress will be resumed instead of reset.
3.4 Player Goal
A player goal records the progress of each player in challenging certain goals and the rewards claiming status.
3.4.1 Key Properties of Simple Player Goal
- Player Goal ID: Id of the player goal. The player goal id will be different when the goal appears in different available periods.
- Achieve Value: Achieve value of the simple goal.
- Current Value: The player's challenging progress toward the goal.
- Is Achieved: True when a goal is achieved, false otherwise.
- Is Claimed: True if rewards are claimed, false otherwise.
3.4.2 Key Properties of Hyper Player Goal
Player Goal ID: Id of the player goal. The player goal id will be different when the goal appears in different available periods.
Current Tier ID: The tier that the player is challenging now.
Current Value: The player's challenging progress toward the current tier.
- When the
Algorithm TypeisAbsolute, the current value is the same as the value of the player's achieve data. - When the
Algorithm TypeisIncrement, the current value is the incremental value obtained by the player achieve data in the current tier.
- When the
Passes: All the passes contained in the goal, and the activation state.
Tiers: Partial tiers information of the hyper goal, which records the achieve value of each tiers, as well as rewards information.
The following diagram illustrates the relationship between the four key concepts.

4. Managing Simple Goals
4.1 Preparing for Achieve Data
Player data and virtual currencies can be used as achieve data sources for both simple & hyper goals. Therefore, you need to read the following pre-documentation before starting to use goal.
Read to learn how to customize player data: doc.
Read to learn how to customize virtual currencies: doc.
4.2 Create a Simple Goal
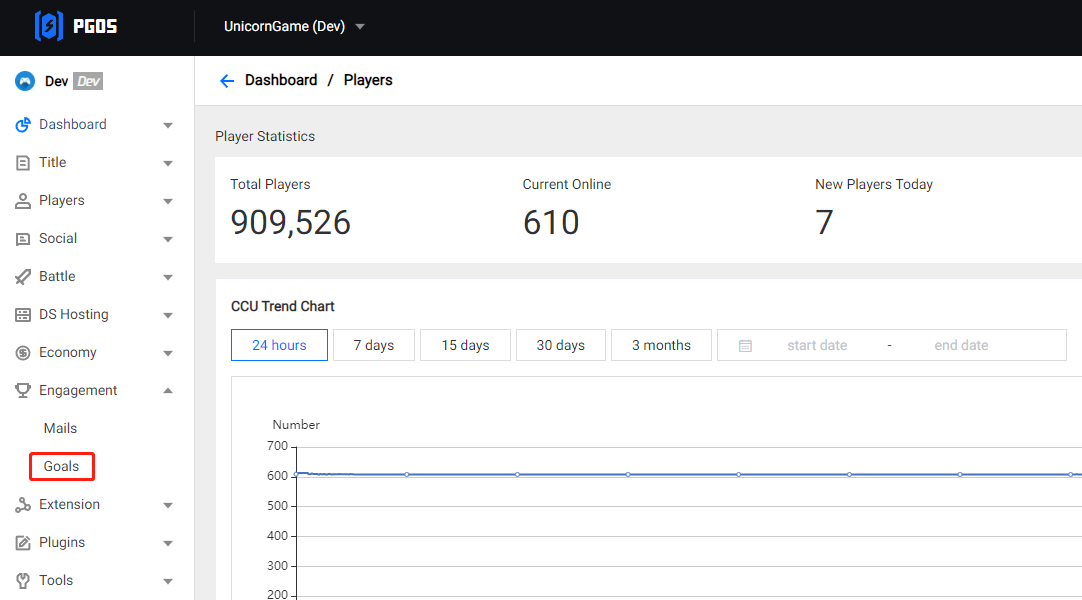
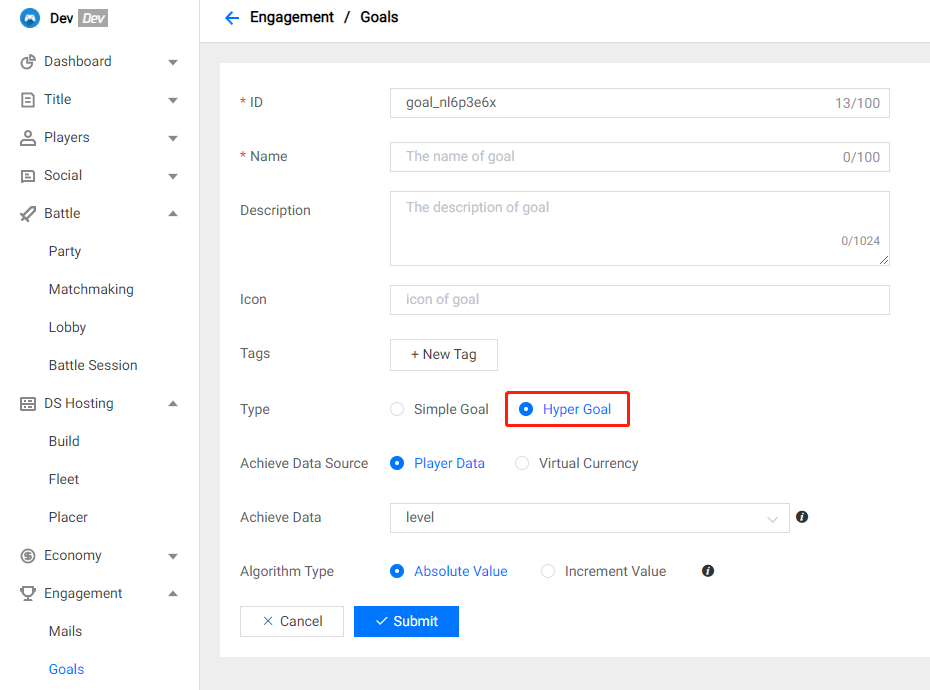
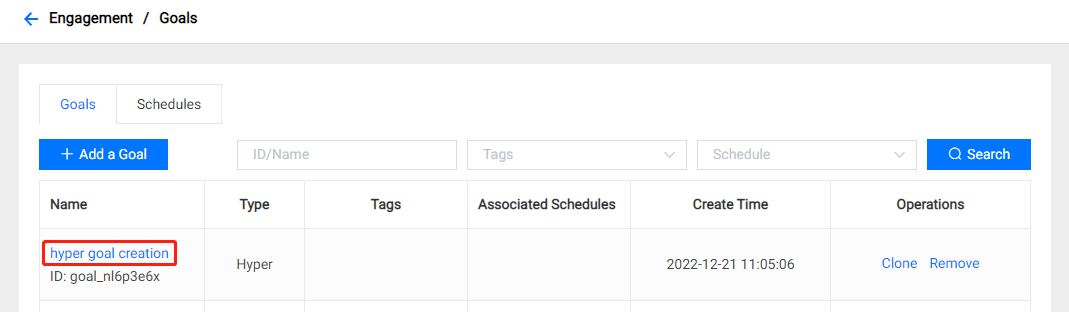
In the PGOS Admin Portal, open the menu Engagement and then select Goals.
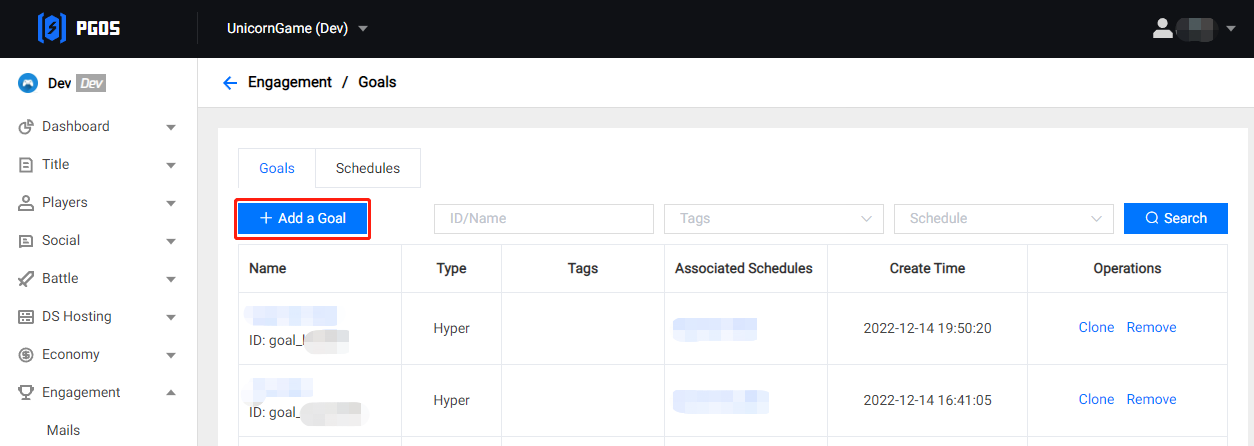
On the goals page, create a new goal by clicking Add a Goal button. Also on the goals page, you could view and filter all the goals that have been created.
Switch the Type to Simple Goal and fill in the required fields on the goal creation page. Read doc for field descriptions.
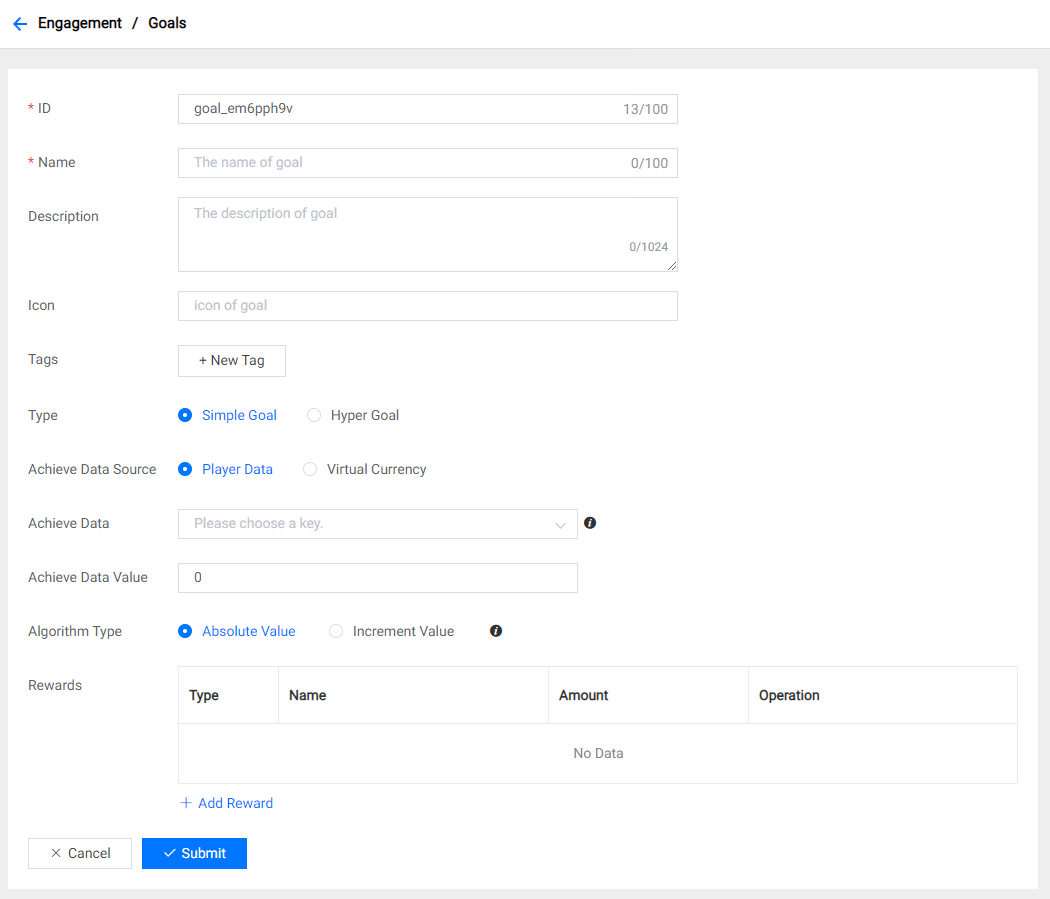
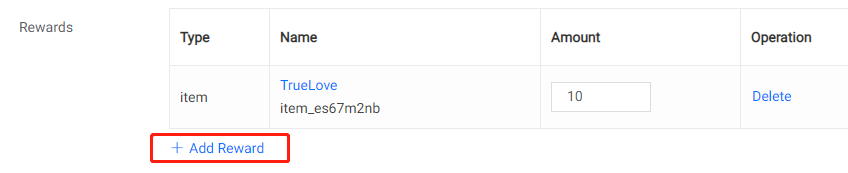
Add rewards to the goal if needed.
Click Submit button to finish the creation, the goal will be added to the goals list.
5. Managing Hyper Goals
5.1 Preparing for Achieve Data
Player data and virtual currencies can be used as achieve data sources for both simple & hyper goals. Therefore, you need to read the following pre-documentation before starting to use goals.
Read to learn how to customize player data: doc.
Read to learn how to customize virtual currencies: doc.
5.2 Preparing for Pass Item
If you want to define a pass that needs to be activated by a specific item in the goal rather than active by default, it is recommended to prepare the definition of the pass item in advance when creating the hyper goal.
- Read to learn how to define an in-game item: doc.
5.3 Create a Hyper Goal
The process of creating a hyper goal is essentially the same as creating a simple, toggle the type of goal to be created by the Type field.
Unlike simple goals, you do not need to fill in the Achieve Data Value immediately when creating a hyper goal. Because the achieve data value of a hyper goal is defined in its tiers.
5.4 Edit Passes
In the Goals tab, choose the goal you want to modify or add passes and click the goal name to open the goal editor page.
On the goal edit page, choose the Passes tab and you will see a pass that was created by default. The default has no pass item and you can both edit or remove it.
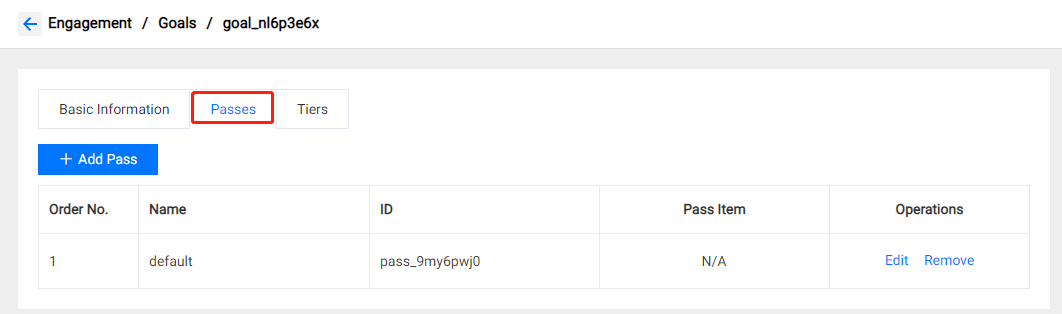
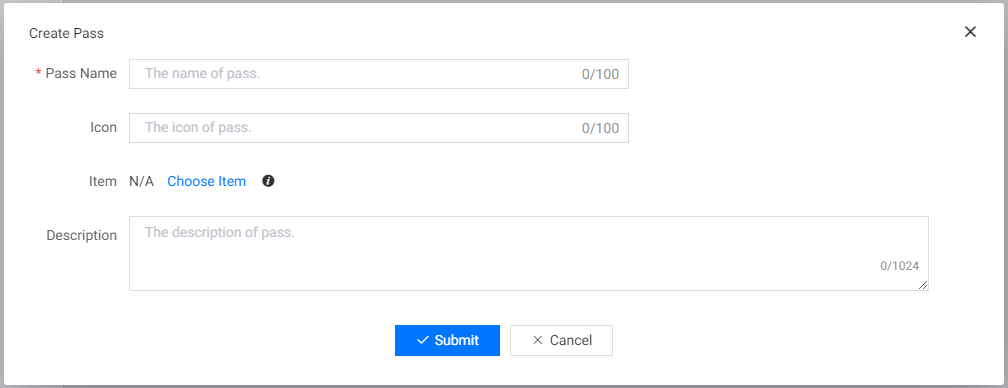
Click Add Pass button and fill in the required fields on the popped pass creation page. Read the doc for field descriptions.
5.5 Edit Tiers
On the goal edit page, choose the Passes tab and you will see a pass that was created by default. The default has no pass item and you can both edit or remove it.
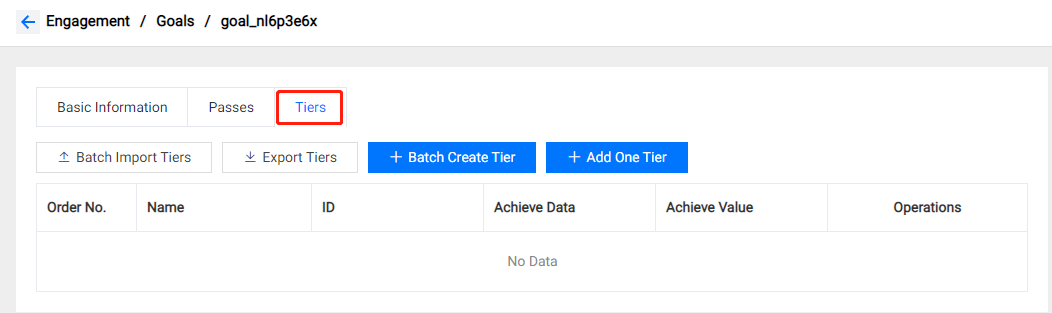
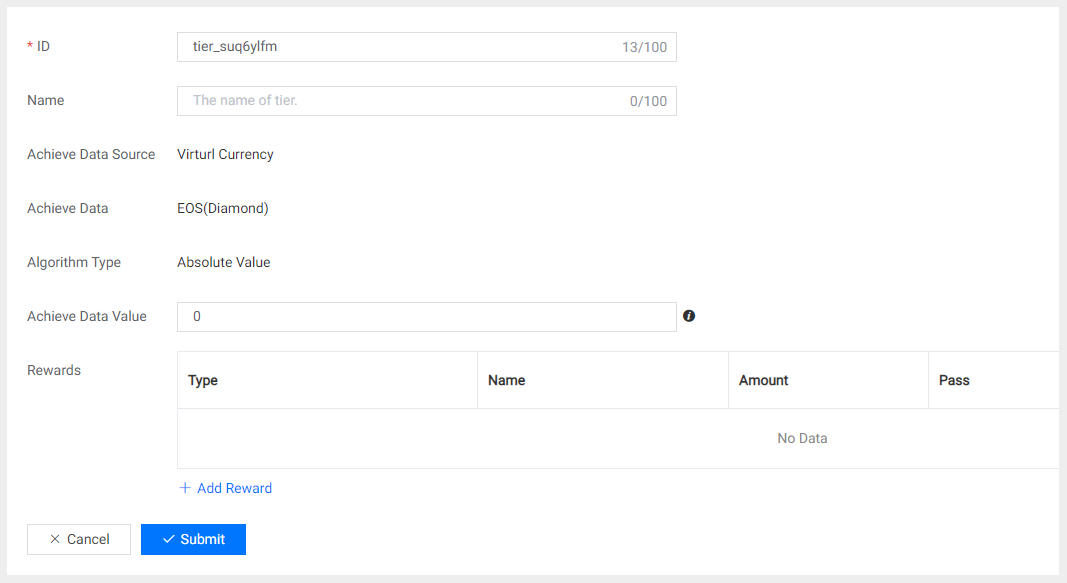
On the tiers page of a hyper goal, click Add One Tier button to create one single tier for the hyper goal.
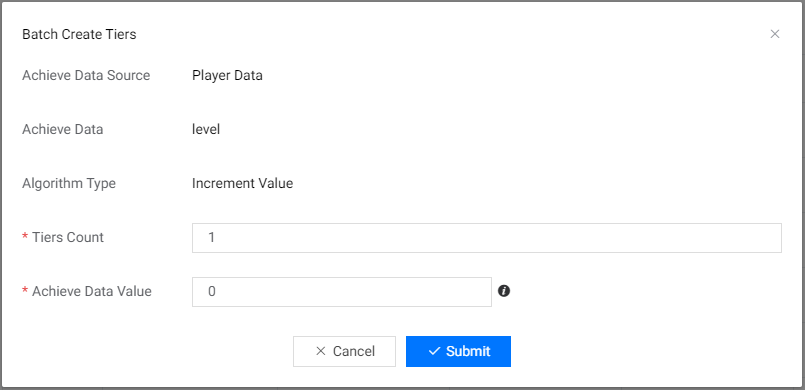
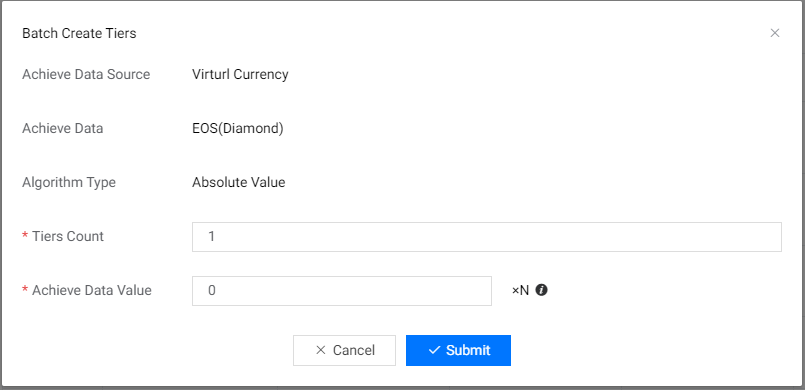
On the tiers page of a hyper goal, click Batch Create Tiers button to create multiple tiers at once. For hyper goals using different algorithm types, the tiers creation page provides different ways to fill in the achieve data value.
When algorithm type is Increment Value:
When algorithm type is Absolute Value:
5.6 Assign Rewards for Tiers
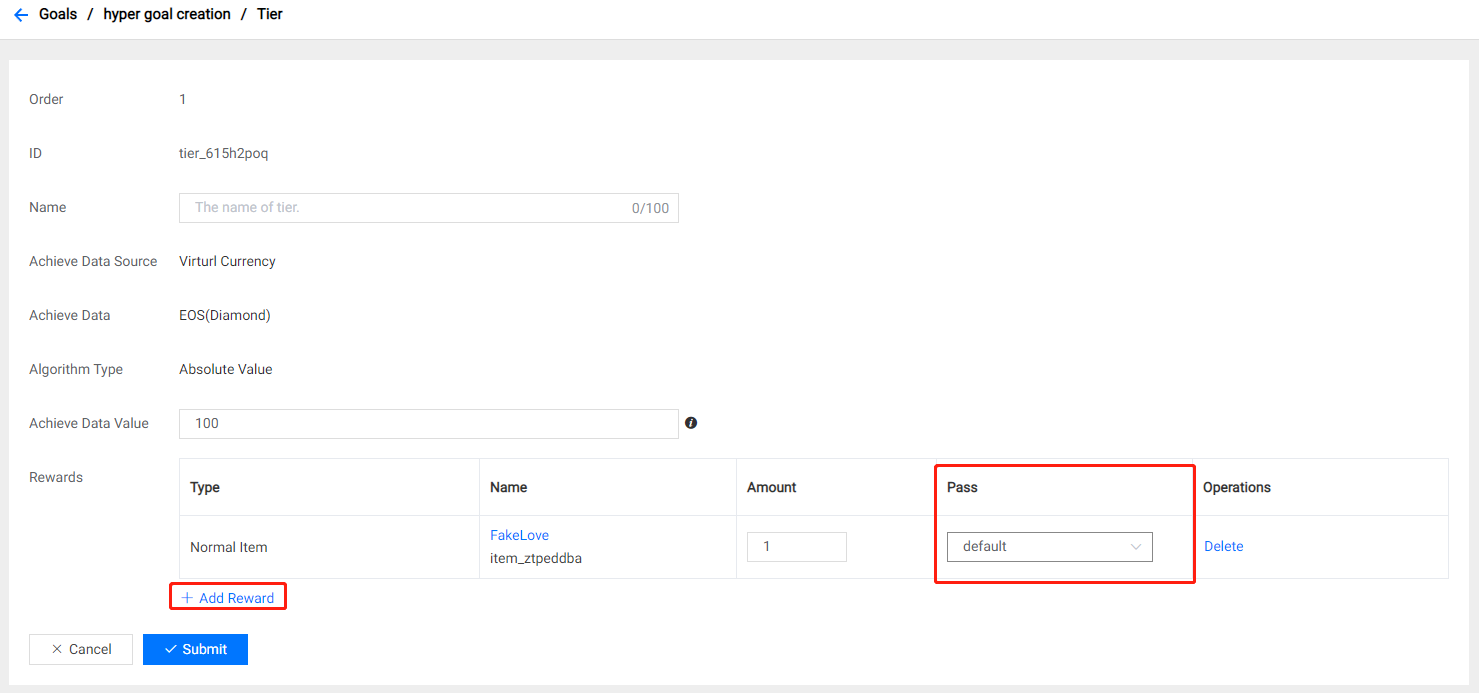
On the tiers tab, choose the tier to add rewards to.
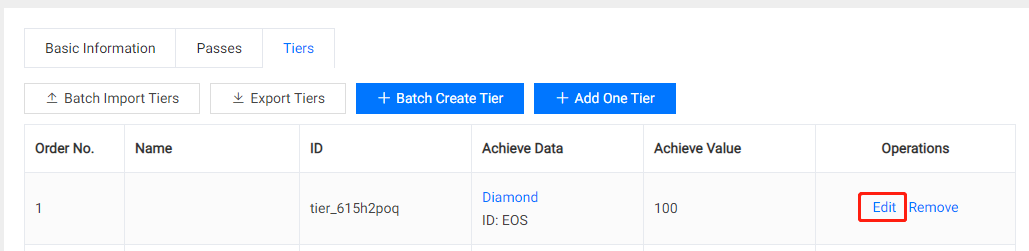
On the tier edit page, click Add Reward button to assign rewards for the tier. Note that you must select the pass to which each reward belongs. Finally, don't forget to click on the Submit button after editing.
5.7 Import / Export Tiers
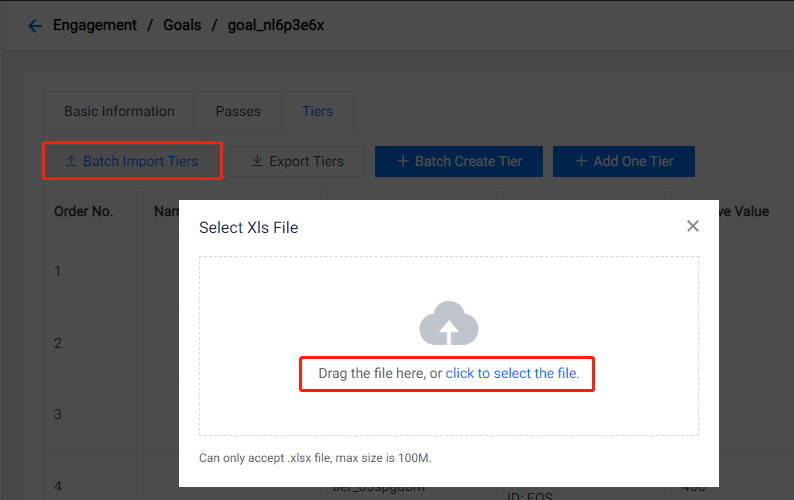
You can not freely specify the achieve data value for each tier by Batch Create Tiers, and you need to manually add rewards for each tier. So we support batch import of tiers data from .xlsx file. Click Batch Import Tiers to select a local file to import.
6. Managing Schedules
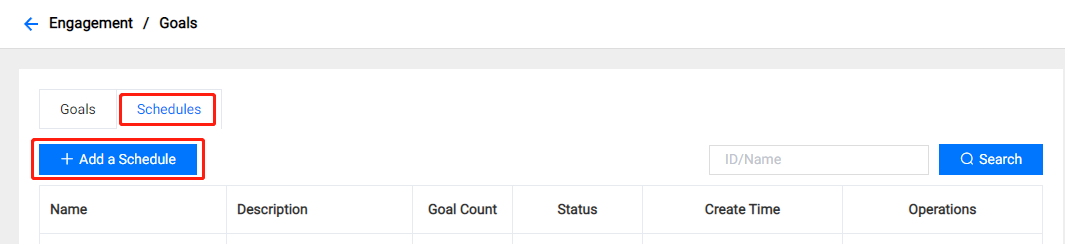
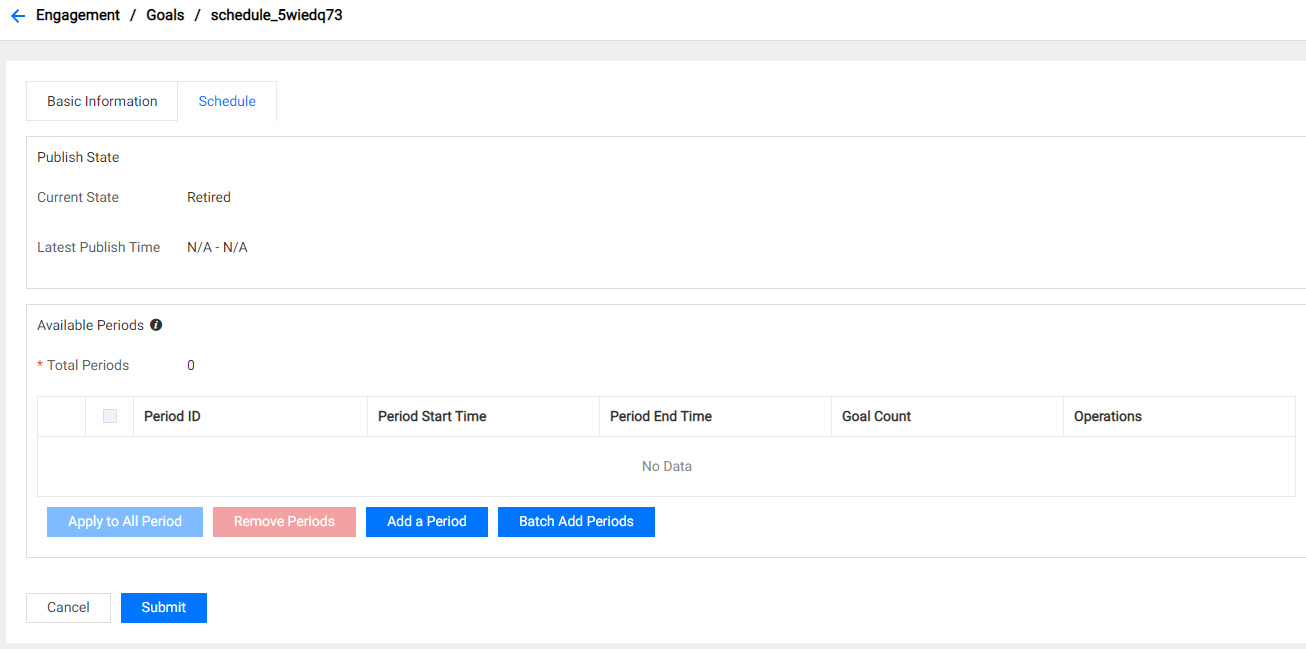
6.1 Create a Goal Schedule
On the goals page, choose the Schedule tab to show the schedules list. Click the Add a Schedule button to create a goal schedule.
Fill in the required fields on the schedule creation page.
- Rewards Way will be applied to all goals in the schedule.

When a new schedule is created, click the schedule name in the schedule list to open the detail page of a schedule.
- Current State shows the current published state of the schedule.
- Latest Publish Time shows the time last publish interval of the schedule.
- Available Periods would be empty for each just-created schedule.
- The schedule name and description could be modified in the Basic Information tab.
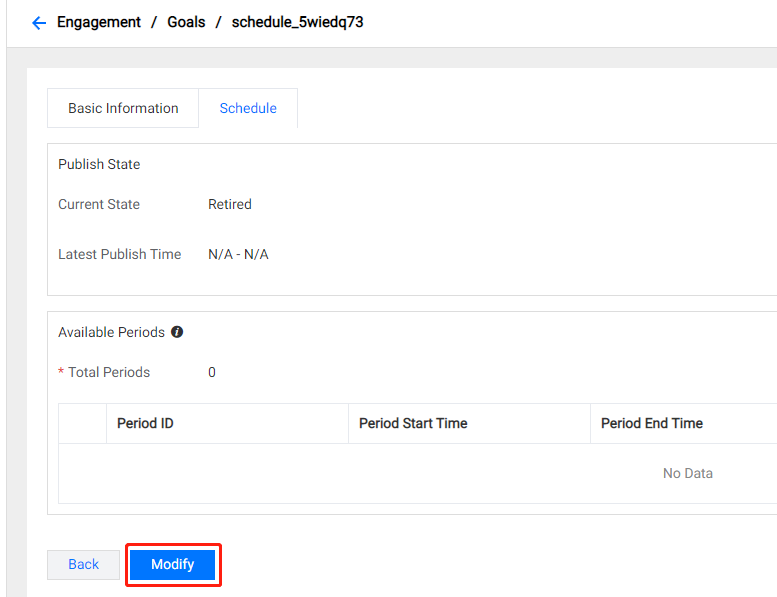
6.2 Edit Available Periods in Schedule
Click the Modify button to activate the edit mode for a schedule.
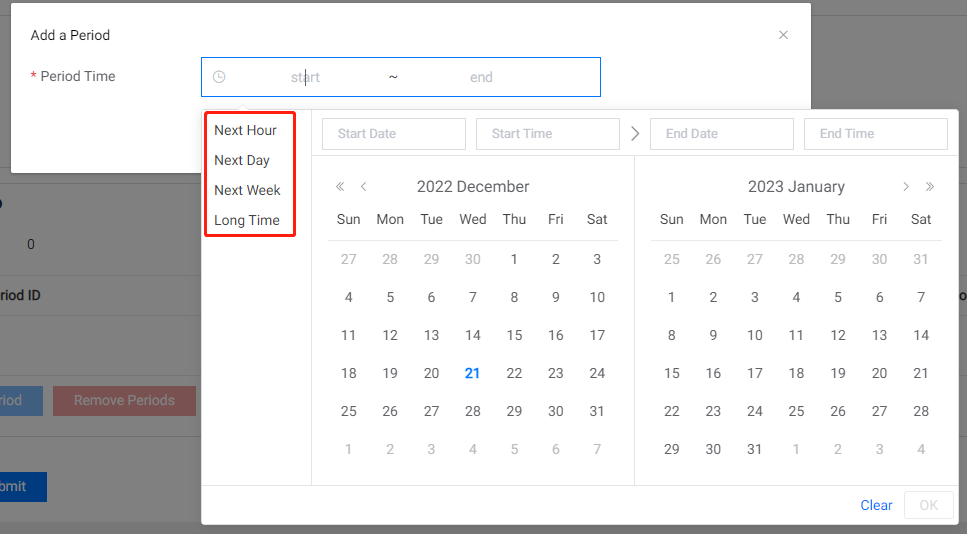
After activating edit mode, you could create one or more periods as needed by clicking Add a Period or Batch Add Periods.
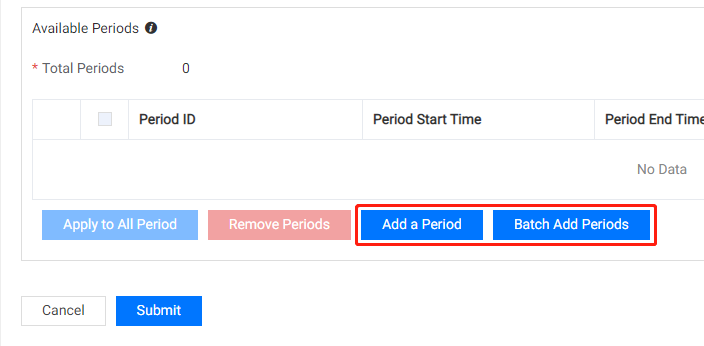
The start and end time of the period need to be entered to create a single available period. Several preset time intervals are provided to allow you to create periods faster.
Batch Add Periods are designed to create multiple periods of the same length and gap. This can be used to build capabilities such as daily quests, weekly quests, etc.
- Start Time: the start time of the first available period.
- Period Count: number of available periods that are created in batches.
- Period Length: length of each period.
- Period Gap: the time gap between adjacent periods.
- End Time: the end time of the last period calculated automatically based on the above input.
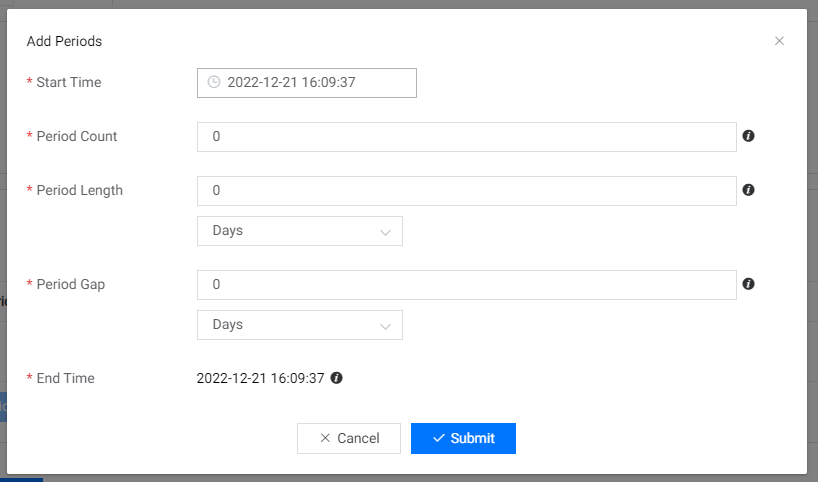
Click Submit to submit changes to the schedule.
6.4 Assign Goals to Available Periods
Goals could be added to or removed from available periods in a schedule.
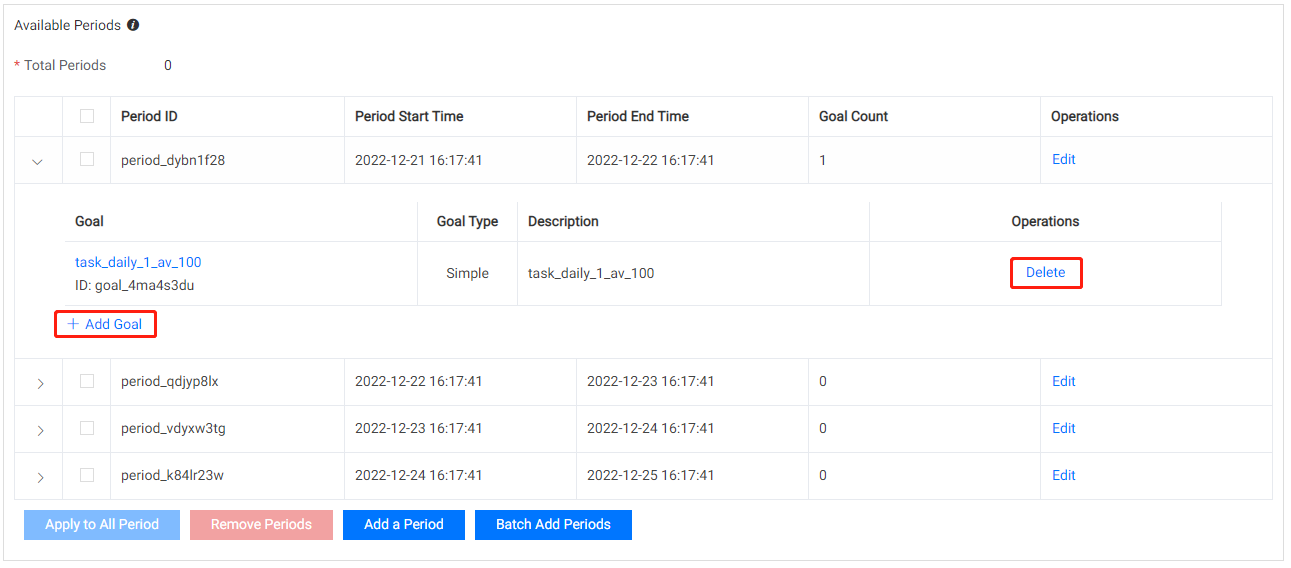
Click Apply to All Periods to quickly sync the goals from the currently selected period to all other periods.
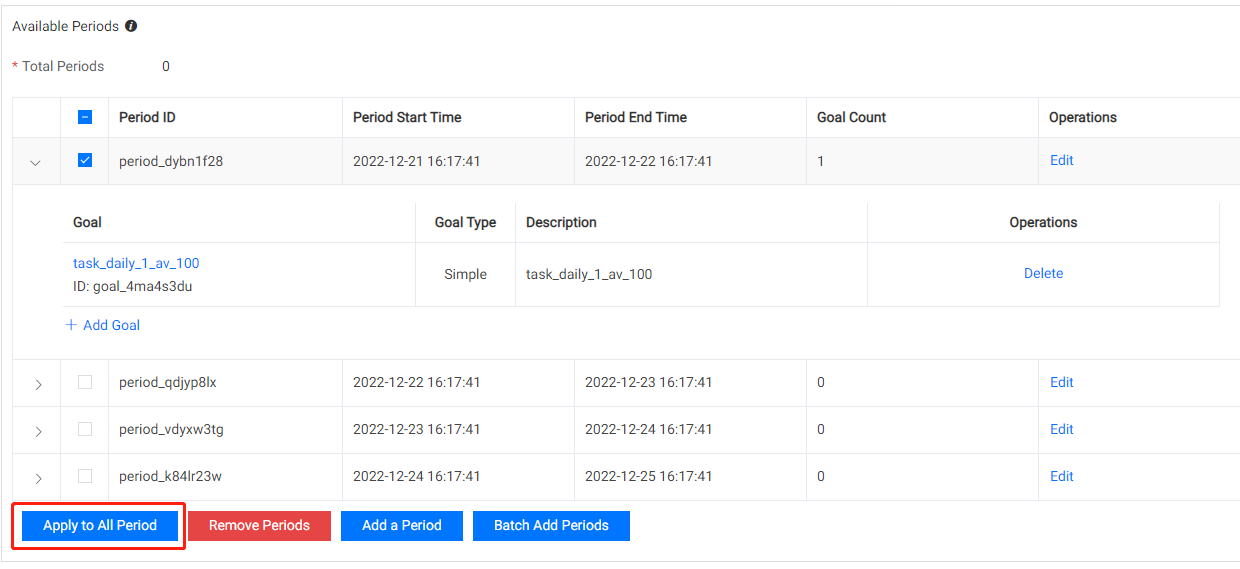
Click Submit to submit changes to the schedule.
6.5 Publish and Retire a Schedule
All available periods in a schedule will take effect after the schedule is published. The goals schedule could be published or retired at any time, and can also be published in advance at a preset time.
Open the Schedules page and choose the schedule that you want to publish then click Publish button in the Operations column.
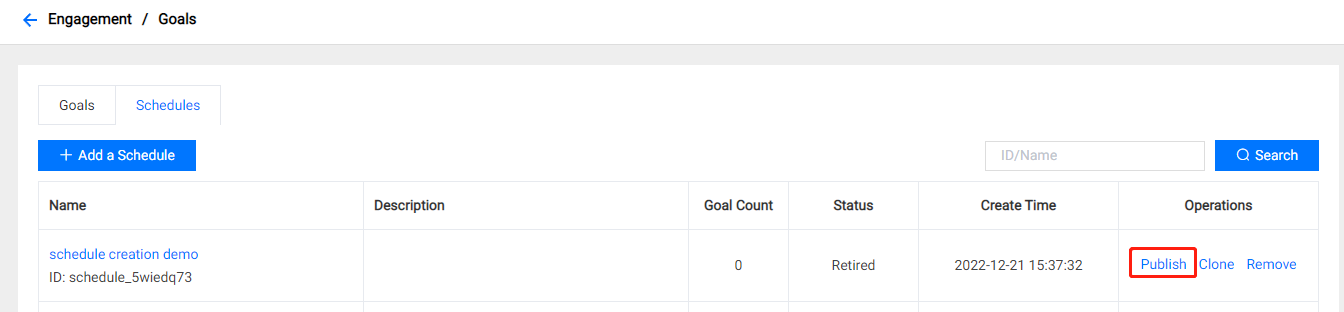
Fill in the publish start and end time. Click Submit to confirm the publish.
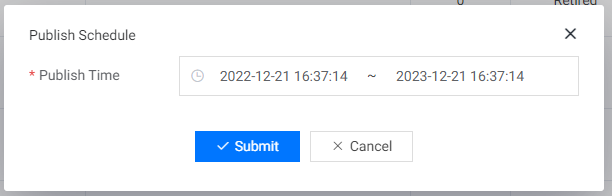
Click the Retire button in the Operations column of a published schedule to retire it.

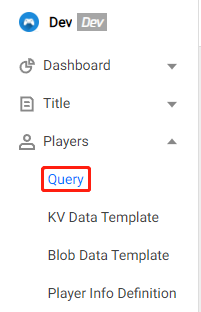
7. Player Goals
In the PGOS Admin Portal, open the menu Players and then select Query.
Select the target player on the player's query page.

Open the Goals tab on the player detail page. All player goals of the player will be listed below and a variety of search options are provided.
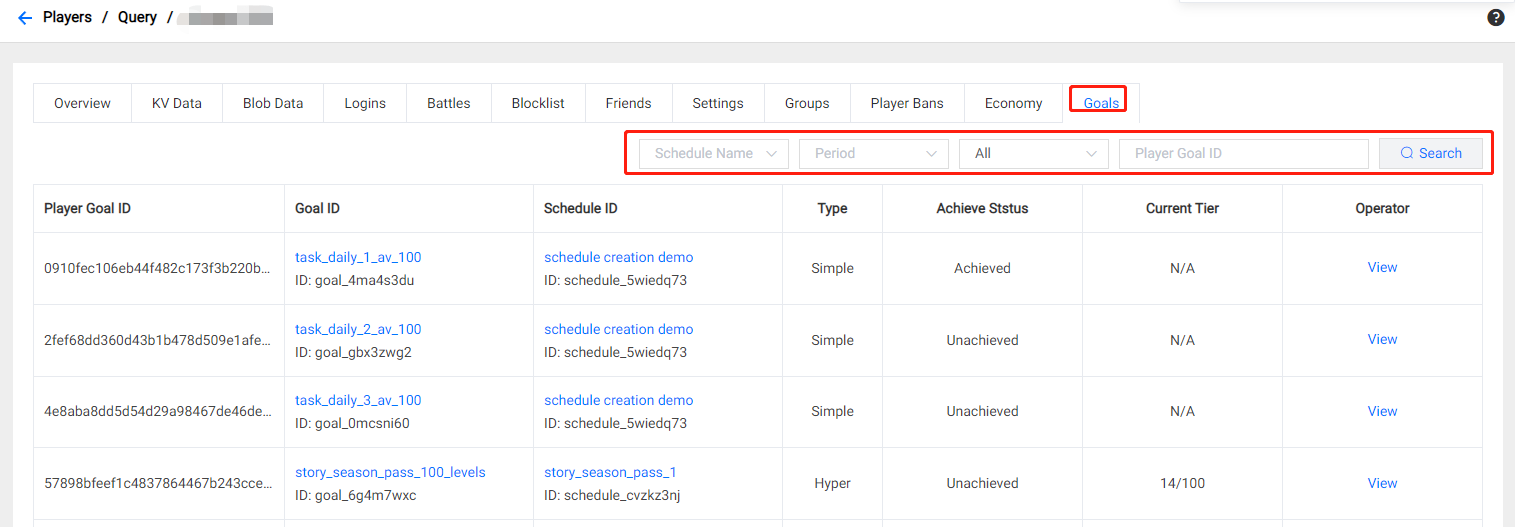
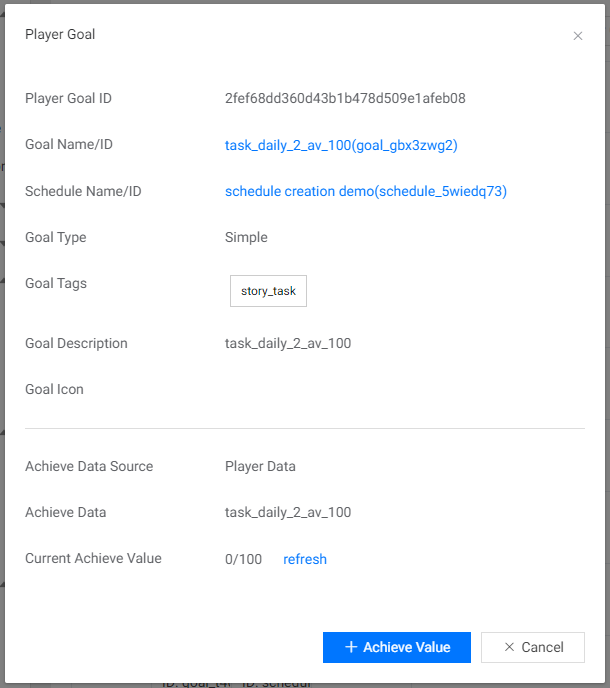
Click View of a simple player goal to check the detailed information.
- Click + Achieve Value to increase the player goal's achieve value.
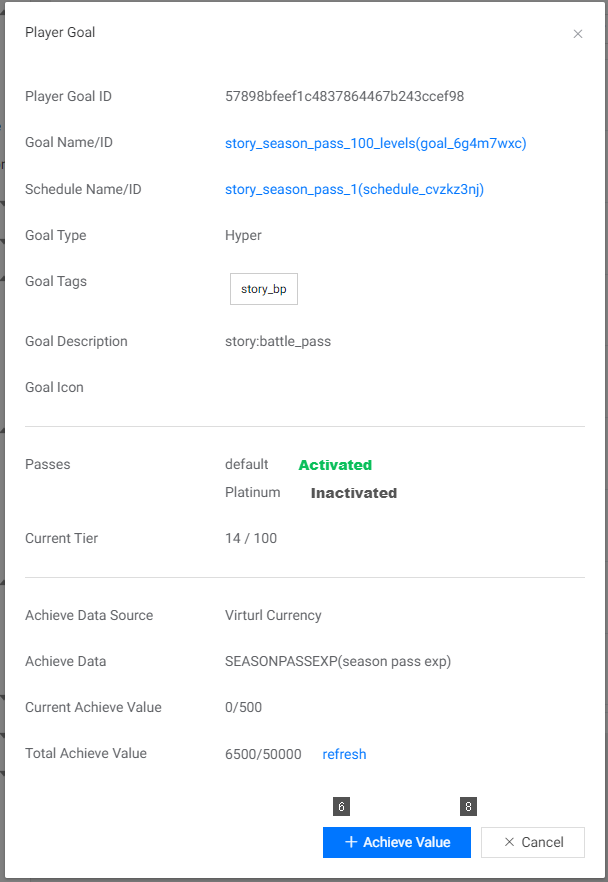
Click View of a hyper player goal to check the detailed information.
- Click + Achieve Value to increase the player goal's achieve value.
- Total Achieve Value show's the achieve value increments accumulated by the player in the player goal.
8. Access Goals with PGOS SDK
8.1 Query Player Goals
Players can access player goals in a published schedule through the SDK to view the status of those goals, the status of rewards claimed, and the expiration date. Call the GetGoalsSchedule method of the Client Goal module:
#include "PgosSDKCpp/Public/PgosSDKCpp.h"
#include "PgosSDKCpp/Public/Core/PgosErrorCode.h"

void SomeUObjectClass::QueryPublishedSchedule()
{
    auto goal = IPgosSDKCpp::Get().GetClientGoalAPI();
    FString schedule_id = "schedule_xxxxxx";
    if (goal)
    {
        goal->GetGoalsSchedule(schedule_id,
            [](const FPgosResult& Ret, const GoalsSchedule* Response) {
            if (Ret.err_code == (int32)Pgos::PgosErrCode::kSuccess)
            {
                UE_LOG(LogTemp, Log, TEXT("GetGoalsSchedule Success"));
            }
            else
            {
                UE_LOG(LogTemp, Log, TEXT("GetGoalsSchedule Failed: err_code=%d, err_msg=%s"), Ret.err_code, *Ret.msg);
            }
        });
    }
}
The hyper goal may contain a large number of tiers, so the GetGoalsSchedule interface does not return all tiers for the hyper goal, and we provide a paging interface for querying. Call the BatchGetGoalTiers method of the Client Goal module to query tiers of specified order range:
#include "PgosSDKCpp/Public/PgosSDKCpp.h"
#include "PgosSDKCpp/Public/Core/PgosErrorCode.h"

void SomeUObjectClass::QueryHyperGoalTiers()
{
    auto goal = IPgosSDKCpp::Get().GetClientGoalAPI();
    FString player_goal_id = "some_hyper_player_id";
    uint32_t start_order = 50;
    uint32_t query_count = 20;
    if (goal)
    {
        goal->BatchGetGoalTiers(player_goal_id,
            start_order,
            query_count,
            [](const FPgosResult& Ret, const GetGoalTiersResult* Response) {
            if (Ret.err_code == (int32)Pgos::PgosErrCode::kSuccess)
            {
                UE_LOG(LogTemp, Log, TEXT("BatchGetGoalTiers Success"));
            }
            else
            {
                UE_LOG(LogTemp, Log, TEXT("BatchGetGoalTiers Failed: err_code=%d, err_msg=%s"), Ret.err_code, *Ret.msg);
            }
        });
    }
}
8.2 Claim Rewards for Achieved Goals(Tiers)
Players can claim rewards for a specific tier. Call the ClaimTierRewards method of the Client Goal module:
#include "PgosSDKCpp/Public/PgosSDKCpp.h"
#include "PgosSDKCpp/Public/Core/PgosErrorCode.h"

void SomeUObjectClass::CliameRewardsfoATier()
{
    auto goal = IPgosSDKCpp::Get().GetClientGoalAPI();
    FString player_goal_id = "some_hyper_player_id";
    FString tier_id = "some_tier_id";
    if (goal)
    {
        goal->ClaimTierRewards(player_goal_id,
            tier_id,
            [](const FPgosResult& Ret, const ClaimGoalsRewardResult* Response) {
            if (Ret.err_code == (int32)Pgos::PgosErrCode::kSuccess)
            {
                UE_LOG(LogTemp, Log, TEXT("ClaimGoalsRewardResult Success"));
            }
            else
            {
                UE_LOG(LogTemp, Log, TEXT("ClaimGoalsRewardResult Failed: err_code=%d, err_msg=%s"), Ret.err_code, *Ret.msg);
            }
        });
    }
}
Players can claim rewards for a specific goal. Call the ClaimGoalRewards method of the Client Goal module:
#include "PgosSDKCpp/Public/PgosSDKCpp.h"
#include "PgosSDKCpp/Public/Core/PgosErrorCode.h"

void SomeUObjectClass::CliameRewardsfoAGoal()
{
    auto goal = IPgosSDKCpp::Get().GetClientGoalAPI();
    FString player_goal_id = "some_hyper_player_id";
    if (goal)
    {
        goal->ClaimGoalRewards(player_goal_id,
            [](const FPgosResult& Ret, const ClaimGoalsRewardResult* Response) {
            if (Ret.err_code == (int32)Pgos::PgosErrCode::kSuccess)
            {
                UE_LOG(LogTemp, Log, TEXT("ClaimGoalRewards Success"));
            }
            else
            {
                UE_LOG(LogTemp, Log, TEXT("ClaimGoalRewards Failed: err_code=%d, err_msg=%s"), Ret.err_code, *Ret.msg);
            }
        });
    }
}
Players can claim rewards for a specific schedule. Call the ClaimScheduleRewards method of the Client Goal module:
#include "PgosSDKCpp/Public/PgosSDKCpp.h"
#include "PgosSDKCpp/Public/Core/PgosErrorCode.h"

void SomeUObjectClass::CliameRewardsfoASchedule()
{
    auto goal = IPgosSDKCpp::Get().GetClientGoalAPI();
    FString schedule_id = "some_schedule_id";
    if (goal)
    {
        goal->ClaimScheduleRewards(player_goal_id,
            [](const FPgosResult& Ret, const ClaimGoalsRewardResult* Response) {
            if (Ret.err_code == (int32)Pgos::PgosErrCode::kSuccess)
            {
                UE_LOG(LogTemp, Log, TEXT("ClaimScheduleRewards Success"));
            }
            else
            {
                UE_LOG(LogTemp, Log, TEXT("ClaimScheduleRewards Failed: err_code=%d, err_msg=%s"), Ret.err_code, *Ret.msg);
            }
        });
    }
}